Part 1. Bitvise SSH Server Users' Guide
Chapter 1.1
Installing Bitvise SSH Server
To install Bitvise SSH Server, execute the installer that you downloaded from our website and follow the process. As soon as the installer completes, you will have a working SSH server installation on your machine. Only minimal changes to settings are necessary: for example, configure a Windows account or virtual account that can connect. See also Configuring groups and accounts - this will help you restrict your users' access to those features that they actually need, which will improve security.
Unattended installation
It is also possible to install Bitvise SSH Server in unattended mode, using command-line parameters to the installer. If you wish to make use of this feature, execute the following for a list of supported command-line parameters:
BvSshServer-Inst.exe -?
To see help output, run the SSH Server installer from an elevated, administrative Command Prompt or PowerShell window. If you run it from a non-elevated window and click through the UAC prompt, Windows will cause the installer to display its output in a separate console window, which will immediately close.
For example, if you wished to install Bitvise SSH Server on a fresh machine and start it immediately afterwards, you might execute the following:
BvSshServer-Inst.exe -defaultInstance -activationCode=0123...6789 net start BvSshServer
To apply a ready-made configuration file as part of the installation process, add the '-settings=...' parameter and specify the file from which Bitvise SSH Server should load its configuration. This file can be created by exporting the settings of an existing installation from its Bitvise SSH Server Control Panel.
If you are installing a single Bitvise SSH Server installation, you should of course simply execute the installer (without parameters) and follow the instructions provided by the user interface.
Unattended configuration
After installing the SSH Server, further automated setup can be performed using:
BssCfg, the SSH Server's command line configuration utility.
PowerShell scripting using the SSH Server's scriptable configuration COM object.
After installation, BssCfg can be found in the SSH Server's installation directory. It needs to be started in an elevated Command Prompt or PowerShell window that runs with administrative permissions.
BssCfg can configure most aspects of an SSH Server installation. For example, the following configures a global default registry setting to avoid the SSH Server Control Panel showing popup messages to administrators who are logged in interactively:
BssCfg popups show -never -default
Run BssCfg without parameters for help.
Unattended configuration of instance settings and updates
When installing many SSH Server instances, you may want to automatically configure:
The SSH Server's instance type - for example, to configure many instances to run as followers.
Automatic updates - for example, to configure maintenance windows or disable automatic updates.
Both types of settings are stored as part of the SSH Server's instance settings. These are kept separate from the SSH Server's main settings because they pertain to the SSH Server installation itself.
You can apply instance settings as part of initial installation. To do so, export instance settings from an existing installation, using the same dialog where you configure instance type or update settings. The binary instance settings can be automatically applied when you install the SSH Server using the installer's command line parameters, for example:
BvSshServer-Inst ... -instanceTypeSettings=c:\path\file.wit
If the installations are already in place, you can apply instance settings from the command line using the BssCfg configuration utility in the SSH Server installation directory:
BssCfg instanceType importBin c:\path\file.wit
Run BssCfg without parameters for help with other commands it supports. For example, it also supports importing and exporting instance settings in a textual format, but the textual format does not guarantee compatibility between SSH Server versions. The binary format can be read by same or newer versions.
You can also script instance settings using PowerShell. Example:
$cfg = new-object -com "BssCfg815.BssCfg815" $cfg.SetInstance("") $cfg.instanceSettings.Lock() $loadResult = $cfg.instanceSettings.Load() $cfg.instanceSettings.update.updateType = $cfg.enums.AutomaticUpdatesType.doNotCheckForUpdates $cfg.instanceSettings.Save() $cfg.instanceSettings.Unlock()
In all cases, these actions must be done from an elevated, administrative Command Prompt or PowerShell window. See also scriptable configuration.
Unattended uninstallation
To uninstall from the command line:
Copy the uninst.exe program in the Bitvise SSH Server or Client installation directory to another temporary location.
Execute uninst.exe in the temporary folder as follows:
uninst.exe "Bitvise SSH Server" -unat
This will uninstall the default (unnamed) SSH Server instance. If you installed a named instance, use its full instance name. For example:
uninst.exe "Bitvise SSH Server - Instance" -unat
To uninstall Bitvise SSH Client from the command line, use:
uninst.exe "BvSshClient" -unat
It is possible to run uninst also directly from the SSH Server installation directory. However if you do that, uninst will first copy itself to a temporary location, then run itself and exit. The original instance of uninst will exit before the uninstallation completes. This may cause problems if your script performs other tasks which should wait for the uninstallation to complete.
Chapter 1.2
Upgrading from a previous version
Upgrading. If you have an older version of Bitvise SSH Server (or an even older WinSSHD) and wish to upgrade to the latest one, download the new installer from our website and execute it on the machine where your previous SSH server version is installed. The installer will offer to upgrade the existing installation.
During upgrade, your server host keys and settings will be preserved.
In case you must downgrade. During a downgrade, your SSH Server settings will be reset if the older version uses a different settings format than the newer version. The SSH Server automatically creates backups of your settings when they are modified, unless this feature is disabled. If you decide to downgrade, you can revert to a previous automatic backup if one was created. The backups are located in the Config subdirectory of your SSH Server installation directory.
Activation. Any existing activation code you have will work for the new version only if the new version was released prior to the upgrade expiry date embedded in the activation code. If your existing activation code is not valid for the upgraded-to version, the new version will install, but will revert into time-limited evaluation. If your upgrade access has expired, log into your License Overview to purchase an upgrade extension and apply a new activation code.
If the purchasing process in your organization is slow, we recommend that you initiate the upgrade extension process before you plan to upgrade to a version not covered by your current upgrade access.
Upgrading Bitvise SSH Server when it provides exclusive access
Bitvise SSH Server can be installed on machines where it provides exclusive access, so that no other avenue of access is open. In such situations, bringing the SSH server down for maintenance or an upgrade can render the machine inaccessible if a problem occurs.
In such situations, we recommend installing an additional SSH Server installation as a named instance. The additional SSH Server installation should accept connections on a different port than the primary installation. This port should be accessible through any routers and firewalls. When maintenance or upgrade is needed on the primary installation, access the server through the maintenance installation, and vice versa. Disable automatic updates on the maintenance installation, so that you don't lose both installations if there's a problem with automatic updates. Update the maintenance installation manually, while connected to the server using the primary installation.
Multiple Bitvise SSH Server installations running directly on the same OS installation do not constitute an additional machine, and are covered by the same license. No additional purchase is needed for a maintenance installation on the same Windows instance.
Unattended upgrade
It is possible to upgrade Bitvise SSH Server in unattended mode, without having to explicitly remove the previous version. This can be done by executing the Bitvise SSH Server installer with command line parameters:
BvSshServer-Inst.exe -defaultInstance
Alternately, if upgrading a named instance:
BvSshServer-Inst.exe -instance="Bitvise SSH Server - InstanceName"
Or by specifying the installation directory:
BvSshServer-Inst.exe -installDir="C:\Program Files\Bitvise SSH Server - InstanceName"
You will also need to supply the -acceptEula parameter to indicate acceptance of the Bitvise SSH Server End User License Agreement.
The installer will automatically stop the SSH Server service and the SSH Server Control Panel, and restart them after if they were running before the upgrade.
Discovering installed instances
Bitvise SSH Server can be installed multiple times on the same computer. Separate instances can use different SSH Server versions. Each instance must have a name which is unique on that computer, for example Bitvise SSH Server - InstanceName. There may or may not be a default (unnamed) instance. A default instance is named simply Bitvise SSH Server, with no additional instance name.
For any unattended upgrade, it is important to know the names of the target instances.
If you only need to check one or a few computers, discovering installed SSH Server instances is easiest using the Apps & features interface in the Windows Control Panel.
If you need to check many computers, you can automate the process using the following PowerShell script:
In recent SSH Server versions, this script can also be found in the SSH Server installation directory.
This can be run directly from PowerShell, or called from another PowerShell script. It returns (or if run directly, displays) a PowerShell object enumerating the installed SSH Server instances and their properties such as versions and installation directories.
Unattended activation code update
From time to time, you might extend upgrade access for your licenses and receive a new activation code. You might need to update to a new SSH Server version which requires a higher upgrade access expiry date than your current activation code permits.
If you are administering a small number of SSH Server installations, it may be easiest to apply the new activation code using the SSH Server Control Panel. This can be done either before or after updating to the new SSH Server version. If you plan to apply the new activation code after upgrading, the main risk is that you may forget. In this case, the SSH Server will continue to run with full functionality for up to 30 days. If no new activation code is applied during that time, it will revert to a state of expired evaluation.
If you are administering a large number of SSH Server installations, there are multiple ways to apply a new activation code unattended:
It may be most practical to apply the new activation code at the exact time it is needed - during installation of a new version that requires it. To do so, run the installer as follows:
BvSshServer-Inst -defaultInstance -activationCode=...
Since SSH Server versions 8.xx, an activation code can be applied from the command line using the BssCfg utility:
BssCfg actCode set ...
Since SSH Server versions 8.xx, an activation code can also be applied using a PowerShell script. Example for versions 9.xx:
$cfg = new-object -com "Bitvise.BssCfg" $cfg.actState.SetActCode("...")
In this case, $cfg.actState can also be used to inspect the current activation state. For more information, run:
$cfg.actState.help
In each of these cases, the activation code must be supplied as a single string, after concatenating both lines (no line breaks).
If there are multiple concurrent SSH Server instances, the same activation state applies to all instances on the computer.
If you are using the SSH Server's master/follower feature, you can also synchronize the activation code from the master to followers. This requires activation code synchronization to be enabled on the master and each follower.
Endpoints for automatic updates
Bitvise software uses HTTPS over port 443 to check for updates and download the installer for a new version. If you wish to use automatic updates, the following URLs need to be accessible:
https://bitvise.com/versions/
https://dl.bitvise.com/
You may need to permit the following additional HTTP URLs for CRL and OCSP certificate verification:
http://crl.sectigo.com/
http://ocsp.sectigo.com/
You can choose to also whitelist the secondary download URL:
https://s3.amazonaws.com/dl.bitvise.com/
The download URLs (dl.bitvise.com and s3.amazonaws.com) may require additional Amazon URLs to be whitelisted for CRL and OCSP certificate verification. For example, to successfully verify Amazon TLS certificates, you may need to whitelist *.amazontrust.com.
Chapter 1.3
Starting Bitvise SSH Server and monitoring activity
Bitvise SSH Server can be started and stopped in the following ways:
- using the SSH Server Control Panel;
- from Administrative Tools > Services;
- from PowerShell or the Windows Command Prompt using commands sc start BvSshServer and sc stop BvSshServer;
- the service can also be stopped remotely, using the SSH Server Remote Control Panel, in Bitvise SSH Client.
Monitoring
The SSH Server Control Panel features a Sessions tab, which shows SSH connections currently active on the server.
The SSH Server Control Panel also features an Activity tab, which shows a history of recent events on the SSH server, such as logins, disconnects, or file transfers. When the SSH Server Control Panel is open or minimized, it can be configured to show pop-up notifications for events that show up in the Activity tab.
The Session and Activity tabs are intended to provide a casual overview of SSH server activity, but not a thorough overview. For a thorough overview or diagnostics, consult textual SSH Server log files.
Logging
When the SSH Server is running, its default logging behavior is as follows:
Errors and warnings are logged to the Application section of the Windows Event Log. Many applications write their log messages to this log. To reduce clutter, Bitvise SSH Server records no Info messages here by default.
You can access the Windows Event Log using Administrative Tools > Event Viewer. It can also be started using the Windows Run dialog (Windows Key + R) by running eventvwr.
Errors, warnings and informational messages are logged into textual XML log files, created by default in the Logs subdirectory of the SSH server installation directory. These log files are stamped with the date and time of their creation and can be viewed with any text editing software, e.g. Notepad.
The logging level for each of these destinations (textual log files or Windows Event Log) can be changed in the SSH Server's Advanced settings. You should log at least errors and warnings, and inspect the log periodically to make sure there are no issues. For storage reasons, do not set the log level higher than Info, except temporarily for troubleshooting.
Advanced logging topics:
Chapter 1.4
Connecting for the first time
If you are new to Bitvise SSH Server, we highly recommend that you first make sure that you can establish a working SSH connection before you change any settings on the server. If you cannot connect to the SSH server using its default configuration, this is most likely due to a network or firewall problem that you will need to resolve before you are able to connect.
In its default configuration, Bitvise SSH Server accepts connections on the well-known port number for SSH servers, 22. To avoid drive-by password guessing, we recommend that you change this to a random port number between 1024 and 65535. This port number - either 22, or the port number you choose - is the only port you need to open in your firewall in order to connect to the SSH server. If you use port forwarding to tunnel other applications through SSH, you should not open any additional ports for the tunneled connections. All tunnelled connections are forwarded through the SSH session, established through the main SSH Server's listening port.
When connecting to Bitvise SSH Server with an SSH client for the first time, log in with the username and password of a Windows account that exists on the machine where the SSH server is running. To log into a Windows domain account, specify it in the 'domain\account' format.
You can use any SSH client to log into Bitvise SSH Server, as long as it supports SSH protocol version 2. Some Unix installations and old routers still have archaic SSH implementations which only support SSH version 1. Such installations must be upgraded, as SSH1 contains security flaws. In general, security software, including SSH software, should be kept up-to-date to minimize exposure to security flaws.
Clients that are known to work well with Bitvise SSH Server include Bitvise SSH Client (which works best), as well as CuteFTP Pro, Tectia, F-Secure / WRQ / Reflection, VanDyke (SecureCRT, SecureFX), OpenSSH, PuTTY, FileZilla, and many others. WinSCP works well in SFTP mode, or in SCP mode if BvShell is enabled.
Chapter 1.5
Configuring Bitvise SSH Server for SFTP, SCP, FTPS file transfer
Bitvise SSH Server provides multiple types of secure remote access to Windows. A frequent usage scenario is to configure the SSH Server specifically for file transfer, without exposing the machine to terminal shell, tunneling and other types of access. This tutorial explains step-by-step how to configure Bitvise SSH Server for a primary role as a file transfer server using SFTP, SCP and/or FTPS.
Install Bitvise SSH Server. Do not start it yet.
When you install Bitvise SSH Server, the Easy settings wizard should appear. You can also access Easy settings at any later time by clicking Open easy settings.
If you have already performed any changes to SSH Server settings, click 'Restore', and then 'Reset settings to default values'.
The first tab of Easy settings is named Server settings. When you are ready for your server to accept connections over the internet, you will need to open this tab and enable the checkbox 'Automatically configure router (requires UPnP)'. You will also need to change the setting 'Open Windows Firewall' to 'Open port(s) to any computer'.
If you wish to enable FTPS access, you can enable it on this tab. If you plan to use FTPS, see Compatibility with FTPS clients.
We recommend that you wait with router and firewall settings until you have configured the server and tested your configuration by connecting with an SSH, SFTP and/or FTPS client installed on the same computer, or in your local network.
The next tab of Easy settings is named Windows accounts. This tutorial describes how to configure Bitvise SSH Server for file transfer using virtual accounts. Therefore, disable the checkbox 'Allow login to any Windows account'. This will prevent anyone from logging into your SSH Server using accounts not configured in SSH Server settings.
To use Bitvise SSH Server with virtual accounts only, do not add any Windows account entries under 'Windows accounts'.
The final tab of Easy settings is named Virtual accounts. Click the 'Add' button to add a virtual account, or use the 'Edit' button to edit an existing virtual account. Edit the virtual account settings as follows:
Virtual account name. This is the name that your user will use to log in.
Virtual account password. This is the password that your user will use to log in (unless you set up public key authentication).
Login allowed. Enable this if the account should be able to connect to your server. You can disable this to prevent access without deleting the account.
Allow file transfer. Enable this checkbox to allow SFTP, SCP and FTPS access.
Shell access type. For virtual accounts, this is set by default to BvShell. This is a small shell provided by the SSH Server which respects the SSH Server's virtual filesystem settings. You can keep this setting configured to BvShell, or you can set this to No shell access. Important: Do not grant access to Command Prompt, PowerShell, or another shell except BvShell, if you want to restrict the user's filesystem access.
Allow port forwarding. Disable this checkbox to prevent the user from accessing other network services over SSH.
Virtual filesystem layout. Set this to Limit to root directory to limit the user's access to a single directory and its subdirectories. Set this to Advanced filesystem layout to configure a virtual filesystem for the user through which they can access multiple directory locations on the server.
To guarantee that your users can access the directories you configure for them, make sure that the Windows account BvSsh_VirtualUsers has Windows filesystem permissions to access those directories. This account is a member of the Users group, so if the Users group has sufficient access, the virtual account will have access as well.
Note: The BvSsh_VirtualUsers account does not exist until the SSH Server has been started with at least one virtual account configured. The account may also be named differently on your installation. See Q460 in the SSH Server Usage FAQ for more information.
When you are done configuring virtual users, click 'Save changes' to exit Easy settings. You can now start Bitvise SSH Server and try connecting with a file transfer client. We also recommend trying to connect with an SSH terminal client to ensure that users cannot access terminal shell and port forwarding.
Once you have tested your configuration and ensured that it works correctly, click 'Open easy settings' again and edit the router and firewall settings on the 'Server settings' tab to open your server to internet connections.
Having configured Bitvise SSH Server in this way, it will only accept connections from users who know one of the Virtual account usernames and passwords you have defined. The SSH Server will allow these users to only use SFTP or SCP, and none of the other SSH protocol features, and will restrict their file access to each user's root directory, or to their virtual filesystem mount points.
If you installed Bitvise SSH Server on a domain controller, the above steps will not be sufficient. Domain controllers do not have local accounts, so the SSH Server cannot manage a local account to provide the security context for virtual users. In this case, you will need to use the SSH Server's Advanced settings and configure a domain account to provide security context. Consult Configuring groups and accounts to learn more about how Bitvise SSH Server operates, so that you can configure it properly.
File transfer using Windows accounts
If you prefer your users to log in with Windows accounts, the process is nearly identical to the above instructions using virtual accounts. The main differences are:
- You need to configure Windows account settings entries instead of virtual account entries.
- You need to actually create the accounts in Windows.
- You need to grant the accounts Windows filesystem permissions to directories you want them to access.
- By default, Windows accounts are granted a more powerful Shell access type than virtual accounts. You need to change their Shell access type to BvShell or No shell access if you do not wish these accounts to access files and directories outside the mount points you configure for them in SSH Server settings.
On-upload scripts, actions, and commands
It is possible to configure the SSH Server to run a command or a script after a user completes an upload. To set this up, you need to configure the setting On-upload command, which can be found in Advanced SSH Server settings. The setting can be configured either in an account settings entry for an individual user, or in a group settings entry as a default for multiple users.
In most cases, we suggest you use the On-upload command to run a PowerShell script. The command can be simply:
PowerShell C:\Path\To\OnUploadScript.ps1
We recommend that the script is given no parameters on the command line, but that it instead obtains information from the environment variables provided by the SSH Server. For example:
$env:SSHUPLOADFILE
This is to avoid pitfalls when parsing the command line, which may contain a path under the SSH client's control.
If a PowerShell script does not work, the Start-Transcript cmdlet can help with troubleshooting.
On-upload email notifications
A common use case for the On-upload command is to set up email notifications for completed incoming transfers. We provide the following example PowerShell script, which can be used to send email notifications. The first few lines of the script need to be modified according to your email setup:
Please note that the file has been renamed to .txt from its original .ps1 extension.
Chapter 1.6
Bitvise SSH Server: Compatibility with FTPS Clients
In SSH, compatibility rarely comes at the expense of security. Therefore, when used with clients supporting SSH, SFTP and SCP, Bitvise SSH Server attempts to be compatible with the widest possible variety of file transfer clients.
Bitvise SSH Server also supports FTPS - FTP over TLS/SSL. The FTP protocol has a longer history than SSH and is originally rooted in an insecure, unencrypted design. FTPS clients vary greatly in the security measures they support for FTP. Therefore, Bitvise SSH Server is compatible with FTPS clients more selectively than in the case of SSH, SFTP and SCP clients.
To be compatible with Bitvise SSH Server, an FTPS client must:
Support explicit TLS started using AUTH TLS at the beginning of the FTP control connection.
Use FTP passive mode.
Support TLS for data connections, and use TLS resume functionality for data connections.
Enabling FTPS
FTPS is available in Bitvise SSH Server versions 8.xx and newer. Older versions do not support FTPS.
FTPS is disabled in the SSH Server by default. An administrator may prefer to use Bitvise SSH Server for only SSH, SFTP or SCP.
FTPS requires at least one additional port. If there is another FTP server on the system, it may be using that port already.
In SSH Server versions 8.xx, you can enable FTPS in Easy settings, on the Server settings tab. Alternately, you can configure FTPS bindings in Advanced settings, under Bindings and UPnP.
TLS session resumption vs. FTP data port range
The SSH Server uses TLS session resumption as a mandatory security mechanism for FTPS data connections. This is the only way to securely associate an FTPS data connection with the correct control connection.
A legacy alternative used by FTP servers is to use a range of ports for data connections. The server then associates the data connection to the control connection based on the port number to which the client connects.
This port range mechanism is insecure. It allows a man-in-the-middle attacker to continuously attempt connections to ports in the server's data port range. Even the largest possible port range is very small compared to secure cryptographic key sizes. This attack is very likely to succeed. The attacker can use it to receive an entire file which was intended for an authenticated user, or to upload a file impersonating the user.
The SSH Server does not support the port range mechanism. The SSH Server uses a single FTP data port, and requires TLS session resumption for security.
Compatible FTPS Clients
We cannot guarantee compatibility between all versions of Bitvise SSH Server and each client. However, our testing has confirmed that the following FTPS clients were compatible with Bitvise SSH Server at some point:
| Product | Version | Platform | Notes |
|---|---|---|---|
| 3D-FTP | 9.07 | Windows | Client did not verify FTPS certificate |
| AnyClient | Windows | ||
| Auto FTP Manager | 6.01 | Windows | |
| Beyond Compare | 4.1.6 build 21095 | Windows | |
| cURL | Linux | ||
| Cyberduck | 5.0.11.20753 | Windows | |
| Directory Opus | 11.19 | Windows | |
| Far Manager | v3.0 build 4747 | Windows | |
| Fetch | Mac | ||
| FileZilla | 3.38.1 | Windows | |
| FlashFXP | 5.4.0 build 3939 | Windows | |
| FTP Manager Lite | 2.1 | Windows | |
| IBM SSL FTP Client | IBM i | We did not test directly. A user indicates it works. | |
| iGetter | v3.2.0 | Windows | We did not test directly. The developer indicates it works. |
| SmartFTP | 8.0.2242 | Windows | |
| Steed (FTP) | 1.2.0.1147 | Windows | |
| Total Commander | 8.52a | Windows | |
| Transmit | Mac |
Semi-Compatible FTPS Clients
We were able to use the following FTPS clients with Bitvise SSH Server after adjusting client settings:
| Product | Version | Platform | Notes |
|---|---|---|---|
| CuteFTP | 9 | Windows | Enable Global Options > Security\SSL Security > Reuse cached session for data connection |
| lftp | Linux | In ~/.lftp/rc, add line: set ftp:ssl-protect-data yes | |
| WinSCP | 5.13.6 (Build 9061) | Windows | SFTP and SCP work. For FTPS, if the SSH Server is behind NAT, then in Advanced settings, Override FTP passive address must be configured for the FTP binding. FTPS fails with WinSCP on older Windows because in that case it does not use TLS resume for data connections. We recommend using WinSCP in SFTP mode. |
| WS_FTP | Windows | Enable Site options > Advanced\SSL > Reuse SSL session |
Incompatible FTPS Clients
We were not able to use the following FTPS clients with Bitvise SSH Server:
| Product | Version | Platform | Notes |
|---|---|---|---|
| Beyond FTP | 3.3.01 | Windows | SSH (SFTP) worked, FTPS did not work due to incompatible algorithms. When we checked, it was last updated in 2010. |
| BitKinex | 3.2.3 | Windows | Client would disconnect before completing SSL negotiation. When we checked, it was last updated in 2010. |
| Core FTP (LE) | 2.2 | Windows | SSH (SFTP) worked, FTPS did not work because it did not support TLS resume for data connections. When we checked, it was last updated in 2016. |
| Commander One | Mac | SSH (SFTP) worked, FTPS did not work | |
| CrossFTP | 1.97.8 | Windows | SSH (SFTP) worked, FTPS did not work because it did not support TLS resume for data connections. When we checked, it was last updated in 2016. |
| ExpanDrive | Windows | SSH (SFTP) worked, FTPS did not work because it did not support TLS resume for data connections. When we checked, it was last updated in 2016. Client did not verify SSH host keys or FTPS certificates | |
| FTP Commander (Deluxe) | Windows | Disconnected at authentication stage. | |
| FTP Voyager | Windows | SSH (SFTP) worked, FTPS did not work due to incompatible algorithms. When we checked, it was last updated in 2014. | |
| FTP Rush | v2.1.8 | Windows | SSH (SFTP) worked, FTPS did not work because it did not support TLS resume for data connections. When we checked, it was last updated in 2011. Client did not verify SSH host keys or FTPS certificates |
| Interarchy | Mac | SSH (SFTP) worked, FTPS did not work | |
| Syncplify.me FTP! | 1.0.11.31 | Windows | SSH (SFTP) worked, FTPS did not work because it did not support TLS for data connections |
| Sysax FTP Automation | 1.0.11.31 | Windows | SSH (SFTP) worked, FTPS did not work because it did not support TLS resume for data connections. When we checked, it was last updated in 2016. |
| WebDrive | 2018.0 | OSX | SSH (SFTP) worked, FTPS did not work |
| WebDrive | 3.2.3 | IOS | SSH (SFTP) worked, FTPS did not work |
| WISE-FTP | 9 | Windows | SSH (SFTP) worked, FTPS did not work because it did not support TLS for data connections. Client did not show fingerprint during SSH host key verification; did not verify FTPS certificate by default |
| Yummy FTP | Mac | SSH (SFTP) worked, FTPS did not work |
Technical details for TLS resume
In order for Bitvise SSH Server to accept an FTPS data connection, the data connection must successfully resume the TLS session associated with the corresponding control connection.
The TLS implementation used by Bitvise is Microsoft Schannel, which is a feature of Windows. This means the TLS implementation is relatively opaque to Bitvise. We do not have control over the implementation details, and its behavior will depend on the version of Windows on which the SSH Server is running, as well as patches you have applied.
Any registry settings you configure for Microsoft Schannel will also apply to FTPS connections handled by Bitvise SSH Server. However, Schannel configuration will not affect connections that use SSH, SFTP, or SCP.
To successfully resume TLS on the data connection, your TLS implementation must support a TLS resume mechanism which is compatible with Microsoft Schannel. This is currently a resume that reuses the session ID in the ClientHello. (The other mechanism is the TLS "session_ticket" extension. Schannel currently supports this as client, but not as server.)
Since October 2019, the Microsoft Schannel implementation will no longer resume TLS sessions unless they use the Extended Master Secret extension. Therefore, support for this extension is required for a successful resume.
Chapter 1.7
Securing Bitvise SSH Server
After initial installation, Bitvise SSH Server will refuse login attempts until settings are changed to permit login for one or more users. The SSH Server can be configured to accept logins from Windows accounts (local or domain accounts created in Windows), as well as virtual accounts (created in the SSH Server).
In Easy settings, under Windows accounts, you can enable the setting Allow login to any Windows account. If you enable this, the SSH Server will permit any user who knows a valid Windows username and password to log in and use the following SSH services:
SFTP and SCP file transfer, allowing the user to access all files and folders that can be accessed by the Windows account they used to log in.
Access to a Command Prompt via terminal console, allowing the user to execute all programs that can be executed by the Windows account they used to log in.
- Routing TCP connections through the SSH server, either from the client to the internet, or from the internet and to the client.
Securing Bitvise SSH Server involves:
Configuring the SSH server to allow access only to a restricted subset of Windows accounts configured on the system, or only to virtual accounts configured in the SSH Server itself.
Identifying which of the above features you want to limit or disable, and doing so.
Making sure that strong authentication is in use for those accounts that can log in.
In order to avoid frustration, do not start locking down SSH server settings prematurely. Make sure that you can establish a connection first. Make sure that you and your users can use the SSH features that you want to use.
To avoid security issues, you can conduct such testing and preliminary setup with a closed firewall. Install an SSH client such as Bitvise SSH Client on the same machine where Bitvise SSH Server is installed, and use that client to connect to the SSH server to test the connection. After you are satisfied that the features you require work correctly, start securing SSH server settings. Once your settings are locked down to provide only the types of access you require, configure the SSH Server to accept connections from the internet.
Restricting access to chosen accounts
If you are using Easy settings, disable the checkbox Allow login to any Windows account on the Windows accounts tab.
If you are using Advanced settings, go to the Everyone group under Windows groups, and disable the Login allowed checkbox. This prohibits SSH login to everyone except the users you configure.
In order to allow a Windows account to log in, you now need to merely add an SSH server account settings entry under Windows accounts, and configure the following fields:
Windows account domain. Leave this empty if you're adding a local Windows account.
Windows account name. The name of the Windows account you are adding. It must be an existing account already created in Windows.
Login allowed. Set this to Yes. This permits this particular user to log into the SSH server, overriding the fact that login is disabled in group settings.
For virtual users, similarly, all you need to do is add a virtual account entry, defining a username and password. For virtual users, you don't need to disable the group default for Login allowed, because there are no virtual users other than those that you configure, in the first place.
Disabling features you don't want
If you intend to use Bitvise SSH Server for file transfer, you will want to disable the other SSH features that you don't want your clients to use.
If you are using Easy settings, use them to configure access types for each account you add.
If you are using Advanced settings, the easiest way to disable features for all users is to do so at the group level. At this point, you may want to consult Configuring groups and accounts for an overview of how Bitvise SSH Server treats Windows- and virtual accounts and groups.
In the most common and straightforward case, you will have a single Windows group for Everyone in SSH Server settings. This Windows group controls settings defaults for all Windows accounts that might log in through the SSH server.
Open this group and configure the following settings:
Shell access type. Found under Terminal and exec requests. Setting this to No shell access prevents users from executing arbitrary commands. You can also configure this to BvShell, which will provide the user with a limited terminal shell that respects the directories you configure for the user.
Permit C2S port forwarding. This prevents your users from accessing other network services over SSH.
Permit S2C port forwarding. This prevents your users from providing access to their own network services over SSH.
If you are using Bitvise SSH Server for more than only file transfer, you may want to leave some of these features enabled. In particular, if you are using SSH for tunneling, do not disable port forwarding. If you are using SSH for remote program execution or a remote console, do not disable shell access. Or disable these settings for the Everyone group, but enable them for the particular users that need these features.
If you will be using virtual accounts, apply the same restrictions to your virtual groups. (By default, there is a single virtual group named Virtual Users.)
Limiting directory access
By default, Bitvise SSH Server permits each user to access any and all parts of the filesystem that Windows filesystem permissions allow them access to. Frequently, you want to limit users to be able to access only a particular directory. Note, however, that it is only secure to impose such restrictions if you have also followed instructions above and disabled access to port forwarding and shell access (except BvShell).
Filesystem access is controlled:
- In Easy settings, under the Virtual filesystem layout section of each account settings entry.
- In Advanced settings, under the File transfer section of each group and account settings entry.
If you are using Easy settings, make sure the Virtual filesystem layout settings are configured securely for each user.
If you are using Advanced settings:
Open File transfer > Mount points for the Everyone group, edit the default mount point ("/"), and set the Real root path to point to an innocuous, empty directory. Or, if all your users should have access to the same folder, you can configure this to point to that directory.
In per-account settings, you can configure a different set of mount points for each user. Under Virtual filesystem layout settings for the user, disable the Use default layout checkbox. Then configure the Real root path for the default mount point ("/") to specify the directory which you want this user to access.
You can configure multiple mount points in this way, permitting the user to access a selected number of server directories. You can also use mount point permission settings to allow the user to only read, but not write to, files in a particular directory.
Ensuring strong authentication
Password authentication can be secure, but only if the passwords are complex. Unless you want the general public to log into a particular account, you need to ensure that all accounts for which you are permitting SSH login - be they Windows accounts or virtual - are configured with complex passwords. Bitvise SSH Server does impose delays and IP blocking to prevent aspiring attackers from successfully guessing a password, but this will not help if your passwords are as simple as "1234" or "password1".
A reasonably complex password would consist of at least 15 random characters from an alphabet of a-z, A-Z, and 0-9. If the chosen password is truly random, this provides the equivalent of about 90 bits of security. This is not as good as a 128-bit symmetric key, but is secure if the only way the attacker can guess a password is by trying to log in via SSH.
If you also want to protect against an attacker who has access to a cryptographic digest of your password, such as by having a copy of your authentication database, or by having physical read access to your system drive, then you need at least 22 characters from the same alphabet (a-z, A-Z, and 0-9) for security equivalent to a 128-bit symmetric key.
Expanding the password alphabet to include non-alphanumeric symbols may not be as great an idea as commonly supposed. Even if 28 symbols are included, the number of characters needed for 128-bit security is still 20. The 10% savings in password length are outweighed by the hassle of entering the symbols, and even more so by problems with programs that interpret such symbols incorrectly.
It is crucial, however, that you do not create your passwords by hand. If you do so, they will not be random. Use a password management utility to securely store your passwords in an encrypted database, and to randomly generate passwords of the desired length.
Alternately, you can configure your SSH client and server to use public-key authentication. For more information, consult the public key section of the Bitvise SSH Server Usage FAQ.
Avoiding password guessing
Any SSH server that is accessible from the internet on the default SSH port (22) will attract password guessing attempts from random attackers. This is because SSH is widely used to provide administrative access to computers and appliances and is therefore often a high value target.
When installed with default settings, Bitvise SSH Server will take several steps to thwart unauthorized attackers.
One way is by imposing a delay between login attempts. The default delay is 3 seconds. Without any other countermeasures, this 3 second delay would ensure that even an account with a weak password, e.g. 6 letters chosen randomly from an alphabet of 26, would on average take years of back-to-back attempts to guess. (Note that passwords this short are very weak and are highly disrecommended.)
Another way Bitvise SSH Server tries to thwart attackers is through automatic blocking of IP addresses that have recently initiated multiple failed login attempts. In default settings, the SSH Server will block for 1 hour any IP address that initiates more than 20 failed login attempts in 5 minutes.
If you wish to see fewer password guessing attempts, an effective mitigation is to configure the SSH Server to accept connections on a port other than 22. This would not be very effective against a determined attacker, but will avoid random hackers looking for low-hanging fruit. Any random port number between 1024 and 49151 is suitable. The main drawback is that any legitimate client that tries to connect to your server will then need to be configured with the port number in addition to the host name. Some Internet Service Providers may also block connections on non-default ports.
If all of your legitimate connections come from Bitvise SSH Client, you can enable SSH protocol obfuscation in the SSH Server in Advanced settings, under Bindings and UPnP. If you enable obfuscation, only Bitvise SSH Client will be able to connect, and then only if configured with the correct obfuscation keyword.
You can also block connections from specific geographic regions outright. If you never expect to receive legitimate connections from specific regions or countries, you can block them in Advanced settings > Access control > Client address rules. If you block all connections except specific countries, remember to also add IP address allow rules for connections not associated with a country (e.g. from the LAN).
Verifying host keys
Properly verified host keys are essential to the security of the SSH protocol. Many clients exist which do not verify a host key. This happens especially with clients which originally support different protocols, and add SSH as yet another one to support. Such clients are not secure to use.
If the client does not verify the server's host key, it renders the connection vulnerable to a man-in-the-middle attack. This means that anyone who is in a network position between the client and the server - including an ISP, or an attacker that gained control of a network gateway - can modify the connection in such a way as to observe, modify, or inject any and all sensitive information without being noticed.
A host key is verified by a client as follows:
The client might be configured with the full public key, or several public keys, corresponding to host keys used by the server. When the client connects, it verifies that the server is using one of these host keys.
The client might be configured with one or more host key fingerprints it should expect from the server. A host key fingerprint is a cryptographic digest of the public key portion of the host key. The fingerprint is calculated using a hash function such as SHA-256, SHA-1, or MD5. Due to weaknesses in SHA-1 and MD5, the type of fingerprint which is now most recommended is SHA-256.
The client might not be configured with a host key, or might expect a different host key than is received from the server. In this case, a secure client must either prevent the connection, or require the user to verify the fingerprint of the received host key.
For more information about how public keys are used in SSH, for both server and client authentication, please see Public keys in SSH.
Chapter 1.8
Understanding and replacing Bitvise SSH Server host keys
Properly verified host keys are essential to the security of the SSH protocol. Many clients exist which do not verify a host key. This happens especially with clients which originally support different protocols, and add SSH as yet another one to support. Such clients are not secure to use.
If the client does not verify the server's host key, it renders the connection vulnerable to a man-in-the-middle attack. This means that anyone who is in a network position between the client and the server - including an ISP, or an attacker that gained control of a network gateway - can modify the connection in such a way as to observe, modify, or inject any and all sensitive information without being noticed.
A host key is verified by a client as follows:
The client might be configured with the full public key, or several public keys, corresponding to host keys used by the server. When the client connects, it verifies that the server is using one of these host keys.
The client might be configured with one or more host key fingerprints it should expect from the server. A host key fingerprint is a cryptographic digest of the public key portion of the host key. The fingerprint is calculated using a hash function such as SHA-256, SHA-1, or MD5. Due to weaknesses in SHA-1 and MD5, the type of fingerprint which is now most recommended is SHA-256.
The client might not be configured with a host key, or might expect a different host key than is received from the server. In this case, a secure client must either prevent the connection, or require the user to verify the fingerprint of the received host key.
For more information about how public keys are used in SSH, for both server and client authentication, please see Public keys in SSH.
SSH host key negotiation
Bitvise SSH Server can use multiple host keys - one for each different host key algorithm. Supported host key algorithms include RSA, Ed25519, several ECDSA algorithms, and the legacy DSA host key algorithm.
When a client connects to Bitvise SSH Server, the host key that will be used is determined as follows:
The SSH Server sends a list of host key algorithms for which it has host keys that are employed.
The client sends a preference list of host key algorithms it supports. Depending on the client, this might be a list of all host key algorithms the client supports, including algorithms for which the client does not trust any host key for this server. Alternately, this could be a list of only those host key algorithms for which the client does know a trusted host key for this server.
The host key algorithm that is chosen is the first algorithm named by the client which is also named by the server.
Changing Bitvise SSH Server host keys
An administrator may wish to add or replace one or more host keys of an existing SSH Server instance for reasons such as:
The SSH Server may be using an older type or size of key that is no longer recommended in SSH. For example: we recommend replacing any size of DSA host key, and any RSA key smaller than 2048 bits, with a 3072-bit RSA host key.
An existing host key could have been exposed to compromise. For example, an administrator might have exported the private key for backup, and there were insufficient controls on the backup to ensure it wasn't accessed in an unauthorized way.
Replacement might be mandated by a key rollover policy.
Replacing a host key with the same algorithm
For example, an administrator may wish to replace a 1024-bit RSA host key with a 3072-bit RSA key. The new host key will have a different public key and a different fingerprint which existing clients do not trust. To replace this host key, we recommend the following process:
Generate a new host key using the Manage host keys interface in the SSH Server Control Panel, but do not yet employ the key.
Distribute either the full new public key, or fingerprints of the new host key, to all clients that need to connect to the SSH Server. Do not send the private key to anyone!
Provide client administrators sufficient time to configure trust in the new host key. At this time, previously employed host keys continue to be used for connections.
Once all clients have been configured to accept the new host key, employ the new host key in place of the old one.
Once the new host key has been employed, client administrators can now remove the previous host key from their trust store.
The old host key of the same algorithm can be kept in the Manage host keys interface in dismissed status, and/or can be removed at the administrator's convenience.
Adding a host key with a different algorithm
For example, an administrator may wish to add a 3072-bit RSA host key to a system that already uses a 1024-bit DSA host key, and has clients trusting the 1024-bit key.
In this case, in theory, the administrator could simply add the new RSA host key, employ it, and leave the DSA host key in place, allowing clients to migrate to the new RSA host key over time.
In practice, however, this will only work if all existing clients that trust the DSA host key either:
do not support the RSA host key algorithm at all; or
their host key algorithm preference list puts DSA in front of RSA; or
no client will request RSA as more preferred than DSA in a situation where it only trusts a DSA key, but not an RSA key.
In practice, when clients connect with a variety of software, all of these conditions may be broken. For example, most clients will support the RSA host key algorithm, and many may prefer it to DSA. In addition, clients that prefer RSA to DSA will send a preference list that prefers RSA even if they trust only a DSA host key for this server, and do not trust any RSA host key.
As a result, with many clients, connections may break immediately as soon as a new host key, which the clients prefer, is employed. This can happen even if there is no other reason these clients could not continue to trust the old host keys that they have always trusted.
For this reason, adding a new host key with a different algorithm needs to follow the following process:
Generate a new host key using the Manage host keys interface in the SSH Server Control Panel, but do not yet employ the key.
Distribute either the full new public key, or fingerprints of the new host key, to all clients that need to connect to the SSH Server. Do not send the private key to anyone!
Provide client administrators sufficient time to configure trust in the new host key.
Once all clients have been configured to accept the new host key, employ the new host key.
Once the new host key has been employed, client administrators can now remove the previous host key from their trust store.
Automatic host key rotation
Some SSH client software, including Bitvise SSH Client, supports host key synchronization using the OpenSSH extension "hostkeys-00@openssh.com".
If all clients that connect to your SSH Server support host key synchronization, it is possible to update host keys without requiring clients to make manual configuration changes. In this case, the server administrator can rotate host keys as follows:
Use the Manage host keys interface to generate a new host key, but do not employ it. The new host key may use a new or existing algorithm.
Wait for clients to connect and receive the new, not yet employed host key. Clients can synchronize the new host key using the "hostkeys-00@openssh.com" extension.
After all clients have connected and received the new host key, employ the new host key.
Any previous host key can now be dismissed (no longer employed). If the previous host key uses the same algorithm as the new host key, the old host key must be dismissed. Due to the design of the SSH protocol, the SSH Server can use only one employed host key for each algorithm.
Once you are satisfied that all clients can connect, you can fully remove the previous host key. This will cause clients that support host key synchronization to also remove the old host key from their trust store.
Limitations:
A wide variety of SSH and SFTP client software does not support host key synchronization, or does not have it enabled.
In Bitvise SSH Client, host key synchronization is supported when the client connects using host key information stored in the SSH Client's Host key manager, either using the default profile or a file-based profile. This is the default behavior, unless host keys are specified using command-line parameters.
Bitvise SSH Client can be invoked using command-line parameters which specify the server host key, such as -hostKeyFp=... or -hostKeyFile=.... In this case, command-line parameters that specify host keys must be updated manually.
Bitvise SSH Client can connect using a file-based profile to which it does not have write access. If the SSH Client cannot update the profile, it will not be able to synchronize host keys stored in the profile.
The Bitvise FlowSsh library does not contain a built-in host key store. The script or application that uses FlowSsh must implement host key management. Typically, the user of the script or application must configure the host key, and there is no provision for host key synchronization.
In Bitvise SSH Server master/follower setups, follower SSH Server instances currently do not support host key synchronization.
In Bitvise SSH Server configurations where the SSH Server is configured to connect to another SSH or SFTP server, the SSH profiles entries configured in Advanced settings currently do not support host key synchronization.
Migrating host keys to a new server
If an SSH Server is migrated to a new installation, it makes sense to migrate host keys only if:
The server move is transparent to clients. Clients must continue to connect using the same DNS name or IP address, and the same TCP port, which they used to connect to the previous SSH Server instance.
If clients need to connect to a new DNS name or IP address, or a different port, then client configuration changes are required. In this case, new host keys should be used. Without explicit configuration steps, clients will not trust the same host keys when connecting to a different server address.
The host keys used by the previous server are not outdated. In the interest of compatibility, you can migrate a 1024-bit DSA host key to a new SSH Server instance. However, we recommend replacing such host keys with new and stronger keys. This involves steps and considerations described in previous sections.
To migrate host keys to a new installation:
Export host keys from the previous installation using the Manage host keys interface in the SSH Server Control Panel. You can select multiple host keys and export them in Bitvise format. To use the host keys on a new server, you need to export the keypairs, not the public key only.
Use the Manage host keys interface on the new installation to dismiss or delete any new host keys that were generated during installation. If the keys were never used, it's best to delete to avoid confusion. Generating new keys is easy, it's configuring clients that's hard.
Use the same interface to import the migrated host keys. Employ the migrated host keys, so they will be used for SSH and SFTP connections.
Chapter 1.9
Storage and backup of Bitvise SSH Server configuration
Your SSH Server configuration can consist of the following parts:
Host keypairs. These are private keys which are used to authenticate your SSH Server installation to clients that connect to it. Host key verification is critical to defend against man-in-the-middle attacks on the SSH session. Without host key verification, an SSH session can be hijacked.
Settings. These are the settings you see when you open Easy settings or Advanced settings in the SSH Server Control Panel. All of your SSH account and group settings entries are stored here, as well as their public keys for client authentication.
Instance-type settings. These are settings that control synchronization of the SSH Server with other instances in a master/follower environment. Standalone installations do not use these settings.
Password cache. You can set up a password cache to allow Windows accounts implicit access to network resources when they log into the SSH Server using public key authentication.
External infrastructure. Your SSH Server setup will likely depend on infrastructure that is not part of the SSH Server itself. This includes Windows accounts that have been granted the right to log in via the SSH Server; any filesystem folders that users have been configured to access; Windows filesystem permissions on those folders; and similar. Any backup of external infrastructure is site-specific, and will not be discussed here.
How the configuration is stored
The components of your SSH Server configuration are stored in the following locations:
Host keys are stored in the Config directory. Within this directory, host keys are stored unencrypted.
Settings are stored in the Config directory. If the settings contain any sensitive information, such as passwords for login to network shares, then such sensitive information is encrypted using the SSH Server's machine-specific encryption key. Other settings are stored unencrypted.
Instance-type settings are stored in the Config directory. If the settings contain a password or obfuscation keyword, only these fields are encrypted using the SSH Server's machine-specific encryption key. Other parts of instance-type settings are stored unencrypted.
The password cache is stored in the SSH Server's instance-specific registry key. This registry key is secured using Windows registry permissions so that only administrators can access it. The passwords are encoded reversibly with an encryption key that is the same on all computers.
The Config directory is a subdirectory of the SSH Server installation directory. Like other sensitive subdirectories, such as Logs, this directory is secured using Windows filesystem permissions so that only administrators can read or write files in it.
The SSH Server's instance-specific registry key matches the name of the SSH Server instance. It can be found under HKLM\Software\Bitvise on 32-bit computers, and HKLM\Software\Wow6432Node\Bitvise on 64-bit.
The SSH Server's machine-specific encryption key is stored as a REG_SZ value named EncKey under the registry key HKLM\Software\Bitvise\AdminKey on 32-bit computers, and HKLM\Software\Wow6432Node\Bitvise\AdminKey on 64-bit.
Built-in automatic backup
By default, your SSH Server host keypairs, settings, and instance type settings are backed up automatically whenever they are changed. The backups are stored in the Config\Backup subdirectory of your SSH Server installation directory. These automatic backups can be disabled in Advanced settings, under Server.
You should not rely on being able to restore the built-in automatic backups on other computers. For example, if the settings contain any sensitive information – such as passwords to access network shares – it will not be possible to decrypt them on another computer. The main purpose of automatic backup is to allow your configuration to be restored, on the same computer, to a previous known working state.
Manual backup
Backups you make manually can be restored on other computers. You can make sporadic backups as follows:
To manually backup host keypairs, use the Manage host keys interface on the Server tab in the SSH Server Control Panel. You can select one or multiple host keys using Ctrl+click or Shift+click. For backup, export the keypairs, not only the public keys.
To manually backup settings, use the Export link on the Server tab in the SSH Server Control Panel, under Settings.
To manually backup instance-type settings, access the Instance type settings dialog from the Server tab in the SSH Server Control Panel. Use the Import / Export button to export the settings.
To manually backup the password cache, open the Manage password cache interface from the Server tab in the SSH Server Control Panel, under Password cache. Under More, find the option Backup items to file.
Automated backup for restoring on other computers
If you need to make frequent backups in a way that can be restored on other computers, you can automate them as follows:
For host keypairs, automated backups are needed only in rare situations. Host keys will not change unless you change them manually, or use advanced configuration options such as scriptable configuration. In this case, the BssCfg COM object contains methods to load, count, and export host keypairs.
For settings, use the BssCfg utility that's included in the SSH Server installation directory:
BssCfg settings exportBin C:\Path\FileName.wst -pass=password
Alternately, use the SSH Server's scriptable configuration. In this case, the BssCfg COM object contains methods to load and export SSH Server settings.
For instance-type settings, use the BssCfg utility that's included in the SSH Server installation directory:
BssCfg instanceType exportBin C:\Path\FileName.wst
Alternately, use the SSH Server's scriptable configuration. In this case, the BssCfg COM object contains methods to load and export instance-type settings.
For the password cache, the SSH Server currently does not provide automated export functionality. However, you can export the registry key that contains the entries using the Windows reg utility. For example, with a default (unnamed) SSH Server installation:
reg export HKLM\Software\Bitvise\BvSshServer C:\Path\FileName.txt /reg:32
The /reg:32 parameter allows this same command to work on both 32-bit and 64-bit Windows. If you are using the Windows Registry Editor, then on 64-bit Windows, the location is HKLM\Software\WOW6432Node\Bitvise\BvSshServer.
Chapter 1.10
Opening Bitvise SSH Server to the internet
Bitvise SSH Server is intended to run with minimal configuration after initial installation. However, when installed in a LAN environment, it will not immediately receive connections from the internet by default.
In order to open Bitvise SSH Server to the internet, other network components must first be configured. The most prominent such components are the firewall on the machine where the SSH server is running, and the router on the LAN to which this machine is attached.
Necessary preparation
Before you open Bitvise SSH Server to the internet, perform the following important steps:
- Follow instructions in Connecting for the first time to make sure you are able to connect to the SSH server from 'localhost'; that is, that you can connect from a client running on the same machine where the SSH server is installed.
- Follow instructions in Securing Bitvise SSH Server to lock down your settings to a degree where you are comfortable with them. After locking down your settings, use a client installed on the same machine to verify that everything is behaving the way you want.
Only when you are satisfied with the security of your settings, and when your settings work when connecting from 'localhost', open your SSH server to the internet by:
- opening the Bitvise SSH Server listening port(s) in your firewall, and
- configuring your router to forward internet connections to the machine where the SSH server runs.
Automatic Configuration
You can configure Bitvise SSH Server to perform the above tasks automatically:
- Open Bitvise SSH Server Easy settings. In the first tab (Server), change the setting "Open Windows Firewall" to "Open port(s) to any computer". This will automatically open your listening ports in your firewall when the SSH server is running.
- On the same tab, enable the setting "Automatically configure router (requires UPnP)". This will automatically configure your router to forward internet connections to Bitvise SSH Server when it is running.
If you have other software or hardware firewalls in addition to the Windows firewall, you will have to configure those firewalls manually.
In order for UPnP NAT forwarding to work, your router must support the Universal Plug and Play standard. Most recent routers do. If yours does not, you will have to configure it manually.
Chapter 1.11
Configuring groups and accounts in Bitvise SSH Server
Unless configured differently during initial setup, Bitvise SSH Server will accept password, NTLM or Kerberos-based login to any Windows account that has Windows permissions log into the machine where the SSH server is running.
When a Windows account user logs in, Bitvise SSH Server will impersonate the security context of that Windows account throughout the user's SSH session. Under default settings, the server will allow any successfully logged on user to take any action that the user is permitted by Windows and file system permissions. Such actions include accessing the terminal shell, running a program, uploading and downloading files, or connecting to another machine using SSH port forwarding.
Most administrators will find it desirable to configure Bitvise SSH Server in a way that restricts users' access further. The groups and accounts sections of Bitvise SSH Server's Advanced settings provide the means for this configurability. The groups and accounts in SSH server settings are an additional layer of security, imposed by the SSH server on top of the Windows permission system. Bitvise SSH Server settings do not replace Windows permissions, but provide complementary settings which Windows does not provide on its own.
Additionally, virtual groups and virtual account settings provide the means to add users in Bitvise SSH Server without having to create separate Windows groups, or having to create and maintain a Windows account for every user.
Windows groups and accounts
By default, the Bitvise SSH Server configuration for Windows groups and accounts is very straightforward. It consists of a single 'Everyone' group. In a default configuration, the SSH server settings for the Everyone group apply to all Windows accounts that log in via SSH.
When a user tries to log into Bitvise SSH Server with a Windows account, the server determines the settings for that account in the following manner:
Account settings. The SSH server searches the entries in 'Windows accounts' to find a match for the account that's logging in. If a match is found, the settings in the account entry are superimposed on the settings found for the account's group. If the 'Specify group' option is enabled, it is used to choose the account's group settings entry.
Group settings. If the SSH server was able to find a match for a Windows account settings entry in SSH server settings, and if this entry uses the 'Specify group' setting, then Bitvise SSH Server will use the configured group settings entry, under the following conditions: that the specified Windows group settings entry exists in the first place; and that the Windows account is actually a member of that group.
If any of these conditions is not met, Bitvise SSH Server looks up the local and domain groups of which the account is a member:
If none of the user's groups have an SSH server group settings entry, the Everyone group settings entry will be used.
If only one of the user's groups has an SSH server group settings entry, that group settings entry will be used, as long as it appears above the Everyone group.
If more than one of the user's groups have an SSH server group settings entry, then the user's "primary group" setting in Active Directory will control which group settings entry is used.
If more than one of the user's groups have an SSH server group settings entry, but the user is not a domain user, or the "primary group" setting does not resolve the group, then the SSH server will choose the group settings entry that appears first in SSH server settings.
This means that:
Bitvise SSH Server account settings can be configured individually by adding individual account entries in 'Windows accounts'.
SSH server account settings can be configured en masse, without having to add or maintain individual account entries, by configuring Bitvise SSH Server settings for a number of Windows groups. When there is no individual account settings entry, the SSH server will use appropriate group settings according to the rules described above.
When configuring settings for multiple Windows accounts through groups, automatic expansion of environment variables in string configuration fields may be helpful. Bitvise SSH Server will substitute environment variables in string fields such as Initial terminal shell directory, Virtual home directory, and others.
Virtual groups and accounts
For administrators who want to avoid setting up a separate Windows account for every SSH user, Bitvise SSH Server provides the means to create virtual accounts. Virtual accounts behave like Windows accounts, except for the following differences:
Scope.
Windows accounts. A Windows account is created in Windows, and can be used to log into Bitvise SSH Server whether or not there is a corresponding Windows account entry. A Windows account exists outside of the SSH server as a Windows security principal.
Virtual accounts. A virtual account is created by adding an entry to 'Virtual accounts' in Bitvise SSH Server settings. A virtual account exists only inside the SSH server, but there is no awareness of virtual accounts in applications that an SSH session launches. Instead, those external applications are aware of a Windows account that is configured to back the virtual account. The backing Windows account provides an impersonation context on the level of the operating system.
Groups.
Windows groups. The mapping between Windows account entries and Windows group entries in Bitvise SSH Server settings can be complex. It depends on the Windows account's actual Windows group memberships, Active Directory primary group settings, the 'Specify group' setting in the SSH account settings entry, etc.
Virtual groups.The mapping between a virtual account and its corresponding virtual group is straightforward. The virtual account entry always directly specifies a single corresponding virtual group.
Password.
Windows accounts. The password of a Windows account is maintained by Windows. It is possible to change it either using the Windows Control Panel or Computer Management, or through Bitvise SSH Server during SSH user authentication, or using the included bvPwd command line utility.
Virtual accounts. The password of a virtual account is maintained in Bitvise SSH Server Settings. It is configured by the administrator, but can also be changed by the user of the virtual account using an SSH client that supports password change during authentication.
Security context. A virtual account still requires configuring a backing Windows account to provide an OS-level security context. The SSH Server will impersonate this backing Windows account when the virtual account is logged into. The same security context can be used for any number of virtual users, or the accounts can use different security contexts. The security context (the backing Windows account) can be defined either for individual virtual accounts, or for whole virtual groups.
If the virtual account logon session needs to access network resources, one way to achieve this is to configure a Windows domain account as the security context, and to enter the password for that Windows account in the SSH server's password cache. This allows the SSH Server to create a stronger Windows logon session which can provide implicit access to network resources. It also allows accessing files encrypted using Windows EFS.
The SSH Server can also create a logon session without a cached password. However, a logon session created without a password will need to use explicit authentication to access network resources, and will not be able to access files encrypted using Windows EFS.
When installed on machines that are not domain controllers, Bitvise SSH Server creates and manages a local Windows account to provide a security context for virtual users. This account is used by default if no other security context is configured. The Windows account is named BvSsh_VirtualUsers on default (unnamed) SSH Server instances, but can be named differently if you installed the SSH Server as a named instance. If the account has been created, its name is displayed on the Server tab in the SSH Server Control Panel. Domain controllers do not have local accounts, so this feature is not available on domain controllers.
If you use the default virtual account security context (BvSsh_VirtualUsers), do not use it to access files encrypted using Windows EFS. The SSH Server routinely resets the password for this account. Since EFS encryption is tied to Windows account password, this can cause EFS-encrypted files to be permanently lost.
In other respects, a virtual account is just like a Windows account. Virtual account settings are superimposed on the corresponding virtual group settings just like with Windows group and account settings entries. All the SSH server settings for virtual accounts that look the same as for Windows accounts behave the same way.
Virtual accounts are well-suited for users who are limited to file transfer. Benefits include:
Less overhead: New virtual accounts can be configured without also adding new Windows accounts.
Windows session sharing: Virtual accounts can share their Windows logon session with other accounts in the same virtual group. When using network shares, this can significantly improve reliability of Windows file share connections.
Chapter 1.12
Security architecture in Bitvise SSH Server
Bitvise SSH Server acts as an extension of the Windows operating system to support SSH login. As such, it needs to act in ways the OS would act to organize security contexts for logon sessions. This means the main SSH Server process is designed to run as Local System; however, the logon sessions themselves run in security contexts of users who are actually logging in.
When a user logs into the SSH Server, for example to use SFTP or open a terminal session:
The SSH session will run as Local System until the user is authenticated.
When the user is authenticated, the thread with the SSH session will switch to that user's security context. If the code implementing the SSH session were to misbehave, it's possible to switch back to the Local System security context from within the thread.
The SFTP server or terminal session is launched as a separate process entirely in the user's security context. If the code implementing the SFTP server or the terminal shell were to misbehave, it cannot switch to the Local System security context.
Security context for virtual accounts
Virtual accounts configured in SSH Server settings do not exist as Windows accounts, but must still run in a Windows security context. On computers that are not domain controllers, the SSH Server will automatically create and manage a local Windows account for this purpose. On a default, unnamed SSH Server instance, this account is named BvSsh_VirtualUsers. This account is not created during installation, but by the SSH Server after it is started, and only if virtual accounts exist that would use it.
On a named SSH Server installation, the name of this account will be different, but will start with BvSsh_.... For example, if you installed an SSH Server instance named "MyInstance", the account might be named BvSsh_MyInstance. You can use Windows local user management tools (Windows Control Panel > Administrative Tools > Computer Management) to discover the account name. You can also find the name of the account in the SSH Server's textual log files, such as in the log message I_AUTO_ACCOUNT_ENABLED.
Unless a virtual account or virtual group is explicitly configured to use a different security context in Advanced SSH Server settings, the SSH Server will use BvSsh_VirtualUsers (or the equivalent) by default. If a virtual account running in this default context needs to access filesystem resources, Windows filesystem permissions need to be granted to this account.
When the SSH Server is installed on a domain controller, it cannot create a default account to provide a security context for virtual accounts because Windows domain controllers do not support local Windows accounts. In this case, if the domain administrator wishes to use virtual accounts in the SSH Server, they must first create a domain account to provide a security context for virtual account logon sessions. This domain account must be configured as the security context for virtual accounts in Advanced SSH Server settings.
If virtual accounts should be able to access network resources using the credentials of an account that has been configured as a custom security context for virtual users, the password for this account should be added to the SSH Server's password cache using the Manage password cache interface, accessible via the Server tab in the SSH Server Control Panel. This will allow the SSH Server to create a logon session with credentials to access network resources in the name of this account.
Running the SSH Server under a different service account
Bitvise SSH Server is designed to run as Local System, but can run as a different account if you grant it privileges that effectively make it as powerful as Local System. These privileges are:
- Act as part of operating system (SeTcbPrivilege)
- Replace a process level token (SeAssignPrimaryTokenPrivilege)
- Adjust memory quotas for a process (SeIncreaseQuotaPrivilege)
In addition, the account must be a member of the local Administrators group on the computer where the SSH Server is to run.
Changing the SSH Server to run in a domain account security context will not grant your SSH users access to domain resources, because the users run in their own security context. If you need users to access network shares, see the page Accessing network shares to configure this in the SSH Server.
When the SSH Server runs as an account other than Local System, then regardless of privileges granted, it is not possible to schedule tasks in Advanced settings > Tasks and actions to run in the Local Service or Network Service security context. To use these security contexts, the SSH Server must run as Local System.
Password storage and hashing
When you connect to the SSH Server using Windows accounts:
By default, the SSH Server does not store Windows account passwords.
If you log in using password authentication, the SSH Server hands the provided password to the Windows LogonUser function to check it. Passwords are not stored unless the SSH Server is configured to cache them using Advanced settings > Access control > Password cache auto-save behavior.
If you log in using public key authentication, then by default, the SSH Server uses Windows APIs to obtain information about the Windows account. The SSH Server then constructs a logon session which does not contain any password credentials. A limitation of this logon mechanism is that the session cannot access network resources or files encrypted using EFS.
Administrators who use Windows accounts with public key authentication, and who want the accounts to be able to access network resources, can consider an option to store Windows account passwords in the SSH Server's password cache. In this case:
The administrator can add a password to the SSH Server's password cache manually using the Manage password cache interface in the SSH Server Control Panel.
The administrator can configure the SSH Server to automatically cache passwords in Advanced settings > Access control > Password cache auto-save behavior.
The password cache is stored in the SSH Server's registry key. This registry key is secured using Windows registry permissions so that only administrators can access it. The passwords are encoded reversibly with an encryption key that is the same on all computers.
When you connect to the SSH Server using virtual accounts:
Virtual account passwords are hashed irreversibly in a manner resistant to brute force attacks on the hashed value. The virtual account password hashes are stored as part of SSH Server settings.
The algorithm used to hash virtual account passwords is denis bider's BusyBeaver, as implemented here:
AtBusyBeaver.h
AtBusyBeaver.cppThe algorithm is described by denis bider here. It is guaranteed to be at least as strong as HMAC-SHA512. Its actual strength is orders of magnitude greater, and is comparable with state-of-the-art password hashing algorithms.
When you export SSH Server settings in textual format, the exported settings will contain irreversible password hashes for virtual accounts. These hashes can be used to guess passwords by brute force. The BusyBeaver algorithm ensures that such attacks are infeasible for complex passwords.
Simple passwords can still be guessed. Even the strongest password hashing does not help if the password is "password1234" or if it is reused from another system.
Before SSH Server version 6.41, the irreversible hash was weaker, using a simple HMAC-SHA1. If your settings contain virtual account passwords that have not been changed since before version 6.41, such passwords will still use HMAC-SHA1. To use the new hash algorithm, you must reset such passwords.
When you configure a password for a Windows file share or for a proxy profile in SSH Server settings:
Such passwords are encrypted reversibly as part of SSH Server settings.
The encryption key is uniquely generated for the Windows instance on which the SSH Server is installed. The encryption key is secured using Windows registry permissions so that only administrators can access it.
The encryption algorithm is AES-256 in CTR mode with an HMAC-SHA512 integrity check.
When you export SSH Server settings in textual format, the exported settings will contain the reversibly encrypted passwords. These cannot be decrypted except with the encryption key, which is unique and only accessible to the machine administrators.
Chapter 1.13
Using Bitvise SSH Server in a domain
Bitvise SSH Server fully supports environments with Windows domain, domain forest, and Unix realm authentication. Changes to Active Directory settings are not necessary to authenticate against the SSH Server, except when using:
Domain accounts with public key authentication and without a password cache.
Virtual accounts with backing Windows domain accounts and without a password cache.
Active Directory permissions for password-less logon
If you would like to use Windows domain accounts with public key authentication, or as backing accounts for virtual accounts; and if you do not wish to configure passwords for these domain accounts in the SSH Server's password cache; then you will need to ensure that the SSH Server has read permissions to user data in the Active Directory.
A default Active Directory installation may grant the necessary read permissions by default – for example, through the Active Directory group Pre-Windows 2000 Compatible Access. If default settings have been changed, a permissions issue might arise when trying to use domain accounts with password-less logon.
If the SSH Server's log files indicate permission-related issues when trying to use domain accounts with password-less logon, grant the necessary read permissions as follows:
On the Domain Controller, open Active Directory Users and Computers under Administrative Tools.
In the View menu, enable Advanced Features.
Right click on the Users container in the tree view. Click Properties.
In the Security tab of the new dialog, click Advanced.
In the Permissions tab of the Advanced Security Settings dialog, add the computer running Bitvise SSH Server:
Set Applies to to This object and all descendant objects.
Enable the permissions List contents and Read all properties.
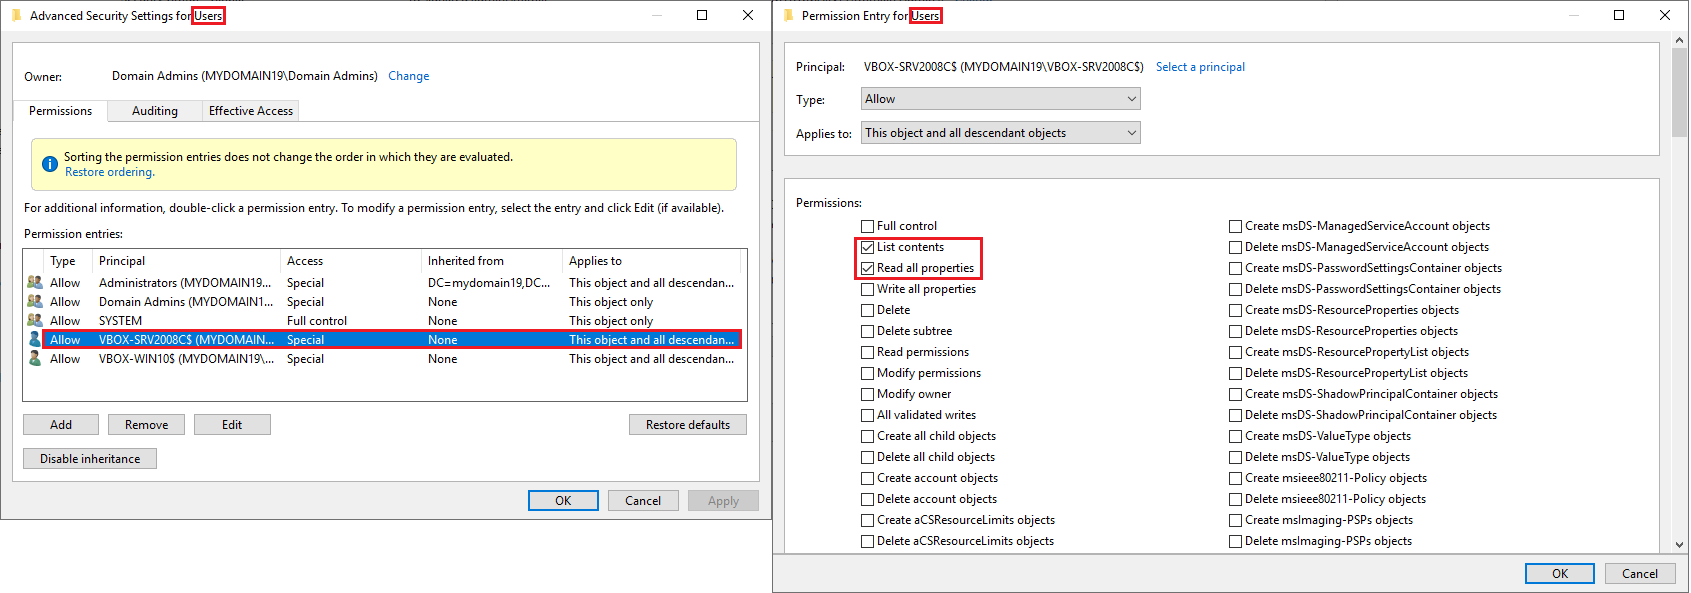
These are recommended settings which are intended to be future-proof and easy to configure. However, it is possible to configure a more restricted alternative.
Windows domain order
Using default SSH Server settings, domain users can log in without providing a domain as part of their username. Usernames do not have to be fully qualified to log in.
In addition, a Windows domain order feature is supported in Advanced settings for administrators who wish to explicitly configure the order in which non-fully-qualified usernames should be looked up. This can be used to ensure predictable results.
Loading Windows profiles
When configuring Bitvise SSH Server to provide SFTP, SCP or FTPS access for domain users, you may want to avoid configuring settings that will cause loading of Windows profiles. Users may have large Windows profiles which, if they need to be loaded, may delay session startup. A Windows profile may also become corrupted from being loaded and unloaded many times. This can prevent connectivity until the profile directory is manually deleted.
Any of the following conditions will cause the SSH Server to load a user's Windows profile:
Map remote home directory is enabled for the user or group in Advanced settings. This is configured in the Windows account or group settings entry, under Session setup > Windows file share settings. This setting is enabled by default for Windows groups. If you are using Windows accounts for limited file transfer access, disable this setting.
Map remembered shares is enabled for the user or group in Advanced settings. This is located under Session setup, on the same page as Map remote home directory.
There is a Connection on-logon command, On-disconnect command, Windows on-logon command or Windows on-logoff command configured to run either in the user's Windows account settings entry, or inherited from a group settings entry; and the option Load Windows profile is enabled in the settings for any configured command.
The client opens a terminal shell, or sends an exec request – except if Shell access type is set to No shell access, or it is set to BvShell and the option Load profile for BvShell is disabled. This is configured in the account or group settings entry, under Shell and exec requests.
The client starts an SFTP, SCP or FTPS file transfer session, and the setting Load profile for file transfer is enabled for the user or group in Advanced settings. This setting is located in the Windows account or group settings entry, under File transfer.
To make sure the SSH Server does not load Windows profiles, verify that none of the above conditions apply.
Cross-domain accounts
The SSH Server supports connections using Windows accounts from different domains than the one where the SSH Server is running, as long as Windows settings and SSH Server settings permit the cross-domain account to log in.
Connections from cross-domain accounts involve additional complexity. Windows account lookup for cross-domain accounts often does not work. The domain controller for the other domain is frequently unreachable. This can prevent a successful connection, but it can be overcome if specific SSH Server settings are relaxed.
If the domain controller for the other domain is unreachable, consider changing the following settings:
In Advanced settings, in the Windows account or group settings entry which applies to the cross-domain account; under Session setup, change If cannot obtain account info to No restrictions.
In the Windows account or group settings entry, under Session setup > Windows file share settings, disable the setting Map remote home directory.
On the same page – still in Windows file share settings – disable the setting Map remembered shares.
Disable any setting which would cause the user's Windows profile to load. See above section: Loading Windows profiles.
Chapter 1.14
Active Directory permissions for password-less logon
If you would like to use Windows domain accounts with public key authentication, or as backing accounts for virtual accounts; and if you do not wish to configure passwords for these domain accounts in the SSH Server's password cache; then you will need to ensure that the SSH Server has read permissions to user data in the Active Directory.
A default Active Directory installation may grant the necessary read permissions by default – for example, through the Active Directory group Pre-Windows 2000 Compatible Access. If default settings have been changed, a permissions issue might arise when trying to use domain accounts with password-less logon.
If the SSH Server's log files indicate permission-related issues when trying to use domain accounts with password-less logon, grant the necessary read permissions as follows:
On the Domain Controller, open Active Directory Users and Computers under Administrative Tools.
In the View menu, enable Advanced Features.
Right click on the Users container in the tree view. Click Properties.
In the Security tab of the new dialog, click Advanced.
In the Permissions tab of the Advanced Security Settings dialog, add the computer running Bitvise SSH Server:
Set Applies to to This object and all descendant objects.
Enable the permissions List contents and Read all properties.
These are recommended settings which are intended to be future-proof and easy to configure. However, it is possible to configure a more restricted alternative.
Alternative most restricted permissions
The most restricted Active Directory permissions that can be applied for the SSH Server to still function are as follows:
Right click on the Users container in the tree view. Click Properties.
In the Security tab of the new dialog, click Advanced.
In the Permissions tab of the Advanced Security Settings dialog, add the computer running Bitvise SSH Server:
Set Applies to to This object only.
Enable the permission List contents.
Continuing in the Permissions tab, add another entry for the computer running Bitvise SSH Server:
Set Applies to to Descendant User objects.
Enable the permissions:
- Read account restrictions
- Read general information
- Read logon information
- Read public information
- Read remote access information
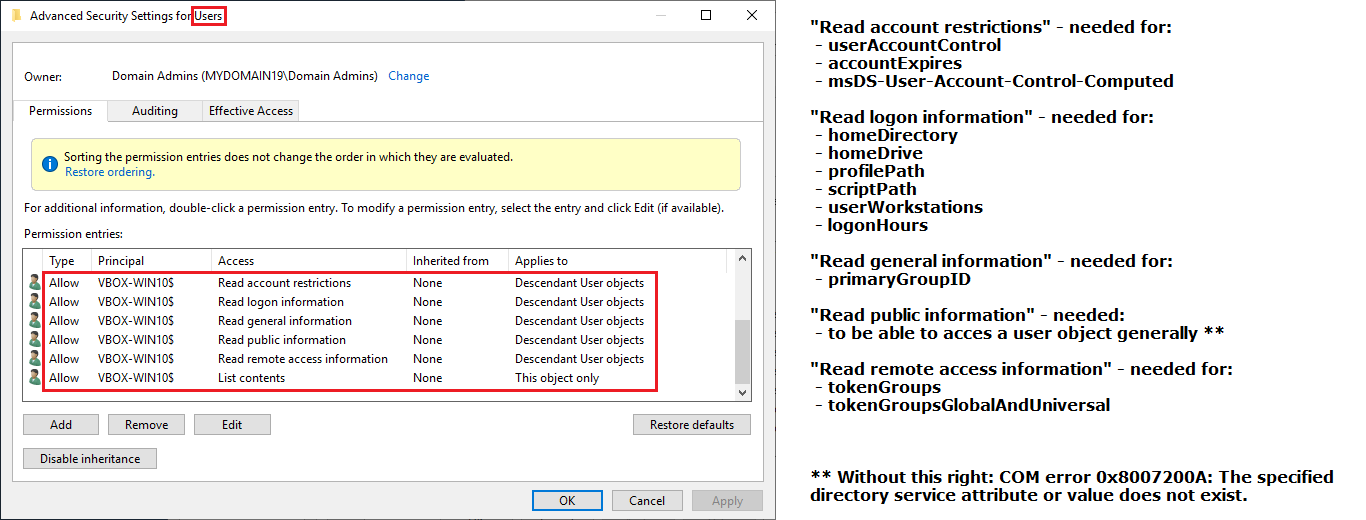
Restricting permissions in this manner is not recommended because:
Future SSH Server versions might require additional permissions for password-less logon.
An SSH Server instance may be configured to automatically update to such a version in the administrator's absence.
If the SSH Server is not updated, it may instead be exposed to a vulnerability that has been discovered and fixed.
Chapter 1.15
Accessing network shares through Bitvise SSH Server
Bitvise SSH Server can be configured to provide users with access to network resources exposed by other computers reachable from the computer where the SSH server is installed.
Access to network resources can be configured in the following ways.
If you are using a Windows account, either domain or local, which can log on locally at the server, and has network shares already configured in Windows, you can make these shares available in an SSH session by enabling the setting Map remembered shares in Advanced settings. This setting can be enabled either in the specific account's settings entry, or in a group settings entry from which the account inherits settings.
Note that this feature may not work if you use domain accounts with public key authentication, and no password configured in the SSH server's Password cache. For more information, see the below section Network shares and public key authentication.
If your SSH users are logging in with Windows domain accounts; and if their domain accounts have the Windows security permissions necessary to access the network shares; then these network shares can be accessed through SFTP or SCP without the need to configure additional access credentials:
If the users have access to the server's entire filesystem (their root mount point is mapped to ""), they can access network shares from their SFTP client simply by entering the network path in the form "/computer/sharename".
If users aren't permitted to access the entire filesystem, you can add file shares they should have access to by configuring them as mount points. For example, you can add a mount point that defines SFTP virtual path "/sharename" and maps it to real path "\\computer\sharename".
- If your SSH users aren't logging in with domain accounts, or if they don't have Windows security permissions necessary to access the network shares on other computers, you need to explicitly configure the network shares in Bitvise SSH Server. You can do so as follows:
In Advanced settings, open the group or account settings entry for the account or group that should have access to the network share.
From the group or account settings entry, open Windows file shares, and click Add. Configure the network share, and the credentials necessary to access the share. You can also configure an optional drive letter to which the share should be mapped.
If the user has access to the server's entire filesystem, the user can now access the share through the drive letter. If the user is not permitted to access the entire filesystem, you can allow them to access the file share by adding a mount point that defines SFTP virtual path "/sharename" and maps it to real path "\\computer\sharename", or you can map it to the local drive letter you configured.
Network shares and public key authentication
Bitvise SSH Server supports public key login without the SSH server needing to know the user's password. The SSH server will create a password-less login session by default if the user authenticates using public key, and no password is configured for the user in the SSH server's Password cache.
When a password-less login session is created for a domain account, Windows will lack security credentials that might be necessary to access network shares under that account's identity. As a result, the Map remembered shares feature may not result in usable connections, and any explicitly configured Windows shares will not work unless they allow public access, or a username and password are explicitly configured to access them.
When accessing network shares in an SSH session that uses public key authentication, the following options are available:
Click the Manage password cache link on the Server tab of Bitvise SSH Server Control Panel, and use the password cache management interface to enter a password for the domain account with which you would like to use network shares.
The password will be reversibly encrypted in the Windows registry, protected with Windows security permissions so that it can be accessed only by administrators and processes with equivalent permissions. A user who does not have administrative access will not be able to retrieve the password, but an attacker with administrative access, or someone with direct hardware access to the computer, would be able to if they have the required skills.
Alternately, configure file shares explicitly using the Windows file shares feature (instead of Map remembered shares), and use the Windows file shares entry to explicitly set up the username and password needed to access the share.
Network shares and Kerberos authentication
In domain environments, clients can connect to Bitvise SSH Server using Kerberos authentication over GSSAPI. A logon session created in this way may or may not have implicit access to network shares, depending on whether delegation was permitted by the client when authenticating. Furthermore, Windows supports constrained delegation, which is a much more complex way of selectively granting access to network resources when authenticating using Kerberos.
When a client authenticates using Kerberos, the client will not be able to implicitly access a network share unless delegation is enabled, or constrained delegation is configured in Windows so that implicit access is possible.
If a client is using Kerberos authentication without delegation, but needs to access network shares, configure them explicitly using the Windows file shares feature, and use the Windows file shares entry to explicitly set up the username and password needed to access the share.
Network shares and virtual accounts
Virtual account logon sessions can run in a variety of security contexts, depending on the choice made for the virtual account or virtual group in Advanced SSH Server settings:
By default, virtual accounts use an automatically managed local Windows account managed by the SSH Server. Virtual accounts can also be configured to use a local account, or to execute in the security context of the SSH Server service (not recommended!).
In all of these situations, the security context is a local Windows account, which does not have access to network resources. Such a virtual account can access a network share in the following ways:
If the share requires authentication, credentials to access the network share need to be configured in the Windows file shares section of the virtual account or group settings entry.
Only if the share does not require authentication (not recommended), then a UNC path can be used directly (e.g. in Real root path in mount point configuration), without requiring an entry under Windows file shares.
Virtual accounts can also be configured to run in the security context of a domain account. In this case, the situation is the same as described under Network shares and public key authentication. Even if public key authentication is not used, the SSH Server will create a passwordless logon that won't have access to network shares, unless the password for the domain account is entered in the SSH Server's password cache. Therefore, you will either need to configure a password cache entry for the domain account, or use the Windows file shares setting. See Network shares and public key authentication.
Network shares and logon type
In some Windows configurations, attempting to access a network share may consistently fail with Windows error code 1312, with error description: "A specified logon session does not exist. It may already have been terminated."
This type of error can be observed in the SSH Server's textual log files, in a log event such as x_LOGON_SHARE_CONFIGURED_NOT_CONNECTED.
If this error occurs consistently, it may indicate that a Windows component is refusing to connect to the network share unless the SSH user is logged in using the Interactive login type. By default, the SSH Server is configured to use the Network logon type for all users.
If this error occurs, it is independent of credentials which are configured to access the share. The error applies even if you configured a Windows file shares entry with explicit network share credentials which are different from the SSH user's security context.
In this case, see Network vs. interactive logon for more information about configuring the SSH user to log on using the Interactive logon type.
Intermittent reliability problems
In SSH Server versions 8.xx and older; and in versions 9.xx and higher, if Windows session sharing is disabled in Advanced settings; each incoming connection from a client creates a separate Windows logon session. Each logon session makes separate connections to network shares. This is not a problem for file transfer clients that create a single long-lived connection for many transfers. However, problems arise with clients that initiate 10 or even 100 concurrent connections, as well as clients which make a new connection for each file, then disconnect.
The SSH Server can handle an indefinite number of such connections. However, network share servers frequently expect a small number of long-lived connections, and cannot handle a large number of short-lived connections. In such situations, the connection between Windows and the network share can sporadically fail. This causes file transfers to fail. The SSH Server's textual log files show errors such as "The RPC server is unavailable", or "The remote procedure call failed and did not execute", or "A specified logon session does not exist. It may already have been terminated."
Since SSH Server versions 9.xx, you can configure the feature Windows session sharing in Advanced settings, under Sessions. This will cause the SSH Server to cache Windows logon sessions for the period of time you configure, and to reuse the same logon session for multiple connections from the same client. This allows the SSH Server to maintain few and long-lived connections to network shares, even for clients that frequently connect and reconnect. This can substantially reduce the occurrence of intermittent connectivity problems between Windows and the network share server.
If Windows session sharing is already enabled, but you are still seeing network share problems, try configuring a longer Windows session keep-alive time. This is configured in Advanced settings, under Sessions.
The default value is 600 seconds, which is 10 minutes. If the user connects less frequently than every 10 minutes, this will cause the user's connection to create a new Windows logon session, with new network share connections. These new network share connections can fail.
If the user connects every 1 hour, you can change the Windows session keep-alive time setting to e.g. 7200 seconds (2 hours). This way, the user's existing Windows logon session will still be available when the user reconnects, and the network connection that was already established will likely work.
Best practices
If you configure Windows file shares entries using Specify credentials, then also configure the SSH Server to disconnect users if configured network share connections fail.
A server-wide setting can be found in: Advanced settings > Sessions > Windows file share settings > On share connect failure. This server-wide setting can be overridden in group or account settings entries. In the account or group settings entry, this can be found under Session setup > Windows file share settings.
If you do not configure this, then if a configured network share connection fails, default SSH Server behavior is to allow the user to proceed with the connection. In this case, if the user has a virtual filesystem mount point which maps to a UNC path, and the user attempts to access that mount point, Windows will try to establish a connection to the UNC path using credentials of the Windows account which provides the security context for the SSH logon session.
If this fallback connection to the network share is successful:
The user may have access to the network share, but using incorrect credentials.
The connection to the network share may be established using anonymous credentials. This is usually insufficient to access files, and will cause Permission denied errors to the client.
The fallback connection that Windows established may interfere with subsequent attempts by the SSH Server to connect to the network share using the intended, configured credentials.
If you don't want to disconnect users if a configured network share connection fails: configure your Windows file shares entries to enable the setting Map to local drive.
Configure a specific drive letter to which the network share must be mapped. Enable the setting Must use this drive. This drive is not globally visible to all users. It is available only in the Windows logon session for this user or virtual group. You must avoid drive letter conflicts, but only with other drives also available in the same Windows logon session.
In virtual filesystem mount point settings, under Real root path, do not use a UNC path. Instead, use the configured drive letter.
If a configured network share connection fails, the drive letter will not be created, and the virtual filesystem mount point will be inaccessible. This prevents Windows from attempting a fallback connection to the network share using incorrect credentials.
If the fallback connection that Windows makes to the UNC path is permitted, it can interfere with subsequent attempts by the SSH Server to connect to the network share using the intended, configured credentials.
Enable and configure Windows session sharing. This is configured in Advanced settings > Sessions. This can increase reliability of network share connections by reducing the number of connections that are made, and increasing retention of successful connections.
See above section: Intermittent reliability problems
For file transfer connections, use virtual accounts rather than Windows accounts, and enable the setting Share logon sessions with group. This requires SSH Server 9.5x or newer. The setting is found in Advanced settings, in the virtual account settings entry, under Session setup.
This feature works in combination with Windows session sharing. Enabling both settings reduces the number of Windows logon sessions that need to be created by a server which handles many virtual account connections. This can dramatically reduce the number of network share connections that are made, and increases the retention of successful network share connections.
This feature requires that you configure virtual filesystem mount points so that virtual accounts cannot access locations which they should not be able to access, but which may be available to other virtual accounts in the same Windows logon session.
Chapter 1.16
Network vs. interactive logon
Windows recognizes different types of logon with subtly different security implications. Bitvise SSH Server can be configured, on a per-account or per-group basis, to use either of the following two logon types:
Network logon. By default, this logon type is configured in SSH Server Advanced settings for both Windows and virtual group settings entries. This logon type is therefore used, by default, for all accounts.
The Network logon type allows the user to log in via SSH even if the underlying Windows account is not granted the Windows security privilege Log on locally.
On very old Windows versions (Windows Server 2003), default filesystem permissions would block access to cmd.exe and other command line tools when a logon session did not have the Interactive logon type. This is not a concern on modern systems.
Interactive logon. The Interactive logon type requires a Windows account to be granted the Windows security privilege Log on locally. By default, this logon type is not used by the SSH Server because a significant number of Windows servers are configured in such a way that this privilege is not granted for non-Administrator accounts.
In some Windows environments, accessing network shares requires the Interactive logon type. It is also not possible to access server-side printers in an SSH terminal session unless the SSH user is either an administrator, or has the Interactive logon type. The Interactive logon type is also required on Windows Server 2003 for terminal shell access.
Batch logon. The Batch logon type requires a Windows account to be granted the Windows security privilege Log on as batch job. This logon type may allow programs to run which do not run correctly under either Network or Interactive.
Logon type is configured in Advanced settings, either in the account settings entry for an individual account, or in a group settings entry as a default for multiple accounts. In the account or group settings entry, the Logon type setting is found under Session setup.
Selecting the right logon type
Users who require terminal shell access may want to use the Interactive logon type, but may also use Network (default). It will usually make sense for these users to log in via SSH as Windows users, not as virtual accounts.
When users use only file transfer or tunneling, we recommend the Network logon type (default). However, in some Windows environments, the Interactive logon type is required in order to connect to network shares.
Windows security settings affecting logon types
Essential Windows security settings that affect logon types are configured in the Group Policy Editor. This can be opened using the Windows Run dialog (Windows key + R) and starting: gpedit.msc. The settings are located under:
Computer Configuration > Windows Settings > Security Settings > Local Policies > User Rights Assignment
There are four main settings that affect whether login will be possible using the two logon types:
Deny log on locally. For accounts that match this setting, login will be prohibited using the Interactive logon type, even if the account matches the setting Allow log on locally.
Allow log on locally. For accounts that match this setting, login will be permitted using the Interactive logon type, unless the account also matches the setting Deny log on locally.
Deny access to this computer from the network. For accounts that match this setting, login will be prohibited using the Network logon type, even if the account matches the setting Access this computer from the network.
Access this computer from the network. For accounts that match this setting, login will be permitted using the Network logon type, unless the account also matches the setting Deny access to this computer from the network.
To be allowed logon using a particular logon type, an account must match the corresponding Allow setting, and must not match the corresponding Deny setting.
Technical clarification of logon type 8: NETWORK_CLEARTEXT
When the Network logon type is used, the SSH Server actually uses Windows logon type 8, which is NETWORK_CLEARTEXT. This is not a security issue.
Windows logon types are described by Microsoft as part of documentation for the LogonUser API. At the time of this writing, authoritative descriptions of logon types NETWORK and NETWORK_CLEARTEXT are as follows:
LOGON32_LOGON_NETWORK: "This logon type is intended for high performance servers to authenticate plaintext passwords. The LogonUser function does not cache credentials for this logon type."
LOGON32_LOGON_NETWORK_CLEARTEXT: "This logon type preserves the name and password in the authentication package, which allows the server to make connections to other network servers while impersonating the client. A server can accept plaintext credentials from a client, call LogonUser, verify that the user can access the system across the network, and still communicate with other servers."
Since 2013, misunderstandings of this logon type have proliferated. This appears to be thanks to this paper by a forensics student, which butchered the description as follows:
- NetworkCleartext: "This is a kind of network logon where the password is sent over the network in the clear text. This is logged as logon type 8. Windows server doesn't allow connection to shared file or printers with clear text authentication. (...)"
This passage is a misunderstanding. Regardless, it is easier to find and read than LogonUser documentation. Thus, it has become cited in online answers, even though it directly contradicts the authoritative descriptions.
What "NETWORK_CLEARTEXT" means is: (1) the login is made over the network, and (2) the server where the login is performed has access to the original password, and can use it to impersonate the user to access further resources as part of the logon session. It does not mean that a password is sent, at any time, over the network unencrypted.
The use of NETWORK_CLEARTEXT - or another logon type that caches credentials, e.g. INTERACTIVE - is required if the session needs to have access to network resources. If NETWORK is used, Windows will not cache the logon credentials, and access to network shares on the user's behalf will not be possible without additional configuration.
The main distinction between logon types NETWORK_CLEARTEXT and INTERACTIVE is that the former requires the user to hold the Windows security privilege Access this computer from the network, whereas the latter requires Log on locally. Beyond this, the logon process is very similar. If you log into Windows via the local keyboard, this is much the same as when the SSH Server calls LogonUser with logon type INTERACTIVE. With NETWORK_CLEARTEXT, the logon process is also much the same; except that the user must hold a different Windows security privilege.
In no event does the SSH Server receive or send the password unencrypted over the network. The password is obtained either locally from the SSH Server's password cache, or is sent by the user over an encrypted SSH session. The SSH Server then passes the password to the Windows LogonUser function. For domain accounts, this will cause Windows to authenticate with the domain controller. As far as we know, Windows also does not send the password unencrypted over the network.
Chapter 1.17
Setting up public key authentication
If your SSH client supports it, you can use public key authentication to log into Bitvise SSH Server. On Windows, we recommend Bitvise SSH Client, which has strong support for public key authentication, as well as password authentication, and Kerberos single sign-on in domain environments.
If you are new to public key authentication, we first suggest reading Public keys in SSH.
To set up public key authentication, you first need to generate a keypair on the client, or select one or more existing keypairs for use with client authentication. The procedure for generating the keypair depends on the client software being used:
- If you are using Bitvise SSH Client, click the link titled Client key manager in the Login tab. You can generate, edit, import and export keypairs in the dialog box that pops up.
- If you are using a different client, you need to follow its process for generating keypairs. For example, in OpenSSH, keypairs are generated using the ssh-keygen utility. Make sure to generate an SSH2 keypair (not SSH1). Use either the ECDSA, RSA, or DSA (DSS) algorithms. We recommend either ECDSA, or RSA with a size of 2048 bits or higher.
Once the keypair has been generated, you need to import the public key (not the whole keypair!) into the SSH Server.
SSH Public Key Subsystem
Recent Bitvise SSH Server and SSH Client versions support the SSH Public Key Subsystem. To import a public key into the SSH Server this way:
- Use the SSH Client to connect to the SSH Server using the account for which you want to configure the public key.
- Once connected, open Client key manager. Right-click on the keypair, and select Upload to server.
- You should now be able to authenticate using this keypair.
You can also use this feature to manage keys in the SSH Server from the command line, using the spksc client included with Bitvise SSH Client.
Import Public Key via File
With most clients, you can export the public key into a file, transfer the file to the SSH Server, and import it into SSH Server settings. In this case:
- Export the public key in either the standard SSH2 public key format, or in the OpenSSH format. If you are using OpenSSH, the public key file can be exported from an existing keypair using the ssh-keygen utility (consult 'man ssh-keygen').
- Once your public key file has been exported, transfer it to the machine where Bitvise SSH Server is installed, or a machine from which you manage the SSH Server remotely using Bitvise SSH Client.
- Use either Easy SSH Server settings (screenshot) or Advanced settings (screenshot) to import the public key into the SSH user's account settings entry.
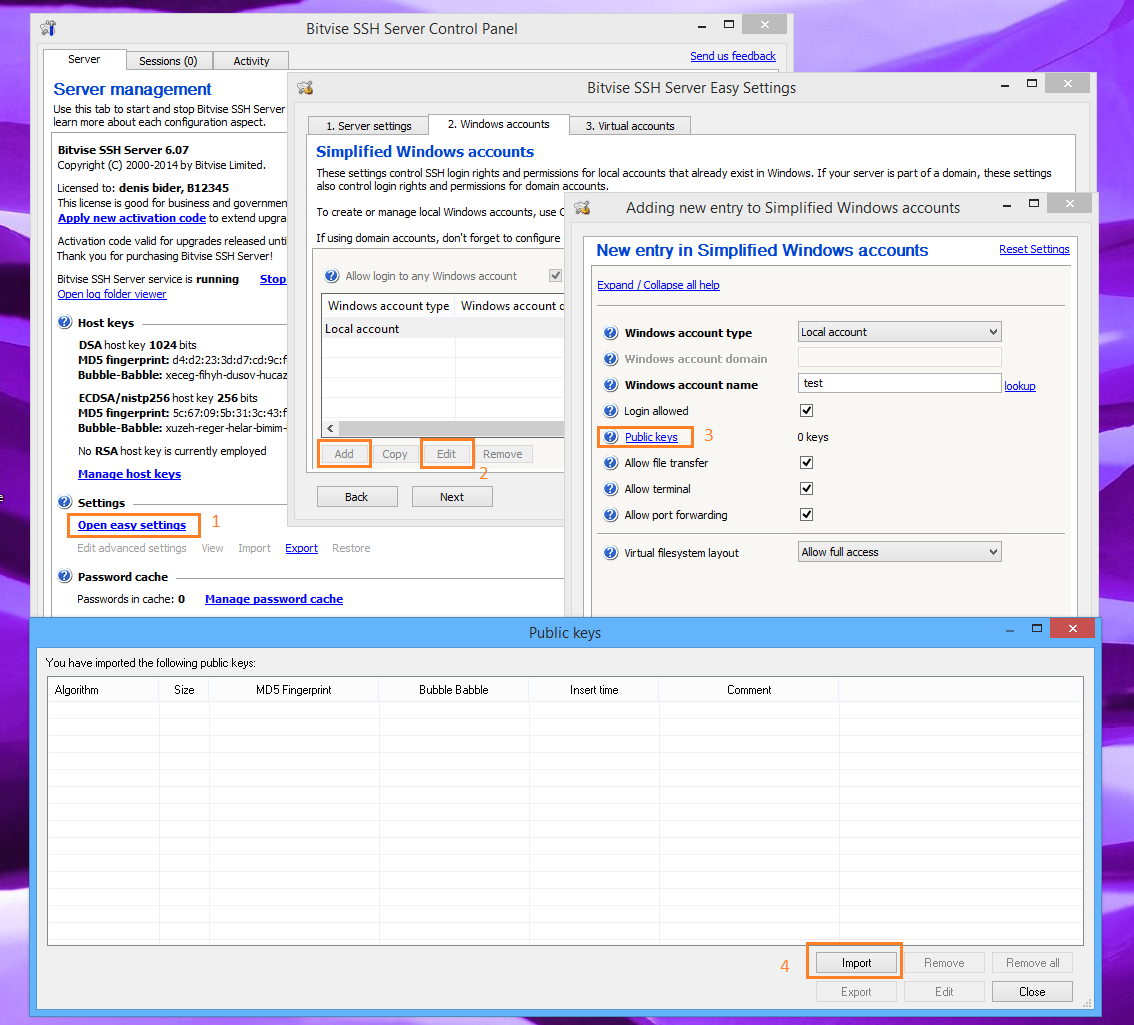
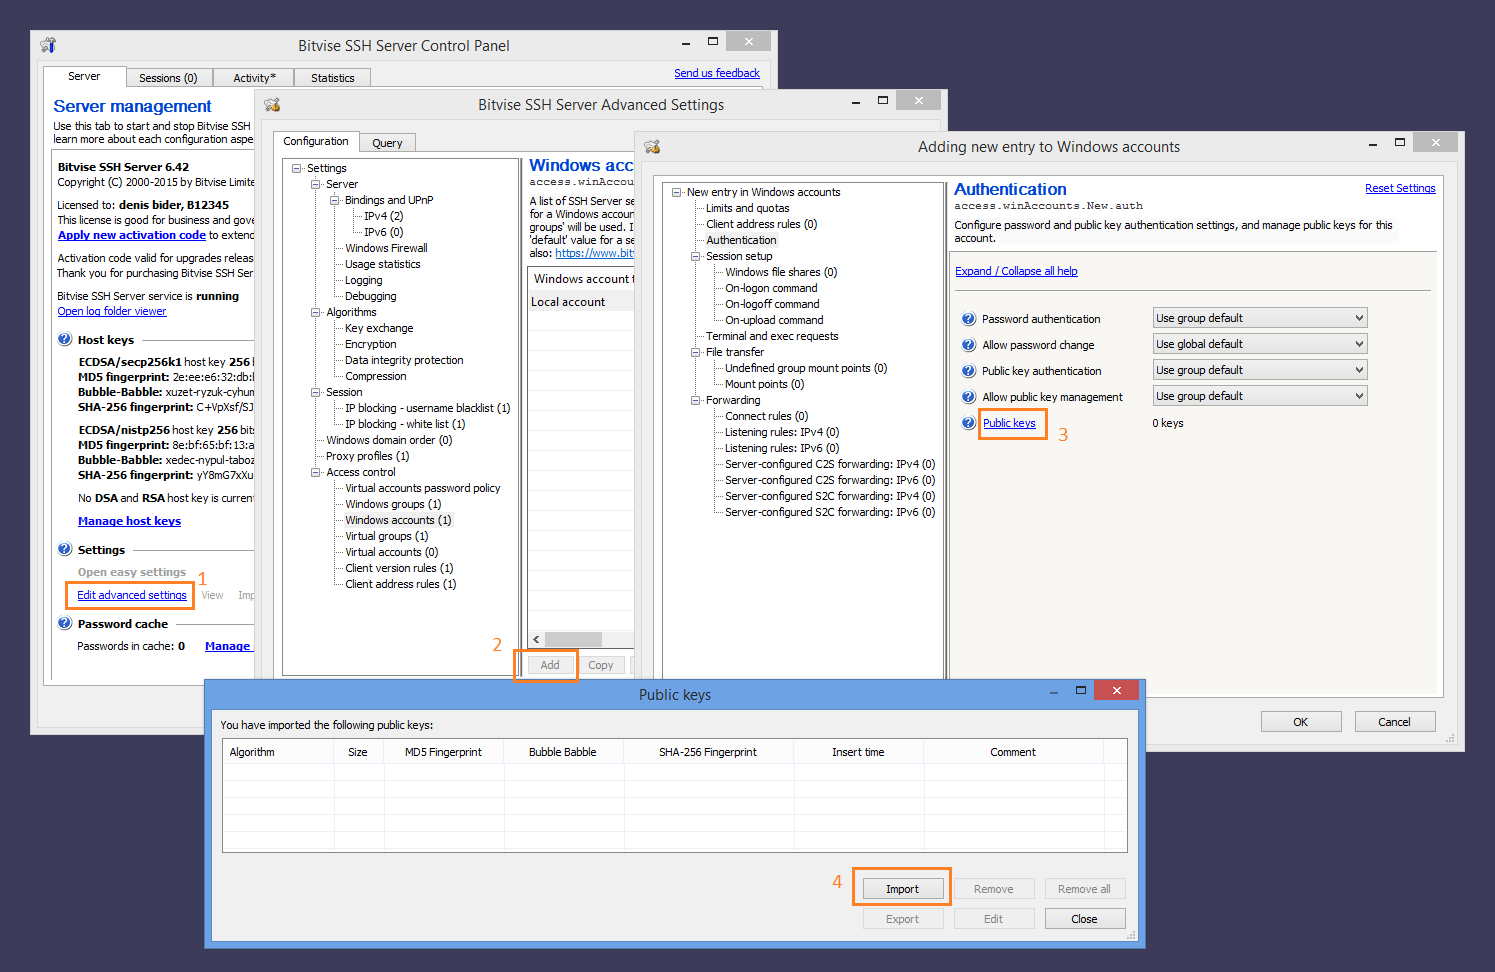
Common mistakes: Make sure that you don't try to import the client's key into the server's host key management interface. The host key management interface is accessed directly from the "Server" tab of the Bitvise SSH Server Control Panel, and is intended to manage keypairs that authenticate the server. These keypairs are separate and unrelated to client authentication.
Synchronization with authorized_keys
For Windows accounts, the SSH Server also supports synchronization with ~/.ssh/authorized_keys. This feature must be enabled in Advanced SSH Server settings, under Access control. It allows Windows users to upload their SSH public key to a file named authorized_keys under a subdirectory named .ssh under the user's Windows profile directory. If this setting is enabled, the SSH Server will check for the existence of the authorized_keys file when the user logs out. If the file exists, the SSH Server will replace all of the public keys configured for the user with keys found in this file.
Use this feature with caution: if your system has unused authorized_keys files laying around, this may cause public keys to be unexpectedly deleted.
Chapter 1.18
Fine-grained tunneling restrictions
'Tunneling' or 'port forwarding' refers to the ability of an SSH client (a) to have the SSH server initiate a TCP/IP connection to another server on the SSH client's behalf (called client-to-server tunneling), or (b) to have the SSH server accept incoming TCP/IP connections on a server's interface and port and forward those connections to the client (called server-to-client port forwarding). (You can learn more in our Short guide to SSH port forwarding.)
If your requirements are simple, Bitvise SSH Server provides two easy ways to control a user's or group's access to tunneling. In the Bitvise SSH Server settings entry for the account or group, there are fields Permit C2S port forwarding and Permit S2C port forwarding. Disable the first and the user will not be able to tell the SSH server to initiate outbound connections. Disable the second and the user will not be able to instruct the SSH server to listen for connections to forward to the SSH client.
Sometimes, such simple controls are not sufficient. For example, you may want to allow the user to use port forwarding to access a service provided by a particular machine on the server's local network; but you don't want to allow the user to use this capability to access any server on the internet, e.g. as a proxy for web browsing.
Such fine-grained control is provided by the Connect rules and Listening rules settings available in Bitvise SSH Server Advanced settings, separately for each group or account settings entry.
Connect rules
Connect rules control what destinations the SSH client will be able to connect to using client-2-server port forwarding. There are four types of connect rules: those that match IPv4 addresses, IPv4 addresses, DNS names, and a separate rule type that matches everything.
An IPv4 rule allows you to specify either a complete IP address (significant bits = 32) or a whole subnet (significant bits = 8 for 255.0.0.0, 16 for 255.255.0.0 or 24 for 255.255.255.0). The IP address 0.0.0.0 with significant bits = 0 will match any destination, and is equivalent to a match-all rule.
IPv6 rules work similarly to IPv4 rules, except that there are up to 128 significant bits.
A DNS name rule allows you to specify a destination either using a specific DNS name or a wildcard of the form *.com, *.bitvise.com or *.research.bitvise.com. A lone wildcard (just *) will match any destination, and is equivalent to a match-all rule.
Bitvise SSH Server processes Connect rules in the order they are configured. When the first match is found, the action configured for that rule is taken, and no further rules are searched.
If Bitvise SSH Server gets a client-to-server tunneling request for which there is no match in the account's Connect rules, the Connect rules of the corresponding group settings entry will be processed. If no match is found in the group Connect rules either, the connection is rejected.
By default, the Connect rule list for a group contains a single entry allowing access to all destinations if 'Permit C2S port forwarding' for the user is true. An account's Connect rule list is empty by default, passing all decisions to Connect rules defined for the user's group.
Listen rules
Listen rules control what server interfaces and ports the user will be able to bind in order to accept connections and forward them to the SSH client. There is a separate list of listening rules for IPv4 and IPv6 requests.
A listen rule identifies an IP address of one of the server's network interfaces, and a port range for which the SSH client is allowed or denied listening. The special address 0.0.0.0 for IPv4, or "::" for IPv6, matches any interface.
A listen rule may contain additional Accept rules which control the origin hosts from which connections to the interface and port range defined in the listen rule will be accepted. By default, the accept rule list contains a single entry allowing connections from all sources.
If Bitvise SSH Server gets a server-to-client tunneling request for which there is no match in the account's Listen rules, the Listen rules of the account's group settings entry will be processed. If no match is found in the group Listen rules either, the tunneling attempt is rejected.
By default, the Listen rule list for a group contains a single entry allowing all interfaces and ports to be bound if 'Permit S2C port forwarding' for the user is true. An account's Listen rule list is empty by default, passing all decisions to Listen rules defined for the user's group.
Example 1: Permit a client-to-server destination
Suppose your SSH server resides on machine 10.10.10.5 in your internal network, and you wish to allow the user to connect, via SSH tunneling, to a Remote Desktop service running on machine 10.10.10.16. You would first need to decide whether to configure this policy for the user's group or for the individual user. If for the individual user, you would need to add a Bitvise SSH Server account settings entry for the user if one does not yet exist. Then, in Advanced settings, you would open the group or account settings entry that you wish to configure this restriction for, and perform the following:
- Add 'allow' rule for client-2-server connections:
- open the 'Connect rules' list and click Add
- under Address type, select IPv4
- under IPV4 Address, input the IP address of the server to which the user is allowed to connect - in our example, 10.10.10.16
- under Significant bits, enter 32 to specify that the IP address in this case identifies an individual IP (10.10.10.16), not a subnet (e.g. 24 for 10.10.10.x)
- under Port range rule, set 'Port from' to the RDP port (3389), and 'Port to' to the same value
- under Instructions, enable the 'Allow connect' setting, and leave the rest at defaults
- click OK to confirm and add the configured rule
- Add a 'deny' rule for other client-2-server connections:
- click Add in 'Connect rules'
- the default will be a rule that covers all connections. Disable the 'Allow connect' setting, and click OK to add the rule.
In this example, if you wanted to prohibit the user from setting up any kind of server-to-client port forwarding whatsoever, you would simply set 'Permit S2C port forwarding' to false. Otherwise, if you wanted to configure a specific range of ports and interfaces where the SSH client may instruct the SSH server to listen, you would add appropriate Listen rules as in the Example 2 (below).
Example 2: Permit a server-to-client binding
Suppose your SSH server machine has two network interfaces: 10.10.10.5 is the private IP address in the local area network and 123.23.12.111 is the server's public IP address on the internet. You know that the user who will be logging into the SSH server will need to run a program on the server side which will initiate a TCP connection to the client, and the user will achieve this using server-to-client port forwarding. You want to allow the user to forward connections from the server's local network through the server's 10.10.10.5 private network interface, as well as from the server itself using the 127.0.0.1 loopback interface, but you do not wish to allow the user to listen for connections from the internet through interface 123.23.12.111. You also want to restrict the user to listening only on ports 1024-65535.
Again, you would first need to decide whether to configure this policy for the user's group or for the individual user. If for the individual user, you would need to add a Bitvise SSH Server account settings entry for the user if one does not yet exist. Then, in Advanced settings, you would open the group or account settings entry that you wish to configure this restriction for, and perform the following:
- Add 'allow' listening rule for 10.10.10.5:
- open 'Listening rules: IPv4' and click Add
- under IPv4 Address, input the IP address of the interface - in our example, 10.10.10.5
- under Port range, enter 1024 into 'Port from' and 65535 into 'Port to'
- enable the 'Allow listening' checkbox
- under Instructions, enable the 'Allow connect' setting and leave the rest at default values
- click OK to confirm and add the configured rule
- Add 'allow' listening rule for 127.0.0.1:
- repeat steps under 1, but using 127.0.0.1 instead of 10.10.10.5. You should now have 2 listening rules.
- Add 'deny' rule for other listening interfaces:
- click Add in 'Listening rules: IPv4'
- the default will be a rule that covers all IPv4 listening interfaces and all ports. Disable the 'Allow connect' setting, and click OK to add the rule.
- Add a 'deny' rule for IPv6:
- click Add in 'Listening rules: IPv6'
- the default will be a rule that covers all IPv6 listening interfaces and all ports. Disable the 'Allow connect' setting, and click OK to add the rule. Since you're not using any IPv6 interfaces, this will be the only IPv6 Listening rule.
In this example, if you wanted to prohibit the user from setting up any kind of client-to-server forwardings whatsoever, you would simply set 'Permit C2S port forwarding' to false. Otherwise, if you wanted to configure a specific range of destination servers and their ports to which the SSH client may connect, you would add appropriate Connect rules as in Example 1 (above).
Chapter 1.19
Master/follower synchronization and clusters
Bitvise SSH server can be run in a master/follower mode which facilitates its use in a cluster or a large-scale deployment.
The scope of the master/follower feature is to automate synchronization of SSH server settings between SSH servers. It is intended for use in environments where administrators would like to apply settings changes on one server (the master), and have the changes automatically propagate to others (followers). The master/follower feature does not interact with solutions for server monitoring or load balancing. If your deployment requires e.g. load balancing, you will need an external solution for that.
To cause some or all aspects of the SSH server's configuration to be automatically reproduced from a primary installation to one or more secondary installations, use the Instance type feature in Bitvise SSH Server Control Panel to configure the primary installation as the master. Then, configure secondary installations to run as followers, and retrieve configuration changes from the master.
A typical cluster installation may wish a secondary server to appear identical to a primary server to its users. To achieve this, a follower would reproduce all aspects of the SSH server's configuration: settings, host keys, and password cache. The aspects of SSH server configuration that will be copied from the master are configured in Instance type settings for each follower installation.
Configuring master/follower synchronization
Master/follower synchronization is configured through Instance type settings in the Bitvise SSH Server Control Panel (top right corner of the Server tab). The following steps are required:On the master server:
Set instance type to Master, and configure a password which follower SSH servers will be required to present in order to synchronize settings from the master. We highly recommend configuring a long, secure, randomly generated password as described on this page.
Use the Manage host keys interface to export the public keys of all host keys used by the SSH server. Alternately, write down the master's employed host key fingerprints so that you can enter them manually into follower configuration.
On follower servers:
Set instance type to Follower.
Import the master's host keys through the Host and fingerprints setting. Alternately, use Add Fp to add a master's host key fingerprint, without importing the key.
Enter the master's network address and port, and set the synchronization password to match the one configured on the master.
In the remaining follower settings, configure which aspects of SSH server settings to synchronize from the master. Host keys can be synchronized from the master only if this is permitted in master settings.
If you enable Auto-manage trusted host keys, the follower server will automatically add to its "Host keys and fingerprints" setting any new host keys generated on the master, assuming they haven't yet been employed. If the host key is already employed when it is first seen by the follower, the follower will not be able to connect regardless of this setting, because it has no previous knowledge of the key.
If a cluster node fails...
If a follower goes down in a cluster, then either the master and/or any other followers will remain up. There will be nodes to handle connections, and it will remain possible to administer SSH Server settings for the cluster through the master. If the follower that failed is brought back online, it will re-synchronize.
If the master goes down, a follower will not automatically become a master. The master needs to be brought back online. Otherwise, an administrator needs to reconfigure the nodes in the cluster so that a different server will serve as master. While the master is down, changing SSH Server settings for the cluster through the master will not be possible, but followers will continue to operate according to the last settings they received from the master. When the master is brought back online, followers will re-synchronize.
Upgrading servers in a master/follower configuration
In versions 8.xx and later, follower instances are able to automatically upgrade to the master's version. If the master downgrades, however, followers will not downgrade.
When the master is updated to a new version, any followers that use an older version will update to the master's version when they reconnect. To control follower downtime during an upgrade, upgrade followers first, and then the master.
In versions 7.xx and earlier, automatic updates were not yet supported. In these versions, follower instances must be an equivalent or newer version than the master in order to successfully synchronize.
Unattended follower installation
If you would like to script several SSH Server follower installations, so that they can be performed unattended, the first preparatory step is to use the graphical SSH Server Control Panel on an exemplary follower installation to configure settings for a typical follower. This includes a step to import master host keys. Once the settings are configured and saved, use the same interface to export instance type settings into a file. For example, we assume the file is named BvSshServerFollower.wit.
On followers you want to script, the next step is to perform a normal unattended SSH Server installation, which can be done independent of instance type. This is described on the page Installing Bitvise SSH Server.
Once the SSH Server is installed, you can use the utility BssCfg, which can be found in the SSH Server installation directory, to import follower settings from the command line, as follows:
BssCfg instanceType importBin C:\Path\BvSshServerFollower.wit
This command needs to be run in an elevated, administrative Command Prompt or PowerShell session.
Once this completes, the SSH Server is configured as a follower, and can be started.
Connections through a front-end or load balancer
In normal use, the SSH Server receives connections from the internet directly. In a cluster, connections may be forwarded to the SSH Server by a front-end or load balancer.
The SSH Server is best used either with a transparent front-end (which preserves IP addresses from clients) or with a non-transparent front-end that supports the PROXY protocol (to convey the client's IP at the start of the connection). If the PROXY protocol is used, it must be enabled in the SSH Server's Advanced settings, under Server > Bindings and UPnP, in the entry for the individual binding.
The SSH Server can also be used with a non-transparent front-end that does not support the PROXY protocol, but then all incoming connections will appear to arrive from the front end's IP instead of the actual clients'. This reduces the ability to audit incoming connections in log files, and may require automatic IP blocking in the SSH Server to be disabled.
Logging of connections from health monitors
A health monitor may be set up to connect to the SSH Server repeatedly to check if it's available. By default, this causes the SSH Server to log many trivial log entries corresponding to the health monitor's connections.
To avoid these trivial log entries, the IP addresses of health monitors may be configured in the SSH Server's Advanced settings, under Logging > Monitor IP whitelist. The connections will still be logged if they involve any SSH or FTPS protocol activity, but trivial connects and disconnects will be omitted.
Chapter 1.20
Environment Variable Expansion
A number of string fields in Bitvise SSH Server's account and group settings entries support environment variable expansion. To see if a particular field supports this, check the help text associated with that field in Advanced SSH Server settings.
The basic rule of environment variable expansion is that if there is an environment variable named VAR, containing the value "value", then any occurrence of "%VAR%" will be replaced with "value":
C:\Dir\File-%VAR%.txt -> C:\Dir\File-value.txt
The SSH Server also supports advanced expansion rules. These mirror the expansion functionality available in the Windows Command Prompt:
| %VAR:~N% | Uses a substring of the value of VAR, starting from zero-based offset N. |
|---|---|
| %VAR:~N,L% | Uses a substring of the value of VAR, of length L, starting from zero-based offset N. |
| %VAR:S1=S2% | Before using the value of VAR, replaces each occurrence of S1 within the value with S2. |
| %VAR:*S1=S2% | Before using the value of VAR, replaces with S2 all characters from the beginning of the value and until the end of the first occurrence of S1. |
| %=LOWER:VAR% | Converts the value to lowercase. This can be combined with other advanced expansion rules. When combined, conversion to lowercase will be done first. For example: if USERNAME has value "JOHN", then %=LOWER:USERNAME:j=J% will produce "John". Requires SSH Server 6.41 or higher. |
| %=UPPER:VAR% | Like =LOWER, but converts to uppercase. Requires SSH Server 6.41 or higher. |
For example, a home directory structure such as M:\Home\a\Aaron, M:\Home\b\Benjamin, can be configured on a group-wide basis, without requiring account-specific settings entries, by setting the group home directory to:
M:\Home\%USERNAME:0,1%\%USERNAME%
On-upload command
When using environment variables in an On-upload command, we recommend that the script is given no parameters on the command line, but that it instead obtains information from its environment block. For example, in PowerShell:
$env:SSHUPLOADFILE
This is to avoid pitfalls when parsing the command line, which may contain a path under the SSH client's control.
Supported Variables
When environment variable expansion is performed in the context of a logged-on user's session, any variable in the user's environment block can be used.
When environment variable expansion is performed for on-logon, on-logoff, on-upload commands configured to execute in service context, any variable in the server's environment block can be used.
In addition, the SSH Server will define the following variables:
| BVSSHSERVERINSTANCE | The name of the SSH Server instance chosen during installation. On servers with multiple SSH Server instances, can be used to distinguish which instance the user is currently logged into. Added in version 8.15. |
|---|---|
| HOME | If not already set by Windows, set by the SSH Server to a concatenation of HOMEDRIVE and HOMEPATH. The SSH Server does not set this for commands executed in service context. |
| HOMEDRIVE | If not already set by Windows, set by the SSH Server to the drive part of what the SSH Server thinks is the user's home path. It is possible for this home path to change as the session progresses. The SSH Server does not set this for commands executed in service context. |
| HOMEPATH | If not already set by Windows, set by the SSH Server to the directory path part of what the SSH Server thinks is the user's home path. It is possible for this home path to change as the session progresses. The SSH Server does not set this for commands executed in service context. |
| SSH_CLIENT | The SSH client's IP address, followed by space, followed by port number. The SSH Server does set this for commands executed in service context. |
| SSH_CONNECTION | The SSH client's IP address, followed by space, followed by the local interface address at which the SSH Server accepted the client's connection. The SSH Server does set this for commands executed in service context. |
| SSHLOGEVENT | Defined for Execute command tasks triggered by a log event. Contains JSON-encoded data for the event that triggered the command. This can be loaded in PowerShell using ConvertFrom-Json $env:SSHLOGEVENT. Added in version 9.12. |
| SSHSESSIONID | The numerical session ID assigned to the current client's session by the SSH Server. The first session receives ID 1001. The SSH Server does set this for commands executed in service context. |
| SSHUPLOADBYTES | Defined during execution of an on-upload command. Contains the number of bytes written to the uploaded file by the client. |
| SSHUPLOADFILE | Defined during execution of an on-upload command. Contains the full local drive and path to the file written to by the client. Warning: Part or all of this parameter is controlled by the SSH client, which can create file names using syntax not expected by the server administrator. If passing this environment variable to e.g. the Windows command interpreter, make sure to enclose it in double quotes: "%SSHUPLOADFILE%" |
| SSHUPLOADENDBY | Has the value "CLIENT" if the file was closed by the client, or "CLEANUP" if it was closed by session teardown. Files with the value "CLEANUP" are likely to be incomplete. Added in version 7.12. |
| SSHUPLOADMOUNTPATH | Defined during execution of an on-upload command. Contains the value of the Virtual mount path setting for the mount point into which the file was uploaded. Added in version 9.12. |
| SSHUPLOADNEW | Defined during execution of an on-upload command. Contains 1 if a new file was created, 0 otherwise. Added in version 6.31. |
| SSHUPLOADRESIZE | Defined during execution of an on-upload command. Contains 1 if at least one file resize request by the client was successfully completed, or if an existing file was truncated when opened. Contains 0 otherwise. Added in version 6.31. |
| SSHUPLOADROOTPATH | Defined during execution of an on-upload command. Contains the value of the Real root path setting for the mount point into which the file was uploaded. Undefined if the mount point has no Real root path. Added in version 8.15. |
| SSHWINGROUP | Defined if the logged-on user is a Windows account (not virtual). Set to the name of the Windows group settings entry from which the Windows account inherits settings. Set to "EVERYONE" if the account inherits settings from the Everyone group. The SSH Server does set this for commands executed in service context. |
| SSHWINGROUPDOMAIN | Defined if the logged-on user is a Windows account (not virtual), and if the user inherits settings from a Windows domain group. Set to the domain name configured in the group settings entry. The SSH Server does set this for commands executed in service context. |
| SSHWINUSER | Defined if the logged-on user is a Windows account (not virtual). Set to the account name portion (without domain) of the user's full account name. The SSH Server does set this for commands executed in service context. |
| SSHWINUSERDOMAIN | Defined if the logged-on user is a Windows account (not virtual). Set to the domain name portion of the user's full account name, or the name of the local computer if the account is local. The SSH Server does set this for commands executed in service context. |
| USERDOMAIN | If not already set by Windows, the SSH Server sets this to the domain name portion of the user's full account name, or the name of the local computer if the account is local. The SSH Server does not set this for commands executed in service context. |
| USERNAME | If not already set by Windows, the SSH Server sets this to the account name portion (without domain) of the user's full account name. The SSH Server does not set this for commands executed in service context. |
| USERPN_DOMAINPART | For Windows domain accounts, the domain part of USERPRINCIPALNAME. Added in version 9.26. |
| USERPN_USERPART | For Windows domain accounts, the user part of USERPRINCIPALNAME. Added in version 9.26. |
| USERPRINCIPALNAME | For Windows domain accounts, the value of the User-Principal-Name attribute associated with the currently logged-on user in the Active Directory. Added in version 8.15. |
| VIRTGROUP | Defined if the logged-on user is a virtual account defined in SSH Server settings. Set to the name of the virtual group settings entry from which the virtual account inherits settings. The SSH Server does set this for commands executed in service context. |
| VIRTUSER | Defined if the logged-on user is a virtual account defined in SSH Server settings. Set to the name of the virtual account. The SSH Server does set this for commands executed in service context. |
Chapter 1.21
Tasks, notifications, triggers and conditions
The following task types can be configured in Advanced settings, under Tasks and actions:
Log file maintenance. By default, the SSH Server will archive its old textual log files by compressing them into a subdirectory of the log file directory.
Execute command. You can configure the SSH Server to run commands, including PowerShell or Windows Command Prompt scripts. An Execute command task runs in the security context of a configured Task profile. It can be scheduled to run regularly based on calendar time, or triggered by log events recorded by the SSH Server. Log event triggers can involve complex scripted conditions.
Email notification. Built-in support for email sending can be enabled in Advanced settings under SMTP sending. If enabled, you can then configure Email notification tasks, triggered primarily by log events recorded by the SSH Server. Log event triggers can involve complex scripted conditions.
Task profiles and network shares
If you configure a task of type Execute command, the command will run under the Task profile which you configure.
A task should run under a task profile that provides the Windows permissions it needs. You can use existing task profiles, or configure your own, so that the task will run as a specific Windows account of your choice.
The SSH Server usually runs as Local System. If you use the task profile Run as SSH Server service account, the command will run as Local System and will have the Windows permissions of Local System.
If a task needs to access network shares, you can edit the associated task profile and configure one or more Windows file shares entries. This will instruct the SSH Server to establish a connection to the network share in the Windows logon session used to run the task.
Handling event data
For Execute command tasks triggered by a log event, the SSH Server defines the environment variable SSHLOGEVENT. This variable contains JSON-encoded data for the event that triggered the command. This can be loaded by a PowerShell script as follows:
$e = ConvertFrom-Json $env:SSHLOGEVENT
For example, if the event is I_SFS_TRANSFER_FILE, the local path can then be accessed as:
$e.event.sfs.parameters.path
On-upload command vs. I_SFS_TRANSFER_FILE
The following SSH Server functionality has some overlap:
The On-upload command can be configured in Advanced settings - either for an individual account in its account settings entry, or in a group settings entry, as a default for multiple users.
Tasks can be configured in Advanced settings, under Tasks and actions, using many possible trigger events, including I_SFS_TRANSFER_FILE.
The following are the most significant differences:
The On-upload command is smarter. In recent SSH Server versions, it will wait for some time until the client has closed the file, to see if the file is going to rename the file, move it, or update its modification time. The On-upload command is run only after the client has closed the file and has not touched it for some time.
A task triggered by I_SFS_TRANSFER_FILE will be scheduled to run as soon as the event is logged. The task may run concurrently with any actions the client is still taking, including renaming the file, moving it, or updating its modification time.
The On-upload command can be configured to run either in the security context of the client's logon session, or in the security context of the main SSH Server service. It cannot be configured to run in other security contexts.
A task can be configured to run in an arbitrary security context configured under Task profiles. However, it cannot be configured to run in the security context of the client's logon session.
A task can use the SSH Server's built-in email support to send a notification. An On-upload command can also send an email notification, but has to use external functionality such as a PowerShell script. An On-upload command cannot leverage the SSH Server's built-in email support.
Recommendation:
Use the On-upload command for actions which process a file, move a file, or make changes to a file after it is uploaded. The On-upload command attempts to start after the client is done working with the file, to avoid interfering with the client's actions.
Use a task triggered by I_SFS_TRANSFER_FILE for actions which do not interact with the uploaded file, but perform an independent effect. For example, use a task to send an email notification.
Scripting trigger conditions
If you want an Execute command or Email notification task to run every time the SSH Server logs an event, no trigger condition is necessary. You can leave the Condition setting for the trigger empty, and the task will be scheduled every time the event is logged.
But you may want to avoid running a task unless specific conditions are met. In this case, you must know the layout of the log event for which you are scripting the condition.
To discover the layout of a log event for which you wish to script a condition:
Reproduce the event which you want your condition to process. For example, perform an action which causes the event to be logged.
Find the event in the textual log files recorded by the SSH Server. By default, textual log files can be found in the Logs subdirectory of the SSH Server installation directory.
Example. The event I_SFS_TRANSFER_FILE is an Info-level event which is logged by the SSH Server when a client reads or writes a file, and then closes a file using any file transfer method - SFTP, SCP, FTPS, or BvShell. In the SSH Server's textual log files, events of this type appear like this:
<event seq="84" time="2022-01-30 08:21:16.663977 -0600" app="BvSshServer 9.14" type="Info" name="I_SFS_TRANSFER_FILE" desc="Virtual filesystem: transfer file."> <conn id="1001" winSesId="C1001" service="SSH" remoteAddress="10.1.1.17:55123" windowsAccount="COMPUTER\User" winSes="new"/> <channel type="session" id="1"/> <sfs moduleName="FlowSfsWin" mountPath="/" code="90000" desc="File transfer ended."> <parameters path="C:\Path\UploadExample.txt" timeMs="2" bytesRead="0" bytesWritten="12091" readRangeOffset="0" readRangeLength="0" writeRangeOffset="0" writeRangeLength="12091" createdNewFile="true" resizedFile="false" startSize="0" finalSize="12091" endedBy="Client" download="none" upload="full"/> <help message="File transfer ended by client."/> </sfs> </event>
This event contains the following member variables. All of these can be used in a scripted condition:
seq, time, app, type, name, desc conn.id, conn.winSesId, conn.service, conn.remoteAddress, conn.virtualAccount, conn.windowsAccount, conn.winSes channel.type, channel.id sfs.moduleName, sfs.mountPath, sfs.code, sfs.desc sfs.parameters.path, sfs.parameters.timeMs, sfs.parameters.bytesRead, sfs.parameters.bytesWritten, ..., sfs.parameters.startSize, sfs.parameters.finalSize, sfs.parameters.endedBy, sfs.parameters.download, sfs.parameters.upload sfs.help.message
When a scripted condition is applied to a log event, any sub-expression which attempts to access an element or attribute which is not present will evaluate to false. As long as other sub-expressions access attributes which are present, the condition as a whole can still produce a meaningful result. To control the result when an attribute could be absent, use the operators any and not any.
In order to be used as a trigger condition, an event must actually be logged. An event that is not configured to be logged, either in the Windows Event Viewer or in the SSH Server's textual log files, will not work as a trigger.
Trigger conditions use the SSH Server's scriptable expression syntax:
Scriptable expression syntax
Scriptable expression syntax
[...] means the inside of square brackets is optional [...]* means zero or more repetitions of an optional part "..." means the quoted text appears literally ... | ... means one of the options { ... } means the inside of curly brackets appears together expression := exprElement | { ["not"] ["("] expression [combiningOp expression]* [")"] } combiningOp := "and" | "or" exprElement := ["not"] { anyExpr | basicExpr | compositeExpr } anyExpr := "any" memberName basicExpr := memberName basicOp value basicOp := "eq" | "ne" | "ge" | "gt" | "le" | "lt" | "startsWith" | "endsWith" compositeExpr := memberName ["not"] compositeOp "(" expression ")" compositeOp := "contains" memberName := path to the member variable, e.g. variable.name value := decimal number, double-quoted string, double-quoted time, or double-quoted date-time
Boolean operators
The SSH Server supports the boolean operators and, or and not. These are used as follows:
(expression) and (expression) (expression) or (expression) not (expression)
Parentheses are optional, but recommended for clarity. The following also works:
expression and expression expression or expression not expression
Comparison operators
The SSH Server supports comparison operators, all of which take the form:
variable.name basicOp value
The value can be a decimal integer; a string in single or double quotes; a boolean literal (true, false); or a date/time.
Comparison operators:
- eq: true if the variable equals the value.
- ne: true if the variable does not equal the value.
- ge: true if the variable is greater than or equal to the value.
- gt: true if the variable is greater than the value.
- le: true if the variable is less than or equal to the value.
- lt: true if the variable is less than the value.
- startsWith: true if the variable starts with a specified string prefix.
- endsWith: true if the variable ends with a specified string suffix.
- contains: true if the variable contains a specified substring.
Operations on strings are case-insensitive using NTFS-like rules. Strings that contain spaces must be quoted. If a string is single-quoted, special characters are not escaped, and the single quote cannot appear in the string. If a string is double-quoted, special characters (", `) must be escaped using the grave accent (`).
Date/time values can be specified in any of the following ISO 8601 or ISO-like formats:
| "HH:MM" | 13:00 |
|---|---|
| "YYYY-MM-DD HH:MM" | "2020-01-01 13:00" |
| "YYYY-MM-DDTHH:MM:SS" | "2020-01-01T13:00:30" |
| "YYYY-MM-DD HH:MM +/-ZONE" | "2020-01-01 13:00 +1000" |
| "YYYY-MM-DDTHH:MM:SS+/-ZONE" | "2020-01-01T13:00:30-2000" |
If a time zone is not specified, local time is assumed.
"any" and "contains"
The any operator tests if a variable is defined:
any variable.name not any variable.name
The contains operator tests if a structure or list contains any member that matches an expression:
variable.name contains (expression) variable.name not contains (expression)
When using the contains operator in this way, parentheses around the expression are required.
Examples using I_CONNECT_ACCEPTED
Condition triggers when the SSH Server is handling more than 100 SSH connections, or more than 100 FTPS connections, whether the clients logged in or not:
(conns.ssh gt 100) or (conns.ftp gt 100)
Condition triggers when the SSH Server is handling more than 100 authenticated SSH connections, or more than 100 authenticated FTPS connections:
(conns.sshAuth gt 100) or (conns.ftpAuth gt 100)
Examples using I_SFS_TRANSFER_FILE
Condition triggers when a client creates a new file:
sfs.parameters.createdNewFile eq true
Condition triggers when virtual account "User" writes more than 100 MB into a file before closing it:
(conn.virtualAccount eq "User") and (sfs.parameters.bytesWritten gt 104857600)
Condition triggers for an upload into the virtual filesystem mount point /incoming where the client wrote at least one byte to the file, or created the file, and the file extension is .txt:
(sfs.mountPath eq "/incoming") and (sfs.parameters.path endsWith ".txt") and (sfs.parameters.upload ne "none")
Condition triggers for a download from server-side directory C:\Dir where the file extension is .pdf, and the client did not write to the file or create it:
(sfs.parameters.path startsWith "C:\Dir\") and (sfs.parameters.path endsWith ".pdf") and (sfs.parameters.download ne "none") and (sfs.parameters.upload eq "none")
In the I_SFS_TRANSFER_FILE event, the download and upload attributes attempt to categorize if the client interacted with the file in a way that can be considered a download, an upload, or both. In the above examples:
The first example considers an "upload" a file interaction which creates or writes to the file, whether or not it also reads from it. A resumed upload may involve reading some of a file before writing.
The second example considers a "download" a file interaction which reads from the file, but does not create it or write to it.
Condition triggers for any complete download by virtual account "User" where the client did not write to the file or create it:
(conn.virtualAccount eq "User") and (sfs.parameters.endedBy eq "Client") and (sfs.parameters.download eq "full") and (sfs.parameters.upload eq "none")
Same example, but for a Windows domain account:
(not any conn.virtualAccount) and ((conn.windowsAccount eq "DOMAINNAME\User") or (conn.windowsAccount eq "user@domainname.com")) and (sfs.parameters.endedBy eq "Client") and (sfs.parameters.download eq "full") and (sfs.parameters.upload eq "none")
Examples using I_SERVICE_CONFIG_DESCRIPTION
Condition triggers when the SSH Server configuration contains any host key that uses an algorithm other than RSA:
(parameters.configPart eq "HostKeys") and (event contains (keypair.algorithm ne "RSA"))
Condition triggers when the SSH Server configuration contains no host authentication keypairs:
(parameters.configPart eq "HostKeys") and (not any keypair)
Examples using I_LOGON_AUTH_COMPLETED
Condition triggers if any account logs in before 6 AM or after 8 PM in the local time zone:
(time lt 06:00) or (time gt 20:00)
Condition triggers when virtual account "AccountName" logs in:
conn.virtualAccount eq "AccountName"
Condition triggers when a Windows account logs in which is a member of "DOMAINNAME" or "domainname.com":
(not any conn.virtualAccount) and ((conn.windowsAccount startsWith "DOMAINNAME\") or (conn.windowsAccount endsWith "@domainname.com"))
Condition triggers when a user logs in after more than 2 authentication attempts:
authentication.attemptNr gt 2
Diagnosing issues with triggers
When a trigger is filtered out by a condition, so that the action does not run, you can monitor this in the SSH Server's textual log files by enabling the Trace-level event T_TASK_RUNNER_TRIGGER_FILTERED.
If the SSH Server cannot evaluate a condition because of an error - for example, if a string data type is used where an integer is expected - then the SSH Server will log the event W_TASK_RUNNER_TRIGGER_NOT_EVALUATED.
Chapter 1.22
Scriptable configuration with BssCfg and PowerShell
Bitvise SSH Server comes with a textual configuration utility, BssCfg, which is useful for administering SSH servers in large-scale installations. It also comes with a configuration COM object, BssCfgManip, which can be used to configure the SSH Server from any language that supports COM, but is especially intended for use with PowerShell.
Using BssCfg and PowerShell, it is possible to administer the SSH Server remotely from client machines where it is not possible to use Bitvise SSH Client and its Remote Control Panel feature. PowerShell scripts that modify SSH Server settings can be run on the server by a client through an SSH terminal shell or using exec requests.
Note: Everything that can be configured through BssCfg and PowerShell can also be configured through the graphical SSH Server Control Panel. Users who don't need scriptable configuration do not need to learn BssCfg or PowerShell. Such users should simply use the graphical settings, accessed through the Bitvise SSH Server Control Panel.
Main changes from versions 8.xxUsing BssCfg
The BssCfg utility resides in the SSH Server installation directory and can be run from a Windows Command Prompt or PowerShell. It can be run either locally or remotely using an SSH session. If run without parameters, it will show available commands and options.
BssCfg must be run by a user with administrative permissions, in an elevated Command Prompt or PowerShell window.
Configuring the SSH Server with PowerShell
To instantiate the SSH Server's configuration COM object in PowerShell, use:
$cfg = new-object -com "Bitvise.BssCfg"
Note:
Like the BssCfg utility, the BssCfgManip COM object must be instantiated by a user with administrative permissions, in an elevated PowerShell window.
If more than one SSH Server version is installed, more than one BssCfgManip COM object version will exist concurrently. In this case, instantiating "Bitvise.BssCfg" will access the newest installed version. To discover the name of the object for a previous version, enumerate $cfg.instances.entries and check the member cfgObjName.
Once the object is instantiated, you can view its properties and methods:
$cfg | Get-Member
Statically-typed languages (C#, .NET)
We suggest using BssCfg with a dynamic language, such as PowerShell or VBScript. PowerShell is slower than statically-typed languages, but your scripts will require fewer changes when updating to future SSH Server versions.
To use BssCfg in a static .NET language, such as C#, add a reference to BssCfgManip.exe, which is found in the SSH Server installation directory. If you are using Visual Studio, you can use Add Reference > Browse > navigate to the SSH Server installation directory > BssCfgManip.exe. This will add BssCfg951Lib to your project.
Using BssCfg in a static language will bind tightly to a specific version of BssCfg interfaces. We maintain stable interface versions over minor releases, but new feature releases require new interface versions. To update to future releases with new BssCfg interface versions, you will need to update and recompile your application. Even if you don't require new features, you will eventually want to upgrade to continue receiving security and reliability fixes.
If you bind statically to a specific BssCfg interface version, disable automatic updates and test compatibility before updating, even across minor versions.
Dynamic languages, such as PowerShell, do not bind tightly to interfaces, and require less maintenance when updating to newer SSH Server versions.
Reference
Every object in the hierarchy features integrated help. You can display it as follows:
$cfg.Help() $cfg.instances.Help() $cfg.instances.entries[0].Help() $cfg.instanceSettings.Help() $cfg.settings.Help() $cfg.keypairs.Help() $cfg.keypairs.entries[0].Help()
You can find built-in help at all levels in the settings hierarchy. For example:
$cfg.settings.access.Help() $cfg.settings.access.virtAccounts.Help() $cfg.settings.access.virtAccounts.new.Help() $cfg.settings.access.virtAccounts.new.auth.Help() $cfg.settings.access.virtAccounts.new.auth.keys.Help()
The same help text has also been compiled, and can be viewed as HTML:
Stop on errors
If your script encounters an error when calling a method such as settings.Lock, it is important the script stops instead of continuing as if no error happened. The reason locking functions must be called is because they can fail: aspects of SSH Server settings can be briefly locked by another process, and it's not safe to try to alter settings in this case.
To make sure your script stops if it encounters any errors, make one of the first commands:
$ErrorActionPreference = "Stop"
Alternately, your script can handle any execution errors in a Try/Catch block.
Selecting the SSH Server instance
It is possible to install multiple concurrent SSH Server instances on the same computer. There can be no more than one default, unnamed instance ("Bitvise SSH Server"). Other instances will have names ("Bitvise SSH Server - InstanceName").
If more than one instance is installed, it must be selected using $cfg.SetInstance. Examples:
# Alternatives to select the default (unnamed) instance $cfg.SetInstance("") $cfg.SetInstance("Bitvise SSH Server") # Alternatives to select the instance named "InstanceName" $cfg.SetInstance("InstanceName") $cfg.SetInstance("Bitvise SSH Server - InstanceName")
Either the short name (the empty string, or "InstanceName") or the long name (prefixed with "Bitvise SSH Server") may be provided.
If only one SSH Server instance is installed, instance selection is not required. The BssCfgManip COM object will automatically use the only installed instance.
Instances can be enumerated using $cfg.instances:
foreach ($instance in $cfg.instances.entries) { Write-Host "Instance: '$($instance.name)', version: $($instance.version)" }
Locking and loading settings
When the BssCfgManip COM object is first instantiated, neither settings nor keypairs are locked or loaded. To modify settings, you must lock and load them as follows:
$cfg.settings.Lock() try { $cfg.settings.Load() # Manipulate settings # ... $cfg.settings.Save() } finally { $cfg.settings.Unlock() }
Similarly, to modify keypairs - lock and load them as follows:
$cfg.keypairs.Lock() try { $cfg.keypairs.Load() # Manipulate keypairs # ... # $true to perform automatic backup; $false to not $cfg.keypairs.Save($true) } finally { $cfg.keypairs.Unlock() }
Master/follower and update settings are stored separately, and must be locked and loaded as follows:
$cfg.instanceSettings.Lock() try { $cfg.instanceSettings.Load() # Manipulate master/follower and update settings # ... $cfg.instanceSettings.Save() } finally { $cfg.instanceSettings.Unlock() }
If you are loading settings or keypairs only to view them; but not change them; it is not necessary to lock them.
Navigating settings
To access server settings, use the property $cfg.settings:
# Load server settings and display the textual log file directory $cfg.settings.Load() Write-Host "Log file directory: $($cfg.settings.server.logging.logFileDir)"
To access master/follower and update settings, use $cfg.instanceSettings:
# Load instance type settings and print the master server's address $cfg.instanceSettings.Load() Write-Host "Master server's address: $($cfg.instanceSettings.follower.host)"
Enumerations
All enumeration values are accessible by name via the BssCfgManip COM object. For example, the following code can be used to set the setting pwCacheAutoSave:
$cfg.settings.access.pwCacheAutoSave = $cfg.enums.pwCacheAutoSave.allAccounts
To list all available values for the pwCacheAutoSave enumeration, use:
$cfg.enums.pwCacheAutoSave
Lists
Every list is represented by a list object with an enumerable .entries property. For example, the list of virtual accounts can be accessed through virtAccounts and virtAccounts.entries. The list object (without .entries) allows manipulation of the list (add, erase, move items). The .entries property (virtAccounts.entries) provides easy, enumerable access to the items.
List object - discard all virtual accounts:
$cfg.settings.access.virtAccounts.Clear()
The .entries property - enumerate virtual accounts:
foreach ($account in $cfg.settings.access.virtAccounts.entries) { Write-Host $account.virtAccount }
Adding new accounts and groups
Accounts and groups are stored by the SSH Server in lists. Some of the fields in each list entry are the entry's sort key; when you use the help property, these fields are displayed with a ">" prefix. Other fields in each list entry may have a unique constraint; such fields will be marked with a "!" prefix in the result of help. For example, virtual accounts are sorted according to the value of their virtAccount field (">" prefix). On the other hand, values of the groupType, winDomain and group properties in Windows group settings entries must be unique ("!" prefix).
New account and group entries are added in two steps:
The entry is initialized with the new settings it will contain. In this step, it is accessed using the new property of the list object. For example:
$cfg.settings.access.winAccounts.new.winAccountType = $cfg.enums.winAccountType.domainAccount $cfg.settings.access.winAccounts.new.winDomain = "DomainName" $cfg.settings.access.winAccounts.new.winAccount = "User" $cfg.settings.access.winAccounts.new.loginAllowed = $cfg.enums.DefaultYesNo.yes $cfg.settings.access.winAccounts.new.xfer.mountPoints.Clear() $cfg.settings.access.winAccounts.new.xfer.mountPoints.new.allowUnlimitedAccess = $false $cfg.settings.access.winAccounts.new.xfer.mountPoints.new.realRootPath = "C:\Sftp\User" $cfg.settings.access.winAccounts.new.xfer.mountPoints.NewCommit() ...
When the initial data for the new list entry is configured, it is committed into the list:
$cfg.settings.access.winAccounts.NewCommit()
This process applies not only to account and group settings entries, but to all settings items stored as lists. In the above example, there is already a second nested example, where a mount point is added to xfer.mountPoints.
Searching and removing list entries
Accounts and groups can be found in lists, and removed from them, by enumerating the lists:
for ($i = 0; $i -lt $cfg.settings.access.winAccounts.count; ) { if ($cfg.settings.access.winAccounts.GetItem($i).winAccount -ieq "User") { $cfg.settings.access.winAccounts.Erase($i) } else { $i++ } }
The above will remove any and all Windows account settings entries whose Windows account name matches "User". For example, it will match and remove a domain account "Domain\User", as well as a local account "User".
Faster search and removal
Accessing COM objects using PowerShell is slow, so list enumeration can take a long time. For faster access, the SSH Server supports the methods FirstWhere, AllWhere, and EraseAll:
The functions FirstWhere return the first list entry which matches the provided expression.
The functions AllWhere return an array of list entries which match the provided expression.
The functions EraseAll remove all list entries which match the provided expression.
Each function comes in 10 versions: for example, FirstWhere and FirstWhere1 to FirstWhere9. The unsuffixed version, FirstWhere, accepts an expression with no variables. The remaining versions are named according to the number of variables accepted by the expression. All expression variables are specified using ? as placeholder. The values must be passed as separate parameters to avoid a security problem comparable to SQL injection.
Examples:
# Erase all Windows account settings entries where Windows account name matches "User" $cfg.settings.access.winAccounts.EraseAll1("winAccount eq ?", "User") # Enumerate virtual accounts without public keys configured foreach ($acct in $cfg.settings.access.virtAccounts.AllWhere("not any auth.keys")) { Write-Host $acct.virtAccount } # Export public keys configured for each virtual account # Also works if changed to enumerate virtAccounts.entries instead of AllWhere # AllWhere is faster if there are many virtual accounts and few have public keys $format = $cfg.enums.PublicKeyFormat.openSsh foreach ($acct in $cfg.settings.access.virtAccounts.AllWhere("any auth.keys")) { foreach ($pubkey in $acct.auth.keys.entries) { $keystr = $pubkey.ExportToBase64String($format) Write-Host "$($acct.virtAccount): $keystr" } }
Expressions passed to FirstWhere, AllWhere and EraseAll functions use the SSH Server's scriptable expression syntax:
Scriptable expression syntax
Scriptable expression syntax
[...] means the inside of square brackets is optional [...]* means zero or more repetitions of an optional part "..." means the quoted text appears literally ... | ... means one of the options { ... } means the inside of curly brackets appears together expression := exprElement | { ["not"] ["("] expression [combiningOp expression]* [")"] } combiningOp := "and" | "or" exprElement := ["not"] { anyExpr | basicExpr | compositeExpr } anyExpr := "any" memberName basicExpr := memberName basicOp value basicOp := "eq" | "ne" | "ge" | "gt" | "le" | "lt" | "startsWith" | "endsWith" compositeExpr := memberName ["not"] compositeOp "(" expression ")" compositeOp := "contains" memberName := path to the member variable, e.g. variable.name value := decimal number, double-quoted string, double-quoted time, or double-quoted date-time
Boolean operators
The SSH Server supports the boolean operators and, or and not. These are used as follows:
(expression) and (expression) (expression) or (expression) not (expression)
Parentheses are optional, but recommended for clarity. The following also works:
expression and expression expression or expression not expression
Comparison operators
The SSH Server supports comparison operators, all of which take the form:
variable.name basicOp value
The value can be a decimal integer; a string in single or double quotes; a boolean literal (true, false); or a date/time.
Comparison operators:
- eq: true if the variable equals the value.
- ne: true if the variable does not equal the value.
- ge: true if the variable is greater than or equal to the value.
- gt: true if the variable is greater than the value.
- le: true if the variable is less than or equal to the value.
- lt: true if the variable is less than the value.
- startsWith: true if the variable starts with a specified string prefix.
- endsWith: true if the variable ends with a specified string suffix.
- contains: true if the variable contains a specified substring.
Operations on strings are case-insensitive using NTFS-like rules. Strings that contain spaces must be quoted. If a string is single-quoted, special characters are not escaped, and the single quote cannot appear in the string. If a string is double-quoted, special characters (", `) must be escaped using the grave accent (`).
Date/time values can be specified in any of the following ISO 8601 or ISO-like formats:
| "HH:MM" | 13:00 |
|---|---|
| "YYYY-MM-DD HH:MM" | "2020-01-01 13:00" |
| "YYYY-MM-DDTHH:MM:SS" | "2020-01-01T13:00:30" |
| "YYYY-MM-DD HH:MM +/-ZONE" | "2020-01-01 13:00 +1000" |
| "YYYY-MM-DDTHH:MM:SS+/-ZONE" | "2020-01-01T13:00:30-2000" |
If a time zone is not specified, local time is assumed.
"any" and "contains"
The any operator tests if a variable is defined:
any variable.name not any variable.name
The contains operator tests if a structure or list contains any member that matches an expression:
variable.name contains (expression) variable.name not contains (expression)
When using the contains operator in this way, parentheses around the expression are required.
Blocking IP addresses
In order to block a large number of IP addresses, you can use PowerShell, or "BssCfg settings importText", to run settings instructions such as these:
$cfg.settings.access.clientAddresses.Clear() $cfg.settings.access.clientAddresses.new.addressRule.addressType = $cfg.enums.AddressVer6Type.ipv4 $cfg.settings.access.clientAddresses.new.addressRule.ipv4 = "10.2.3.4" $cfg.settings.access.clientAddresses.new.instr.allowConnect = $false $cfg.settings.access.clientAddresses.NewCommit() $cfg.settings.access.clientAddresses.new.addressRule.addressType = $cfg.enums.AddressVer6Type.anyIP $cfg.settings.access.clientAddresses.new.instr.allowConnect = $true $cfg.settings.access.clientAddresses.NewCommit()
These instructions will:
- Clear the list of rules in Advanced settings > Access control > Client address rules.
- Add a rule to block connections from the single IPv4 address 10.2.3.4.
- Add a final rule to allow connections from other IP address.
Faster import
The BssCfg command-line utility implements a number of commands to access all aspects of the SSH Server's configuration. Among them are the commands BssCfg settings exportText and importText.
The command settings exportText is roughly equivalent to the following in PowerShell:
$cfg = new-object -com "Bitvise.BssCfg" $cfg.settings.Load() $cfg.settings.Dump()
The result of settings exportText is executable directly as a PowerShell script, and will set SSH Server settings to what they were at the time of export. However, the settings in this format can also be imported using BssCfg settings importText.
The command settings importText imports SSH Server settings in the textual format exported by exportText. The syntax supported by importText is very limited, and does not support most PowerShell language features. The main feature of importText is that it is much faster than direct execution of the same script in PowerShell.
The same fast-import functionality is also available using the COM object. For example:
$textSettings = $cfg.LoadText("C:\Path\To\Settings.txt") $cfg.settings.Import($textSettings)
Or:
$textSettings = $cfg.LoadText("C:\Path\To\InstanceSettings.txt") $cfg.instanceSettings.Import($textSettings)
Example scripts
The following example scripts have been renamed to .txt from their original extensions:
PowerShell: Roll over to a new SSH host key algorithm in two stages: first generate a new host key and export the public key; subsequently employ it.
PowerShell: Import and employ a new FTPS certificate from a .pfx or .p12 file containing a new certificate and private key.
PowerShell: Import a public key into a virtual account settings entry.
PowerShell: Loop through virtual account entries, displaying the virtual filesystem mount points defined by each virtual account settings entry.
PowerShell: Loop through Windows group settings entries, searching for Windows file share entries that use accounts whose passwords have changed, and update such file share entries with new passwords.
PowerShell: Create a virtual account, assign it a password and public key for authentication, configure it with virtual filesystem mount points.
PowerShell: Change a virtual account password for an existing virtual account.
PowerShell: Create a new mount point for an existing virtual account, with non-default mount point permissions.
PowerShell: Read a file with IP addresses and add them to Client address rules.
PowerShell: Create a virtual account with server-configured port forwarding rules in the client-to-server and server-to-client direction.
PowerShell: Locate any DSA keys, both among host keypairs used for server authentication, and public keys imported for client authentication in account and group settings entries.
PowerShell: Rename a virtual group and update virtual accounts that reference it.
PowerShell: Disable virtual accounts that have not logged in for a number of days.
PowerShell: Disable automatic checks for updates.
PowerShell: Disable weak encryption algorithms – those using 3DES and CBC mode – for SSH connections.
PowerShell: Reset file sharing settings for all mount points defined in Windows and virtual group or account settings entries.
PowerShell: Query SSH Server activation information.
VBScript: Load, Update and Apply Settings.
VBScript: Loop through Windows account entries, resetting their mount points so that each account has a single mount point with a real root path set to the value of the "Initial terminal shell directory" for the account.
C#: List virtual accounts, remove a virtual account, or create a virtual account.
You can find the following scripts in your SSH Server installation directory:
VirtAccountExporter.ps1: A PowerShell script that exports virtual account information into a CSV text file.
VirtAccountImporter.ps1: A PowerShell script that imports new virtual accounts from a CSV text file.
These scripts can be used as-is, or modified according to your needs.
Main changes from versions 8.xx
All examples assume the following:
$ErrorActionPreference = "Stop"
Creating the configuration COM object:
# 8.xx: $cfg = new-object -com "BssCfg815.BssCfg815" # 9.xx: $cfg = new-object -com "Bitvise.BssCfg"
Locking and loading settings:
# 8.xx: $cfg.settings.Lock() try { $result = $cfg.settings.Load() if ($result.failure) { Write-Error $result.Describe() } ... } finally { $cfg.settings.Unlock() } # 9.xx: $cfg.settings.Lock() try { $cfg.settings.Load() ... } finally { $cfg.settings.Unlock() }
Changed names and locations of certain items:
# 8.xx: $algId = 6 # $cfg.enums.hostKeyAlgId.ed25519 $cfg.settings.session.sessionTimeout = 120 ... # 9.xx: $algId = 6 # $cfg.enums.KeypairAlgId.ed25519 $cfg.settings.connections.connectionTimeout = 120 ...
Need help?
If you run into any problems or need help with scripted configuration, feel free to contact us. Your questions will help us augment this guide so that solutions to problems can be more readily available.
Older versions
Scriptable configuration in Bitvise SSH Server versions 8.xx
Scriptable configuration in Bitvise SSH Server versions 7.xx
Chapter 1.23
Scriptable log filtering
The SSH Server's baseline logging settings in Advanced settings > Logging allow configuring which events are logged to the Application section of the Windows Event Log, and to the SSH Server's textual log files.
Selecting which event types should be logged does not require scriptable log filtering. Filtering is an advanced feature for administrators who wish to include or exclude events not only based on the event type, but also based on detailed content.
One example is when the SSH Server handles frequent connections from an internal process, as well as connections from external users. The administrator may wish to log activity from external users, but not the many events produced by the internal process.
This feature requires SSH Server version 9.51 or newer.
Log filter processing
For an event to be filtered, it first has to be enabled for logging using baseline logging settings in Advanced settings > Logging.
Events are enabled for logging separately for the Windows Event Log, and for the SSH Server's textual log files. Filtering is applied separately for each destination.
If any filters are configured, each filter is applied to a configurable subset of events. If an event type is enabled to be logged, but no filter is configured to process that event type, events of that type are logged as if no filtering was configured.
Scripting filter conditions
Each configured log filter defines a scripted condition. The SSH Server applies the scripted conditions to events that are about to be logged. The results of one or more configured filters determine if the event will be logged.
To discover the layout of a log event for which you wish to script a condition:
Reproduce the event which you want your condition to process. For example, perform an action which causes the event to be logged.
Find the event in the textual log files recorded by the SSH Server. By default, textual log files can be found in the Logs subdirectory of the SSH Server installation directory.
Example. The event I_SFS_TRANSFER_FILE is an Info-level event which is logged by the SSH Server when a client reads or writes a file, and then closes a file using any file transfer method - SFTP, SCP, FTPS, or BvShell. In the SSH Server's textual log files, events of this type appear like this:
<event seq="84" time="2022-01-30 08:21:16.663977 -0600" app="BvSshServer 9.14" type="Info" name="I_SFS_TRANSFER_FILE" desc="Virtual filesystem: transfer file."> <conn id="1001" winSesId="C1001" service="SSH" remoteAddress="10.1.1.17:55123" windowsAccount="COMPUTER\User" winSes="new"/> <channel type="session" id="1"/> <sfs moduleName="FlowSfsWin" mountPath="/" code="90000" desc="File transfer ended."> <parameters path="C:\Path\UploadExample.txt" timeMs="2" bytesRead="0" bytesWritten="12091" readRangeOffset="0" readRangeLength="0" writeRangeOffset="0" writeRangeLength="12091" createdNewFile="true" resizedFile="false" startSize="0" finalSize="12091" endedBy="Client" download="none" upload="full"/> <help message="File transfer ended by client."/> </sfs> </event>
This event contains the following member variables. All of these can be used in a scripted condition:
seq, time, app, type, name, desc conn.id, conn.winSesId, conn.service, conn.remoteAddress, conn.virtualAccount, conn.windowsAccount, conn.winSes channel.type, channel.id sfs.moduleName, sfs.mountPath, sfs.code, sfs.desc sfs.parameters.path, sfs.parameters.timeMs, sfs.parameters.bytesRead, sfs.parameters.bytesWritten, ..., sfs.parameters.startSize, sfs.parameters.finalSize, sfs.parameters.endedBy, sfs.parameters.download, sfs.parameters.upload sfs.help.message
When a scripted condition is applied to a log event, any sub-expression which attempts to access an element or attribute which is not present will evaluate to false. As long as other sub-expressions access attributes which are present, the condition as a whole can still produce a meaningful result. To control the result when an attribute could be absent, use the operators any and not any.
Log filter conditions use the SSH Server's scriptable expression syntax:
Scriptable expression syntax
Scriptable expression syntax
[...] means the inside of square brackets is optional [...]* means zero or more repetitions of an optional part "..." means the quoted text appears literally ... | ... means one of the options { ... } means the inside of curly brackets appears together expression := exprElement | { ["not"] ["("] expression [combiningOp expression]* [")"] } combiningOp := "and" | "or" exprElement := ["not"] { anyExpr | basicExpr | compositeExpr } anyExpr := "any" memberName basicExpr := memberName basicOp value basicOp := "eq" | "ne" | "ge" | "gt" | "le" | "lt" | "startsWith" | "endsWith" compositeExpr := memberName ["not"] compositeOp "(" expression ")" compositeOp := "contains" memberName := path to the member variable, e.g. variable.name value := decimal number, double-quoted string, double-quoted time, or double-quoted date-time
Boolean operators
The SSH Server supports the boolean operators and, or and not. These are used as follows:
(expression) and (expression) (expression) or (expression) not (expression)
Parentheses are optional, but recommended for clarity. The following also works:
expression and expression expression or expression not expression
Comparison operators
The SSH Server supports comparison operators, all of which take the form:
variable.name basicOp value
The value can be a decimal integer; a string in single or double quotes; a boolean literal (true, false); or a date/time.
Comparison operators:
- eq: true if the variable equals the value.
- ne: true if the variable does not equal the value.
- ge: true if the variable is greater than or equal to the value.
- gt: true if the variable is greater than the value.
- le: true if the variable is less than or equal to the value.
- lt: true if the variable is less than the value.
- startsWith: true if the variable starts with a specified string prefix.
- endsWith: true if the variable ends with a specified string suffix.
- contains: true if the variable contains a specified substring.
Operations on strings are case-insensitive using NTFS-like rules. Strings that contain spaces must be quoted. If a string is single-quoted, special characters are not escaped, and the single quote cannot appear in the string. If a string is double-quoted, special characters (", `) must be escaped using the grave accent (`).
Date/time values can be specified in any of the following ISO 8601 or ISO-like formats:
| "HH:MM" | 13:00 |
|---|---|
| "YYYY-MM-DD HH:MM" | "2020-01-01 13:00" |
| "YYYY-MM-DDTHH:MM:SS" | "2020-01-01T13:00:30" |
| "YYYY-MM-DD HH:MM +/-ZONE" | "2020-01-01 13:00 +1000" |
| "YYYY-MM-DDTHH:MM:SS+/-ZONE" | "2020-01-01T13:00:30-2000" |
If a time zone is not specified, local time is assumed.
"any" and "contains"
The any operator tests if a variable is defined:
any variable.name not any variable.name
The contains operator tests if a structure or list contains any member that matches an expression:
variable.name contains (expression) variable.name not contains (expression)
When using the contains operator in this way, parentheses around the expression are required.
Verifying filter operation
If any events were filtered since the last event was logged, the next event will include a final group element named filteredEvents. This contains the number of events of each type that were filtered since the previous event was logged. The counts are specific for the logging destination: textual log files keep a separate count from the Windows Event Log.
To check if configured log filters are being applied as intended, you can configure your log level for textual log files to Custom events, and enable the following Debug-level event:
D_SERVICE_LOG_EVENT_FILTERED
If enabled, this event is logged instead of every filtered event. This defeats the purpose of log filtering, so it should only be enabled for diagnostics. It is a Debug event so that it won't be automatically enabled if you set the log level to Trace.
If one of your filter conditions contains an error which prevents it from being evaluated, the SSH Server will log the first occurrence using the Warning-level event:
W_SERVICE_LOG_EVENT_FILTER_NOT_EVALUATED
Further occurrences of this event will be suppressed to Info severity. Check the SSH Server's textual log files for both Warning and Info versions of this event.
Chapter 1.24
Interpreting SSH Server Log Files using Microsoft Log Parser
Bitvise SSH Server's textual log files are recorded in a machine processable XML format. It is straightforward to process XML files using any .NET language, but another way to extract information from Bitvise SSH Server log files is using Microsoft Log Parser.
When using MS Log Parser, it is important to use the following parameters:
-fNames:XPath -fMode:Tree
With the -fNames:XPath parameter, field names will appear unambiguously, using the full XPath of the attribute to which they refer. The default setting, "compact", can assign unpredictable field names to attributes used in different types of log entries.
If the SSH Server is running...
If the SSH Server is currently running, then it keeps the most recent log file open for writing. The Log Parser will then refuse to process that log file.
To work around this, you can either stop the SSH Server, or copy the log files to another directory before processing. You can copy the most recent log file as well, even while it is open for writing.
Examples with I_LOGON_AUTH_COMPLETED
A basic command to find out who and when logged onto the server:
LogParser -q -i:XML -fNames:XPath -fMode:Tree "SELECT /log/event/@time, /log/event/conn/@windowsAccount, /log/event/conn/@virtualAccount FROM *.log WHERE /log/event/@name = 'I_LOGON_AUTH_COMPLETED'"
We can shorten the paths using the -rootXPath parameter:
LogParser -q -i:XML -fNames:XPath -fMode:Tree -rootXPath:/log/event "SELECT /event/@time, /event/conn/@windowsAccount, /event/conn/@virtualAccount FROM *.log WHERE /event/@name = 'I_LOGON_AUTH_COMPLETED'"
We can use aliases to clarify output headers:
LogParser -q -i:XML -fNames:XPath -fMode:Tree -rootXPath:/log/event "SELECT /event/@time AS Time, /event/conn/@windowsAccount AS WinAccount, /event/conn/@virtualAccount AS VirtAccount FROM *.log WHERE /event/@name = 'I_LOGON_AUTH_COMPLETED'"
Show only logons to Windows accounts:
LogParser -q -i:XML -fNames:XPath -fMode:Tree -rootXPath:/log/event "SELECT /event/@time AS Time, /event/conn/@windowsAccount AS WinAccount FROM *.log WHERE /event/@name = 'I_LOGON_AUTH_COMPLETED' AND /event/conn/@virtualAccount IS NULL"
Show only logons to virtual accounts - we can use the VirtAccount alias in the WHERE clause to shorten the command:
LogParser -q -i:XML -fNames:XPath -fMode:Tree -rootXPath:/log/event "SELECT /event/@time AS Time, /event/conn/@virtualAccount AS VirtAccount FROM *.log WHERE /event/@name = 'I_LOGON_AUTH_COMPLETED' AND VirtAccount IS NOT NULL"
Show all Windows and virtual logons on a specific date (local time):
LogParser -q -i:XML -fNames:XPath -fMode:Tree -rootXPath:/log/event "SELECT /event/@time AS Time, /event/conn/@windowsAccount AS WinAccount, /event/conn/@virtualAccount AS VirtAccount FROM *.log WHERE /event/@name = 'I_LOGON_AUTH_COMPLETED' AND Time BETWEEN '2022-08-07' AND '2022-08-08'"
Find the first login time for the virtual user "Michele":
LogParser -q -i:XML -fNames:XPath -fMode:Tree -rootXPath:/log/event "SELECT MIN(/event/@time) FROM *.log WHERE /event/@name = 'I_LOGON_AUTH_COMPLETED' AND /event/conn/@virtualAccount LIKE 'Michele'"
Measure the effectiveness of Windows session sharing. Count how many connections created a new Windows logon session, vs. how many connections reused an existing Windows logon session:
LogParser -q -i:XML -fNames:XPath -fMode:Tree -rootXPath:/log/event "SELECT /event/conn/@winSes AS winSes, COUNT(/event/conn/@winSes) FROM *.log WHERE /event/@name = 'I_LOGON_AUTH_COMPLETED' GROUP BY /event/conn/@winSes"
Example with I_SERVICE_CONFIG_DESCRIPTION
Find when the SSH Server first logged settings containing a virtual account named "Michele":
LogParser -q -i:XML -fNames:XPath -fMode:Tree -rootXPath:/log/event "SELECT MIN(/event/@time) FROM *.log WHERE /event/@name = 'I_SERVICE_CONFIG_DESCRIPTION' AND (/event/settings/powerShell#CDATA LIKE '%.new.virtAccount = \"Michele\"%' OR /event/settings/powerShellDiff#CDATA LIKE '%.new.virtAccount = \"Michele\"%')"
If the SSH Server was stopped when the account was created, this will find the first time the SSH Server was started with settings that contained this account.
It is necessary to search both /event/settings/powerShell#CDATA, which is logged when the SSH Server is started, and /event/settings/powerShellDiff#CDATA, which is logged subsequently if settings are changed.
Examples with I_SFS_TRANSFER_FILE
Find out who and when transferred which files:
LogParser -q -i:XML -fNames:XPath -fMode:Tree -rootXPath:/log/event "SELECT /event/@time AS Time, /event/conn/@windowsAccount AS WinAccount, /event/conn/@virtualAccount AS VirtAccount, /event/sfs/parameters/@path AS Path, /event/sfs/parameters/@bytesWritten AS BytesWritten, /event/sfs/parameters/@bytesRead AS BytesRead FROM *.log WHERE /event/@name = 'I_SFS_TRANSFER_FILE'"
Limit the above query to files that have only been written:
LogParser -q -i:XML -fNames:XPath -fMode:Tree -rootXPath:/log/event "SELECT /event/@time AS Time, /event/conn/@windowsAccount AS WinAccount, /event/conn/@virtualAccount AS VirtAccount, /event/sfs/parameters/@path AS Path, /event/sfs/parameters/@bytesWritten AS BytesWritten, /event/sfs/parameters/@bytesRead AS BytesRead FROM *.log WHERE /event/@name = 'I_SFS_TRANSFER_FILE' AND BytesWritten <> 0"
Find out who removed which '*.docx' or '*.doc' files (case-insensitive) on August 7, 2022, between 2 pm and 7:30 pm (local time):
LogParser -q -i:XML -fNames:XPath -fMode:Tree -rootXPath:/log/event "SELECT /event/conn/@windowsAccount AS WinAccount, /event/conn/@virtualAccount AS VirtAccount, /event/sfs/parameters/@path AS Path FROM *.log WHERE /event/@name = 'I_SFS_REMOVE_FILE' AND /event/@time BETWEEN '2022-08-07 14:00' AND '2022-08-07 19:30' AND (Path LIKE '%.docx' OR Path LIKE '%.doc')"
Events and IP addresses
Enumerate all distinct IP addresses from which authenticated users have connected:
LogParser -q -i:XML -fNames:XPath -fMode:Tree -rootXPath:/log/event "SELECT DISTINCT /event/conn/@remoteAddr AS RemoteAddr, /event/conn/@windowsAccount AS WinAccount, /event/conn/@virtualAccount AS VirtAccount FROM *.log WHERE /event/@name = 'I_LOGON_AUTH_COMPLETED'"
In SSH Server versions before 9.51, the client IP address appears in the same attribute with the client-side port number, and the attribute is named remoteAddress. In that case, use the following syntax instead of /event/conn/@remoteAddr:
If the log file contains IPv4 addresses only:
EXTRACT_PREFIX(/event/conn/@remoteAddress, 0, ':')
If the log file can also contain IPv6 addresses:
SUBSTR(/event/conn/@remoteAddress, 0, LAST_INDEX_OF(/event/conn/@remoteAddress, ':'))
List the times, connection IDs and names of events from a set of remote IP addresses:
LogParser -q -i:XML -fNames:XPath -fMode:Tree -rootXPath:/log/event "SELECT /event/@time AS Time, /event/conn/@id as Id, /event/conn/@remoteAddr AS RemoteAddr, /event/@name as Event from '*.log' where /event/conn/@remoteAddr in ('10.1.1.7'; '192.168.1.3'; '127.0.0.1')"
Enumerate the times and IP addresses of logons for a virtual user named "Michele". Use LIKE to match the username without case sensitivity:
LogParser -q -i:XML -fNames:XPath -fMode:Tree -rootXPath:/log/event "SELECT /event/@time AS Time, /event/conn/@remoteAddress AS RemoteAddress FROM *.log WHERE /event/@name = 'I_LOGON_AUTH_COMPLETED' AND /event/conn/@virtualAccount LIKE 'Michele'"
Enumerate distinct IP addresses from which the virtual user "Michele" has connected:
LogParser -q -i:XML -fNames:XPath -fMode:Tree -rootXPath:/log/event "SELECT DISTINCT /event/conn/@remoteAddr AS RemoteAddr FROM *.log WHERE /event/@name = 'I_LOGON_AUTH_COMPLETED' AND /event/conn/@virtualAccount LIKE 'Michele'"
Enumerate the times and IP addresses of all logons for virtual users whose name starts with "M" or "m":
LogParser -q -i:XML -fNames:XPath -fMode:Tree -rootXPath:/log/event "SELECT /event/@time AS Time, /event/conn/@remoteAddress AS RemoteAddress, /event/conn/@virtualAccount AS VirtAccount FROM *.log WHERE /event/@name = 'I_LOGON_AUTH_COMPLETED' AND VirtAccount LIKE 'M%'"
Events sorted by connection ID
Show events and IP addresses ordered by connection ID first, and then timestamp:
LogParser -q -i:XML -fNames:XPath -fMode:Tree -rootXPath:/log/event "SELECT /event/conn/@id AS Id, SUBSTR(/event/@time, 11, 11) AS Time, /event/conn/@remoteAddr AS RemoteAddr, /event/@name AS Event FROM '*.log' ORDER BY Id, Time"
Events for a specific account
List the times, connection IDs and names of events associated with a specific Windows account. This will not include events about the start of a connection, since the user is not yet authenticated at that time:
LogParser -q -i:XML -fNames:XPath -fMode:Tree -rootXPath:/log/event "SELECT /event/@time AS Time, /event/conn/@id as Id, /event/conn/@remoteAddr AS RemoteAddr, /event/@name as Event from '*.log' where /event/conn/@windowsAccount like 'DOMAIN\\User'"
Extracting negotiated algorithms
If your settings still enable SSH algorithms which are no longer recommended for use, you can check if any clients are using those algorithms before you disable them. The following example extracts information about SSH algorithms negotiated by any client in available log files:
LogParser -q -i:XML -fNames:XPath -fMode:Tree -rootXPath:/log/event "SELECT /event/@time as Time, /event/conn/@id as Id, /event/conn/@remoteAddress as RemoteAddr, /event/parameters/@kexAlg as KexAlg, /event/parameters/@hostKeyAlg as HostKeyAlg, /event/parameters/@cipherAlgIn as CipherAlgIn, /event/parameters/@cipherAlgOut as CipherAlgOut, /event/parameters/@macAlgIn as MacAlgIn, /event/parameters/@macAlgOut as MacAlgOut FROM *.log WHERE /event/@name='I_SSH_KEY_EXCHANGE_ALGORITHMS'"
For several algorithms, Bitvise software logs friendly names because some of the technical names are unintuitive or verbose. The algorithm "ssh-rsa" is recorded as either "RSA" or "RSA/sha1", depending on whether it's used as a public key format or a signature algorithm. The algorithms "rsa-sha2-256" and "rsa-sha2-512" are recorded as "RSA/sha2-256" and "RSA/sha2-512".
If you are processing log files generated by older SSH Server versions, the query requires some adaptations. For log files generated by versions 8.xx, replace /event/conn with /event/session, and I_SSH_KEY_EXCHANGE_ALGORITHMS with I_SESSION_KEY_EXCHANGE_ALGORITHMS:
LogParser -q -i:XML -fNames:XPath -fMode:Tree -rootXPath:/log/event "SELECT /event/@time as Time, /event/session/@id as Id, /event/session/@remoteAddress as RemoteAddr, /event/parameters/@kexAlg as KexAlg, /event/parameters/@hostKeyAlg as HostKeyAlg, /event/parameters/@cipherAlgIn as CipherAlgIn, /event/parameters/@cipherAlgOut as CipherAlgOut, /event/parameters/@macAlgIn as MacAlgIn, /event/parameters/@macAlgOut as MacAlgOut FROM *.log WHERE /event/@name='I_SESSION_KEY_EXCHANGE_ALGORITHMS'"
If you enabled support for FTPS, the following example extracts information about the TLS protocol and cipher suite negotiated by FTPS clients:
LogParser -q -i:XML -fNames:XPath -fMode:Tree -rootXPath:/log/event "SELECT /event/@time as Time, /event/conn/@id as Id, /event/conn/@remoteAddress as RemoteAddr, /event/parameters/@protocol as Protocol, /event/parameters/@cipherSuite as CipherSuite FROM *.log WHERE /event/@name='I_FTP_CONTROL_TLS_NEGOTIATED'"
Processing statistics files
In addition to log files, the SSH Server maintains usage statistics in XML format. These are stored in the Stats subdirectory of the SSH Server installation directory. Statistics files can also be processed using MS Log parser. For example:
LogParser -q -i:XML -fNames:XPath -q -fMode:Tree "SELECT DISTINCT /stats/@type, /stats/@account, /stats/info/@lastLogin FROM *.xml"
This will display the last login time for each virtual and Windows account recorded in SSH Server statistics.
More Information
For more information on the Log Parser's SQL SELECT statement, execute:
LogParser -h GRAMMAR
We also suggest checking out the -o:DATAGRID output format.
Chapter 1.25
Virtual filesystem providers
Bitvise SSH Server supports pluggable filesystem providers. Third parties can implement custom providers to support any type of backing store for files accessed via SFTP, SCP or FTPS. Possibilities include file transfer access to files contained in a database; or a bridge that permits SFTP, SCP and FTPS access to files hosted on another server.
Third-party providers can be mounted concurrently with the SSH server's built-in providers. SSH and FTPS users can be configured to access the Windows filesystem, and your own virtual filesystem provider, concurrently.
A virtual filesystem provider needs to be implemented as a native Windows DLL with a C-style interface. There are no licensing or royalty fees.
To get started, download our Virtual Filesystem Provider Development Kit. An example provider is included.
SSH Server Control Panel protocol
Third party programs can interact with Bitvise SSH Server using the same protocol used by the SSH Server Control Panel, and can obtain the same information from the SSH Server that the SSH Server Control Panel displays. Look for BssStat.exe and BssStat.cpp in your SSH Server installation directory for an example command line program that implements the protocol, and its full source code.
Chapter 1.26
Useful resources and utilities
Log analysis. Bitvise SSH Server records extensive textual log files in a machine-processable XML format. We recommend Microsoft Log Parser for analyzing the log files and extracting information you require. See also Interpreting SSH Server Log Files using Microsoft Log Parser.
Command-line utilities. The following is a list of command-line utilities which will likely be useful to Bitvise SSH Server users, along with short descriptions and links to documentation and/or source. If there is a utility you feel should be added to this list, let us know.
BvRun. Included with Bitvise SSH Server. Executes a process in a custom manner. In particular, allows an SSH user to run a process so that it will not be terminated when the SSH session terminates using the -brj parameter. (This requires the 'allow job breakaway' feature to be enabled in SSH server settings.) Execute 'bvRun /?' from your SSH server directory for help.
BvPwd. Included with Bitvise SSH Server. Allows a user to change their Windows password from a Command Prompt, in case they are using an SSH client that does not support password change. Execute 'bvPwd /?' from your SSH server directory for help.
BssStat. Included with Bitvise SSH Server. Displays SSH sessions currently connected to the SSH server, as well as their tunnelled TCP/IP connections. Also included is C++ source code which demonstrates obtaining this information programmatically. Execute 'BssStat' from your SSH server directory for help.
NetStat. Included with Windows. Run 'netstat -ano' for a list of active TCP/IP connections and listening ports, including PIDs of the processes using them. Valuable in diagnosing networking issues.
SchTasks. Included with Windows. This command allows Cron-like scheduling of tasks from the Windows command line. Documentation can be found in Microsoft's Command-Line Reference.
There are other useful utilities already present in Windows, or among the Windows Support Tools (available for installation as a Windows feature) or Resource Kit Tools (separate download for Windows Server 2003).
Resources:
- Microsoft's Getting Started with Windows PowerShell.
- Microsoft's Command-Line Reference documents the command-line utilities available in Windows.
- Instructions for writing Windows batch files (command line shell scripts executed by Cmd.exe), a useful skill for any Windows server administrator - particularly when managing machines remotely via SSH and SFTP.
Part 2. Tutorials
Chapter 2.1
Frequently Asked Questions about Bitvise SSH Server
As an administrator of Bitvise SSH Server, you should first become comfortable with the SSH server's log files. Bitvise SSH Server writes warnings and errors into the Application section of the Windows Event Log, but it also writes more detailed information to textual log files. These are located by default in the 'Logs' subdirectory of the SSH server installation directory.
Whenever you have a problem, the SSH server log files are the first place you should look.
- Personal Edition
- Configuring and Running
- Terminal Shell
- File Transfer
- Automated Actions After File Transfers
- Public Key Authentication
- Account Settings
- Usage Issues and Operation Concerns
- Upgrading and Moving
- Contacting Support
Personal Edition
Q000. Where do I get an activation code for personal use?
No activation code is needed to use Bitvise SSH Server for personal use. If your Bitvise SSH Server Control Panel is saying that there is an evaluation period, this means that you installed the product as the Standard Edition. In this case, you need to uninstall Bitvise SSH Server, re-install it again, and choose the Personal Edition this time.
Note that Bitvise SSH Server may be installed in the Personal Edition only by genuine, non-commercial personal users who are not using the SSH server as part of a commercial endeavor, and are not using it in an organization, whether commercial or otherwise. All commercial or organizational use requires a purchased license.
Q020. What are the limitations of the Personal Edition?
The Bitvise SSH Server Personal Edition:
- On domain member computers, can use only local Windows accounts. On a domain controller, can use domain accounts of that domain controller.
- Can configure only one Windows group (Everyone).
- Can configure only one virtual group.
- Has a limit of 10 Windows account entries.
- Has a limit of 10 virtual account entries.
- Has a limit of 15 concurrent connections from non-administrators.
- GSSAPI authentication is disabled (Kerberos and NTLM).
If you are deciding whether to use the Personal or Standard Edition – in most cases, this is not a technical decision. All organizations, as well as personal users who do not qualify as non-commercial, must purchase a license for the Standard Edition. The Personal Edition is available only for users who are both personal and non-commercial, and are therefore likely to be unaffected by the above limitations.
Configuring and Running
Q075. When I try to run the SSH Server or Client installer, nothing happens. How do I start it?
Depending on your Windows version, security settings, and how the installer was downloaded, you may need to take an extra step to start it. On Windows Server 2016, right-click the installer executable in Windows Explorer, click Properties, and see if you need to check Unblock on the General tab.
Q090. The SSH Server or Client installer warns me that the "installation directory is insecure". Why is it insecure, and what can I do about it?
This can happen if you created a custom parent directory such as D:\Programs into which you are installing Bitvise software, but you have not taken care to configure Windows filesystem permissions on that directory.
Bitvise software generally runs with high privileges. The SSH Server runs as Local System or equivalent, and the SSH Client can be run by administrators.
This means that any other user on the system who is able to rename a Bitvise software installation directory, or to rename or modify files it contains, can use this limited access to give themselves complete administrative access to the system.
Recent versions of our software will warn about this situation, and will do so even if the system does not currently have any non-administrative users. If the filesystem permissions are not fixed, a problem can still arise if non-administrative accounts are added later.
To fix this problem, you must set up Windows filesystem permissions on the parent directory into which you are installing Bitvise software. For example, if you are installing under D:\Programs, you must ensure that only administrators have the right to rename or modify files and subdirectories under this location.
This is achieved by configuring permissions using Windows File Explorer. If you are unfamiliar with Windows permissions, we suggest installing into a standard location such as C:\Program Files or C:\Program Files (x86). Filesystem permissions on these directories are configured properly by default by Windows.
Q100. After I install Bitvise SSH Server, what do I need to configure before I can start using it?
For a basic, open setup, just start Bitvise SSH Server and it will work. Use one of your existing Windows account names and passwords to log on. For a basic usage case, where you want to use the SSH server for remote administration, the default server settings do not need to be changed. The one exception is the Open Windows Firewall Setting, described in Q103.
After you have established a successful connection, consider locking down your settings to prevent SSH access to Windows accounts and features that you do not want to be accessible over SSH. See the page Securing Bitvise SSH Server for more information.
Q101. Can the SSH Server be configured by a user who does not have full administrative rights?
The SSH Server is configured primarily by a user who is a member of the Administrators group on the computer where the SSH Server is running. The SSH Server also supports a delegated administration feature where aspects of SSH Server settings can be configured by a user who does not need administrative rights.
Delegated administration can be set up as follows:
Use Advanced settings to configure one or more accounts so they can connect to the SSH Server and use the delegated administration feature. This can be configured either for an individual user in their account settings entry, or in a group settings entry as a default for multiple users. The settings can be found under Remote administration access.
Use a recent Bitvise SSH Client version to connect to the SSH Server using an account that can use delegated administration. Once connected, use the SSH Server Control Panel button in the SSH Client. This will open a delegated administration interface which allows the user to perform administrative tasks within limits configured by a full administrator.
The delegated administration interface permits access to a subset of SSH Server settings. If you would like specific functionality to be configurable using this interface, and it is not, please contact us to describe the situation.
Q103. I can connect to Bitvise SSH Server from the local network, but not from the internet.
To help prevent inadvertently exposing your SSH server to the internet before it has been properly configured, Bitvise SSH Server will not open its ports to the internet by default. When you are ready to open your server to internet connections, go to Easy SSH server settings, and change the setting Open Windows Firewall to Open port(s) to any computer. If your Windows Firewall is disabled, or if you prefer to manage it manually, change this setting to Do not change Windows Firewall settings.
If you still cannot connect from the internet after making this change, make sure that your router is properly configured to forward SSH connections to the SSH server. You can configure the router directly through its administrative interface, or if the router can be managed using Universal Plug and Play, you can set Bitvise SSH Server to configure it. To let the SSH server manage the router, enable Automatically configure router (requires UPnP) in Easy SSH server settings.
If the SSH Server is installed on a cloud instance, such as Amazon EC2 or Azure, ensure also that security settings which apply to the cloud instance (e.g. the security group in Amazon EC2) allow connections to the instance and port on which the SSH Server is accepting connections.
Q110. How do I log in to a Windows domain account?
It is best practice to specify the username in either the domain - backslash - account format; for example, "COMPANY\John"; or with a fully qualified name; for example, "john@company.com".
It is possible to log into a domain account by providing only the account name, e.g. "John". In this case, authentication outcome may be undependable if Windows finds multiple matches. For example, there may be a local account named "John", a domain account named "DOMAIN\John", and another one named "OTHER\John". You can control the outcome in such circumstances by configuring the Windows domain order setting in Advanced SSH Server settings.
Users can also log in using Unix realm accounts if they are in a trust relationship with the server's domain. Such users must always provide the fully qualified Unix realm account name, because Windows cannot look up Unix realm usernames.
Q120. What client software can I use to connect to Bitvise SSH Server?
You can use any client program that supports SSH, as long as it implements SSH version 2 - the newer and secure version of the protocol. There are multiple types of SSH clients, including terminal session clients, file transfer clients, port forwarding clients, command execution clients, and they come in all sorts of combinations. If your client machine runs Windows, you can use Bitvise SSH Client for most purposes. Our SSH client offers an excellent terminal console, graphical file transfer, dynamic and manual port forwarding, as well as scriptable command-line clients and an FTP-to-SFTP bridge. Also available for Windows is PuTTY, which includes SSH file transfer programs 'pscp' and 'psftp'. On Unix platforms, the OpenSSH package is freely available and provides the 'ssh' program for terminal sessions and port forwarding, as well as 'scp' and 'sftp' for file transfers.
Q130. My Bitvise SSH Server logs show an error like 'Failed to bind listening socket', and I cannot connect to the server.
Such an error indicates that another application is already listening on the port you have configured for Bitvise SSH Server. The default port is 22, and this port is used as default by all SSH servers. It is likely that you already have another SSH server running on your machine, and that it is occupying port 22. You either need to shutdown the other SSH server, or configure Bitvise SSH Server to listen on a different port.
Q140. I can only log in with an administrator account - attempting to log in with a regular account fails.
There are two most common causes.
- You are trying to log in with an account configured in Bitvise SSH Server to use the 'interactive' logon type, but this account does not have the Windows permission to log on locally. On domain controllers, this permission is not granted to regular users by default and must be enabled in the Domain Controller Security Policy.
- You have successfully logged in with an account configured in Bitvise SSH Server to use the 'network' logon type, or you logged in using GSSAPI (Kerberos or NTLM) authentication, but starting the terminal shell failed with an Access Denied error. This is because default filesystem permissions on Windows 2003 servers grant access to cmd.exe and other command line tools only to 'interactive' users. Switch this user or group in Bitvise SSH Server to use the 'interactive' logon type, or modify filesystem permissions for cmd.exe and other command-line tools to allow execution by users logged in with the 'network' logon type.
For more information, please read the Network vs. interactive logon section in the Bitvise SSH Server Users' Guide.
Q145. The SSH Server sometimes terminates client connections with "Locked out due to too many failed login attempts." If I restart the SSH Server, the issue is fixed for a while. Why does this happen?
You have a client that's trying to connect to the SSH Server with invalid credentials, most likely using an incorrect username or password. To protect against password guessing and related attacks, the SSH Server is configured by default to automatically block IP addresses that initiate many such connections.
If IP addresses have been automatically blocked, you can unblock them using the Manage blocked IPs interface. This can be accessed on the Connections tab of the SSH Server Control Panel.
If this feature is causing legitimate clients to be blocked, we can recommend the following changes:
If it's an important client IP address that should never be blocked, open Advanced settings in the SSH Server Control Panel, and add this address to IP blocking > IP blocking - whitelist. Note: this will not allow the address to log in if it is prohibited to connect via Access control > Client IP address rules. It will only prevent the SSH Server from automatically blocking the IP address.
Ideally, a client should not initiate login attempts that cause it to be locked out. We recommend investigating the SSH Server's textual log files to see what login attempts the client is sending that cause it to be locked out. You can find the SSH Server's textual log files via Open log folder viewer on the Server tab of the SSH Server Control Panel. Once the nature of the problem login attempts is understood (e.g. an incorrect password), the configuration of the client should be fixed so it will no longer send login attempts that result in penalties.
Finally, you can also change the thresholds for automatic IP blocking, or disable the feature altogether. This can be done in Advanced settings, under IP blocking.
Q150. I'm trying to get some SSH client to work with Bitvise SSH Server. However, the session gets terminated immediately after connecting, and the SSH server logs tell me: 'Unable to create child process: Access is denied.' What is going on?
In order to provide SFTP, SCP, terminal shell, or exec request functionality, Bitvise SSH Server must have permission from Windows to execute a child process in the name of the user. You have probably configured your machine in such a way that, when the user logs in and the SSH server starts impersonating that user, the server loses permission to execute the necessary child processes. In order to use Bitvise SSH Server, you must configure your machine so that the remote user will be able to run executables in the SSH server installation directory; plus, of course, whatever programs you want the user to be able to execute, such as the terminal shell - 'cmd.exe'. Read and execute access is also required to the dynamic load libraries that programs use - in particular, system libraries which reside in the \Windows and \Windows\System32 directories.
Q170. An SSH client hangs for no apparent reason when connecting to Bitvise SSH Server, and then the session breaks due to an authentication timeout.
If the SSH client is set up to try Kerberos authentication, but Kerberos isn't available between the client and the server, the client might hang when it tries to unsuccessfully get Kerberos credentials.
To rectify this behavior, you can disable GSSAPI (Kerberos) either in the SSH client, or in the SSH Server.
If you prefer to disable GSSAPI authentication in the SSH Server, you can do so either globally or for a specific make of client:
To disable GSSAPI globally, find the settings Kerberos 5 authentication and NTLM authentication on the Access control page of Advanced settings, and set them both to Disabled. Disabling both methods will disable GSSAPI authentication for all users.
To disable GSSAPI for specific client software, find the section Client version rules under Access control in Advanced settings. You will need to either find an existing rule or define a new one for the affected client software. In the client version rule, disable the setting Allow GSSAPI authentication. This setting is available in SSH Server versions 8.xx and higher.
If you disable GSSAPI on the server, the server won't advertise GSSAPI (either to this client or globally), and the client won't shoot itself in the foot trying to get Kerberos credentials.
Q175. Kerberos authentication works using Bitvise SSH Client and PuTTY, but it does not work using an OpenSSH client.
A number of OpenSSH clients are misconfigured to try Kerberos authentication even when they can't obtain credentials. If the SSH Server advertises GSSAPI support to these clients, the clients incur a long delay trying to get Kerberos credentials, even when the user does not intend to use Kerberos. This causes connections to fail in a way that isn't understandable for users.
For this reason, Bitvise SSH Server versions 8.xx and higher disable GSSAPI authentication for OpenSSH clients by default. However, it can be enabled.
To enable Kerberos authentication for OpenSSH clients, find the section Client version rules under Access control in Advanced SSH Server settings. Find the client version rule for OpenSSH. In this rule, enable the setting Allow GSSAPI authentication.
Q180. How do I configure two-factor authentication (2FA, MFA) using a time-based one-time password (TOTP)?
The SSH Server supports time-based one-time passwords compatible with RFC 6238 authenticator apps, including Microsoft Authenticator, Google Authenticator, LastPass, Authy, WinAuth, or FreeOTP.
Configuring TOTP is straightforward:
- In Advanced settings, open the user's Windows or virtual account settings entry.
- In the account settings entry, navigate to Authentication > Time-based one-time password.
- Configure the setting Time-based OTP authentication to Required.
- Click the link Secret key to open the TOTP secret key management interface.
- Click Generate to generate a secret key, then Copy key to copy it to clipboard.
- Alternately, you can click Export as image to export a 2D image that many authenticator apps can read. You can also use Show 2D code to show the image, which a mobile authenticator app can immediately scan.
- Close and save SSH Server settings.
- In your chosen authenticator app, either scan the 2D image that contains the secret key, or enter the secret key manually.
That's it. Fundamentally, all you need to do is use the account settings entry to set TOTP to Required, and set up the same secret key in the account settings entry and in the authenticator app.
The SSH Server supports other TOTP-related settings which you can change. Those settings are only for advanced users and should not be changed in most circumstances. If you changed such settings without understanding the impact, reset them to defaults.
Q190. I would like to provide a user with access only to port forwarding, but the client disconnects unless I also allow terminal shell access.
Most clients can be configured to not require a terminal shell when using port forwarding:
- If using OpenSSH, use the -T parameter ("Disable pseudo-tty allocation").
- If using plink (part of PuTTY), use the -N parameter ("don't start a shell/command").
- If using the graphical PuTTY client, enable Connection > SSH > Don't start a shell or command at all.
If using Bitvise SSH Client, the session won't be disconnected if a terminal window can't be opened, in the first place. However, if terminal shell and/or SFTP access are not available, you may want to disable the automatic opening of a terminal shell and/or SFTP window. This is configured under Options > On Login.
Terminal Shell
Q160. I'm trying to use PowerShell in a terminal session using the 'dumb' terminal type. It doesn't display a command prompt.
From Windows PowerShell Cookbook:
When PowerShell detects that its input or output streams have been redirected, it suppresses any prompts that it might normally display. If you want to host an interactive PowerShell prompt inside another application (such as Emacs), use "-" as the argument for the -File parameter. In many shells, this implies "taken from standard input."
powershell -File -
Q180. Can I set up Bitvise SSH Server to use a different terminal shell, such as Windows PowerShell, or a Unix-style shell such as Bash?
Certainly. The Shell access type setting can be configured either in Easy settings or Advanced settings. In Advanced settings, the setting can be found in the account or group settings entry, under Terminal and exec requests.
To use a terminal shell that doesn't come with Windows, such as Bash, you will need to install it. You can obtain Bash from a variety of sources, such as Cygwin.
For Windows PowerShell, see also Question 160.
Q185. How do I use the terminal shell or an exec request to run a process that should continue to run when the SSH session exits?
By default, all child processes of a terminal shell or exec request are terminated by the SSH Server when the SSH session exits, unless you take extra steps to launch a process outside of the session's job object. The following are some of the ways:
You can launch the process using Windows Task Scheduler. To do this, first use the Task Scheduler to configure a task that you can run by name. Then run the task from the SSH session using:
schtasks /run /tn NameOfTask
If the task runs a PowerShell script or batch file, you can also change the contents of the script file on demand, to correspond to what you want to run.
You can directly start a process to run outside of the SSH session job:
Enable the setting Allow job breakaway in Advanced SSH Server settings. This setting can be configured either in an account settings entry for an individual account, or in a group settings entry as a default for multiple users. The location of this setting is as shown in this screenshot. If the user's shell access type is configured to Command Prompt or PowerShell, this setting is enabled by default.
Within a terminal shell or exec request, use the BvRun utility in the SSH Server's installation directory using the -brj parameter to launch a child process outside of the session job. In addition, if you're launching a console program, use either -new or -det to run it in a new console or a detached console, otherwise the process will close when the console window closes. Example screenshot.
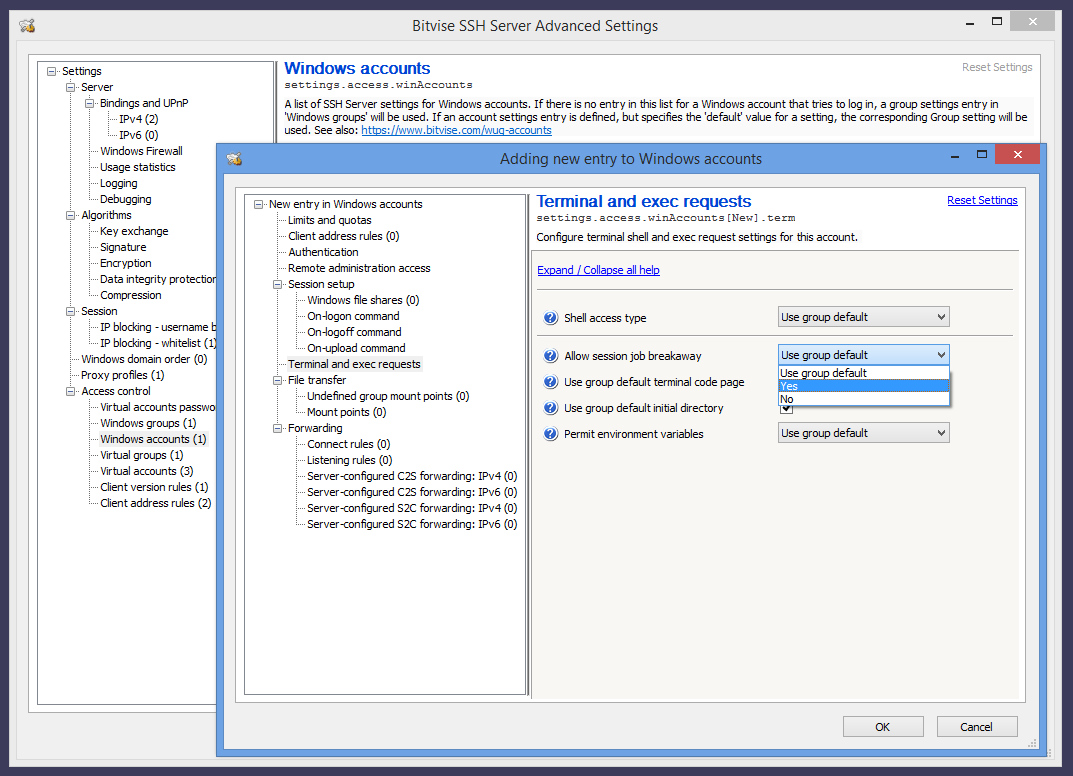
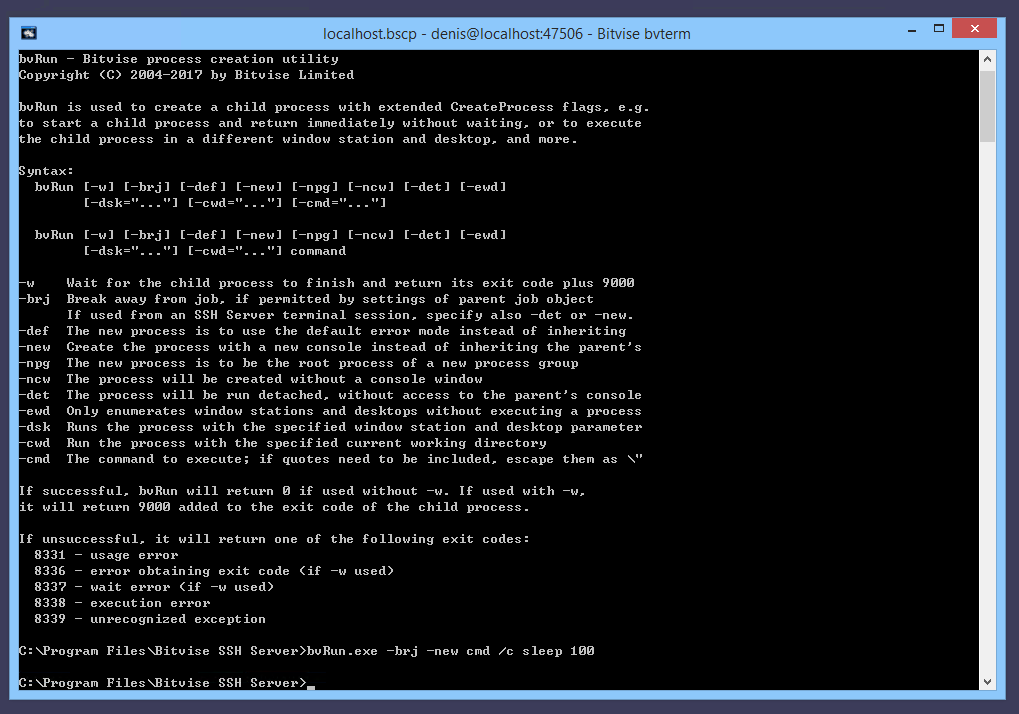
Q187. How can I use SSH to start a program so it displays on the server's interactive desktop?
The easiest way to do this is using the Windows Task Scheduler. First, use the Task Scheduler to configure a task that you can run by name. Then run the task from the SSH session using:
schtasks /run /tn NameOfTask
If the task runs a PowerShell script or batch file, you can also change the contents of the script file on demand, to correspond to what you want to run.
Q195. I'm using the Command Prompt shell access type. When I send an exec request that chains commands using &&, the "cd" command does not appear to be effective.
If you are executing a command like this:
ssh user@host cmd /c 'cd C:\Path && echo e > tmp.txt'
... and if the SSH Server is configured to use the Command Prompt shell access type, it will automatically prepend an additional cmd.exe /c, so that the full command executed is this:
<event seq=... time=... app="BvSshServer 7.44" name="I_EXECS_COMMAND_EXECUTED" desc="Command executed."> <session id=... service="SSH" remoteAddress=... windowsAccount=.../> <channel type="session" id="1"/> <parameters command="cmd.exe /c cmd /c cd C:\Path && echo e > tmp.txt" initDir=... execRequest="cmd /c cd C:\Path && echo e > tmp.txt"/> </event>
In this case, the outer cmd.exe will interpret the && echo part, whereas the inner cmd.exe will interpret the cd C:\Path part. As a result, cd will not take effect for the outer command.
To fix this, omit the extra cmd /c prefix in your command:
ssh user@host 'cd C:\Path && echo e > tmp.txt'
Q197. Our security software is detecting events such as "toterms.exe created a remote thread in the context of conhost.exe". Is the SSH Server intended to run a process such as "conhost.exe 0xffffffff -ForceV1"?
"toterms" is the SSH Server's terminal subsystem. The terminal subsystem is launched if an SSH user is permitted to open an interactive terminal shell window using any of the available Shell access types. This includes BvShell, PowerShell, or the Windows Command Prompt.
The SSH Server's terminal subsystem uses low-level techniques to capture Windows console output and translate it into escape sequences for the terminal client. This functionality allows the SSH Server to render Windows console output accurately.
As of 2024, detection techniques in security software have increased in sensitivity, so that they now trigger alerts about this functionality. The functionality has been in place since SSH Server versions 5.xx released in 2008, with improvements implemented over time.
Bitvise is not aware of a simpler approach which could deliver a similar quality of terminal output for a wide variety of Windows console applications. It is possible to configure the SSH Server to simply pass through the stdin, stdout and stderr streams for console applications. However, this only works with software that outputs its own terminal escape sequences, and is able to handle escape sequences from the client.
File Transfer
Q210. When users log in, they can see all drives on my server. How do I limit them to a certain directory?
If using Easy settings, you will need to use the Virtual filesystem layout setting under a Windows or virtual account settings entry. Configure this setting to Limit to root directory, and then configure the Root directory. Alternately, select Advanced filesystem layout, and you can configure multiple directories.
If using Advanced settings, this feature is configurable either per-account or per-group. When editing account or group settings, click Virtual filesystem layout in the configuration tree on the left side of the account or group settings window. Edit Mount Points, and change the 'Real root path' setting for the default mount point (virtual mount path "/") to the directory you want the user to be able to access. The user or users will now be able to see only files and subdirectories in that folder.
If configuring mount points via Advanced settings for a specific account, note that the setting Inherit group mount points is enabled by default. Leaving this enabled will inherit a default mount point ("/") from group settings which allows full filesystem access unless it's redefined or undefined in the account settings entry.
If you want the user to be able to access multiple directories in independent locations, add additional mount points.
Note that the virtual filesystem limits will affect only users who log in using SFTP, SCP, or terminal shell using BvShell. Users who are allowed to use an external shell, such as PowerShell or the Command Prompt, will be able to use this shell to access the entire filesystem, limited by their Windows filesystem permissions.
If you want users to only have file transfer access, you should configure their Shell access type to either BvShell or No shell access. See also Securing Bitvise SSH Server.
Q215. File transfer users are able to upload and download files, but cannot delete them. What permission am I missing?
When a client logs into the SSH Server via SFTP, SCP or FTPS, the client's access is controlled by two things:
Permissions configured for the mount point in SSH Server settings. If you configure a mount point, then by default, all permissions are granted on files and directories within the configured Real root path.
Windows filesystem permissions. These are checked independently of SSH Server permissions, and must also be granted in order to access files.
If you log into the SSH Server with a Windows account, then the filesystem permissions that apply are those for the Windows account you used to log in.
If you log into the SSH Server with a virtual account, then the SSH Server will use a Windows account to provide a security context for the session. By default, this is a local account named BvSsh_VirtualUsers, which is created and managed by the SSH Server. See also Security architecture.
Whichever Windows account the session is running as, that account needs to be granted Windows filesystem permissions to access files and directories under the Real root path, in order for the session to be able to access them.
Windows filesystem permissions are configured using the Windows File Explorer. Select and then right click on a file or directory, and select Properties > Security.
Q217. Can I use Windows EFS encryption for files accessed via the SSH Server?
Yes, with important considerations.
For Windows accounts that use password authentication, there are no obstacles.
For Windows accounts that use public key authentication, see Q340. The Windows account password needs to be configured in the SSH Server's password cache.
For virtual accounts, only use EFS if you configure a custom security context for these virtual accounts in Advanced SSH Server settings. The security context can be configured either in the virtual account settings entry, or in a virtual group as a default for virtual users.
To use EFS with virtual accounts, you must configure their security context to be a Windows local or domain account which you control. You must know the password for this account. For the virtual accounts to access EFS-encrypted files, you must configure the password for the Windows account that provides the security context in the SSH Server's password cache. This is done using the Manage password cache interface in the SSH Server Control Panel.
If you ever use administrative privileges to reset the password for this Windows account (i.e. not a graceful password change), EFS-encrypted files will be lost.
Do not use EFS with virtual accounts that use the default security context provided by the SSH Server. This is the BvSsh_VirtualUsers account if you installed a default (unnamed) SSH Server instance, or the equivalent BvSsh_... account if you installed a named instance.
Windows EFS encryption keys are linked to the Windows account password. The password for the BvSsh_VirtualUsers account is reset by the SSH Server when it starts, or if the password expires. The SSH Server does not persist this password. It is only stored in memory. When the SSH Server stops, EFS-encrypted files which were encrypted under BvSsh_VirtualUsers will become unrecoverable.
We suggest whole-disk encryption, e.g. using Windows BitLocker, as a stronger alternative to EFS. It is less fragile and provides greater protection.
Q220. What is the difference between SCP and SFTP?
SCP and SFTP are different file transfer protocols. SFTP, despite its name, has no relation to FTP. It is a remote file access protocol which provides rich and fine-grained functionality for managing, accessing, and modifying files on an SSH server. SCP is an adaptation of the Unix utility 'rcp' to run over an SSH session, and provides simplistic file transfer operations only. SFTP is launched by the client opening a session channel and requesting the 'sftp' subsystem. SCP is launched by the client instructing the server to execute the SCP program via an SSH exec request.
Up to WinSSHD 4, the SCP subsystem was not supported as well as SFTP. In later versions, support for the two subsystems is integrated, and the same virtual filesystem can be accessed through SFTP or SCP. Since Bitvise SSH Server version 7, the BvShell shell access type now also provides access to the same virtual filesystem.
Q230. How do I get WinSCP to work with Bitvise SSH Server?
WinSCP works well in SFTP mode, without requiring additional configuration beyond any other SFTP client. In SCP mode, WinSCP requires a Unix-style terminal shell. WinSCP will work in SCP mode if you configure the user's Shell access type to BvShell.
Q235. Can I use rsync with Bitvise SSH Server?
Bitvise SSH Server can be used with rsync, but it currently does not include it. To use the SSH Server with rsync:
Install a bash shell and rsync from a third party source. One such source is Cygwin.
Do not use the Windows 10 bash shell. That runs under the Windows Subsystem for Linux, which currently does not work well in a multi-user environment.
In SSH Server settings, in the account settings entry for the user, set Shell access type to bash.
Open an SSH terminal shell using the configured account. Make sure the user can run rsync from the bash shell. If bash can't find the rsync command, use the Windows Control Panel to edit the system-wide PATH environment variable so it will contain the directory which has the rsync executable.
It will now be possible to use rsync with the SSH Server.
Note: Use of rsync is incompatible with restricted filesystem access. The third-party bash and rsync are not familiar with SSH Server settings, and will not respect the virtual filesystem you configure for the user. The user will be able to access everything in the server-side filesystem that they can access using their Windows filesystem permissions.
Q240. The SFTP client I tested performs poorly with Bitvise SSH Server. How can I improve performance?
SFTP performance is almost entirely client-controlled. Almost always, the solution is to use a faster client.
If the bottleneck could be in the SSH Server, check whether the server is consuming at least one CPU core at 100% during most of the transfer:
If the server is consuming 100% of at least one CPU core, then you are running into hardware limitations of the server system.
If you are not seeing 100% consumption of a CPU core during most of the transfer, you're running into a limitation of the client or network.
For high-performance transfers, the SFTP client must implement performance optimizations appropriate to available bandwidth and latency. These optimizations include:
- Read/write request sizing.
- Read/write request pipelining.
- SSH channel receive window sizing.
The only performance parameter the SFTP server has control over is its own SSH channel receive window size. However, this only affects the speed of uploads - not downloads - and Bitvise SSH Server is already aggressive in this regard; it's unlikely to bottleneck the client.
If your SFTP client doesn't reach transfer speeds that would cause the server to reach 100% of a CPU core, but network bandwidth is still available, try with a different client. Our Bitvise SSH Client performs aggressive pipelining, which might perform better than some other clients.
Q245. We are using the SSH Server to provide access to Windows file shares. Sometimes connections to the network shares don't work. We are seeing textual log file events such as I_LOGON_SHARE_CONFIGURED_NOT_CONNECTED_YET. File transfers in those connections fail.
In such circumstances, Windows is taking a long time to complete the connection to the network share. After a configurable period, the SSH Server allows the connection to proceed, even though the network share connection has not completed. Then, two kinds of errors are likely:
If the network share is configured to map to a local drive, and the virtual filesystem mount point is configured to use that drive, the drive letter intended for the network share will not be available.
If the virtual filesystem mount point is configured to directly access the UNC path, attempts to access the network share will use implicit (anonymous) access. If permissions on the network share server are well-configured, this fails with "Access is denied."
The SSH Server does not control connecting to network shares, and cannot cause network share connections to complete faster or more reliably. However, the following are some settings to investigate:
You can enable and configure Windows session sharing in the SSH Server. SSH Server settings upgraded from older versions preserve the behavior of those versions, and remain configured by default so that each connection uses a separate Windows logon session. In Advanced SSH Server settings, under Sessions, you can find the setting Windows session sharing. You can enable this setting, and configure how long Windows sessions should be kept alive. In recent versions, this setting is enabled by default, but the setting Windows session keep-alive time is set to a short duration (e.g. 10 minutes).
Enabling Windows session sharing causes the SSH Server to reuse the same Windows logon sessions for the same accounts, as long as the accounts connect more frequently than the configured keep-alive time. Reusing the same Windows logon session keeps connections to network shares active, so they are not repeatedly connected and disconnected. Since fewer connections to network shares are made, there are fewer opportunities for them to fail. However, this also causes the total number of active connections at the network share server to increase, potentially reaching a limit.
For more information, we recommend the page Accessing network shares in the SSH Server Users' Guide. See section: Intermittent reliability problems.
You can configure the SSH Server to refuse login outright if a network share could not be connected. In Advanced SSH Server settings, under Sessions > Windows file share settings, you can find the setting On share connect failure. The default setting is Continue connection. This can be changed to Disconnect.
This setting can be overridden and configured differently for a specific group or account. In that case, the setting is found in the group or account settings entry, under Session setup > Windows file share settings.
You can configure a longer timeout for network share connections. This causes the SSH Server to delay the login process further until network share connections are complete. However, long network share connection attempts are unlikely to succeed; and waiting for them longer can cause clients to time out.
In Advanced SSH Server settings, under Sessions > Windows file share settings, there is a server-wide default setting Max total share wait time. The default value in recent versions accommodates clients with aggressive login timeouts. You can raise this value if you want the SSH Server to wait longer for network share connections to succeed or fail. They will most likely fail.
This setting can be overridden and configured differently for a specific group or account. In that case, the setting is found in the group or account settings entry, under Session setup > Windows file share settings.
Q250. How do I configure Bitvise SSH Server so that clients can upload files, but not see or modify existing files - a file drop scenario?
If you are using Easy settings, then in the latest SSH Server versions, you can configure the user's Virtual filesystem layout setting to Blind drop.
Alternately, this can also be configured in Advanced settings. In this case, under the account or group settings entry where you want to configure the mount point, open mount point settings under File transfer > Mount points. To implement a file drop scenario, remove permissions to List, Read Existing, Write Existing, and Delete Existing, but enable the permission to Read/Write/Delete New. Also, enable Show empty directory if no access (enabled by default).
See also Configuring Bitvise SSH Server for SFTP, SCP file transfer.
Q255. File transfers to and from Bitvise SSH Server are getting randomly disconnected. Both client and server report the session was disconnected or terminated by a socket error.
If both the SFTP or SSH client and server report that the connection was terminated by a socket error, then neither the server or client is terminating the connection. This means it's being terminated by an intermediate network component, such as:
- Drivers. This has been seen in practice.
- Security software, such as an anti-virus.
- Firewalls and routers.
- Network misconfiguration.
Since the issue does not occur in either the SSH or SFTP server or client, we cannot help diagnose it. Instead, someone who has direct access to the computers in question has to look at the possible causes and eliminate them one by one through trial and error.
The above applies if the SSH or SFTP server and client are both reporting a disconnect due to a socket error. If software on either side reports a different cause, then that is the cause to follow up on.
Q257. We are seeing I_SFS_TRANSFER_FILE events which state: "File transfer ended by connection cleanup; file transfer may not have completed as intended." Why does this happen?
This message is typically logged when the file transfer client disconnects before completing the file transfer. A disconnect can happen for a variety of reasons. The most common is an unreliable network connection. To determine the reason, both server log files and client-side output need to be examined.
Shortly after the I_SFS_TRANSFER_FILE event, the SSH Server logs an event which describes how the client disconnected. If the disconnect event describes a TCP connection error, this means that either (A) the client encountered an error and disconnected abruptly, or (B) the connection was disconnected by a network component between the client and the server.
If the client-side output also describes a TCP connection error, the disconnect is due to a network component. In this case, see Q255.
Q260. I don't want the SSH Server to load the users' Windows profiles during file transfer sessions. How do I prevent the Windows profile from being loaded?
Bitvise SSH Server will load the user's Windows profile if it's asked to provide functionality that requires the Windows profile. To avoid loading the Windows profile, turn off options which require it to be loaded. These options may be found in Advanced SSH server settings, either in a user or group settings entry. They are as follows:
- Session setup > Windows file share settings > Map remote home directory
- Session setup > Windows file share settings > Map remembered shares
- Session setup, Connection setup > On-logon or on-logoff command that enables profile loading
- File transfer > Load profile for file transfer
With all of the above options disabled, the SSH Server will not load the user's Windows profile for file transfer sessions.
The most common culprit that's causing the Windows profile to be loaded is that Load profile for file transfer is enabled under File transfer in the group settings entry that applies to the user. This is disabled in new SSH Server installations by default, but an enabled setting can be inherited from older configurations.
Q265. Should I disable Windows profile loading?
The latest versions of Bitvise SSH Server are configured by default to avoid profile loading for file transfer connections. However, profile loading may be enabled when upgrading from an older SSH Server version where it was enabled by default.
Several versions of Windows contain a leak which will lead to resource exhaustion after a very large number of profiles have been loaded, requiring the system to be restarted. Unfortunately, this is not a problem we can fix in the SSH Server. You can work around it by following instructions in Q260 to disable profile loading.
Loading a Windows profile can also take varying amounts of time; sometimes up to a minute with large domain account profiles. Disabling profile loading when not needed will improve performance.
Finally, a Windows profile can get corrupted. If profile loading is enabled and the profile becomes corrupted, connections will no longer work until a manual intervention. A typical intervention is to delete the affected Windows profile so that Windows can recreate it. The greater the number of connections that the SSH Server handles, the greater the chance that profile corruption will occur. To avoid this, it is better to disable Windows profile loading.
Q270. Can Bitvise SSH Server lock (or not lock) files being accessed by a client, to prevent (or allow) them to be accessed by other applications? How do we enable (or disable) such blocking?
The following are default SSH Server locking behaviors for files that clients access via SFTP, SCP or FTPS:
In SSH Server versions 9.xx and newer, the SSH Server by default permits Read, Write and Delete sharing for downloads, and only Delete sharing for uploads. Disabling Read and Write sharing for uploads prevents a failure case where another process – a task or file transfer session – can corrupt a file while it is being uploaded, or process a partial upload which has not yet completed.
In SSH Server versions 8.35 - 8.49, the SSH Server by default permits Read and Delete sharing, but not Write sharing. These versions use the same setting for uploads and downloads.
In versions 8.34 and earlier, the SSH Server by default permits all access by other applications.
These behaviors can be configured in Advanced SSH Server settings, in the following locations:
Server-wide defaults can be configured in Advanced settings, under File transfer. The settings are File sharing behavior, File sharing for uploads, and File sharing for downloads.
In an account or group settings entry, under File transfer > Mount points, in the entry for a specific mount point. The settings are File sharing behavior, File sharing for uploads, and File sharing for downloads. Screenshot.
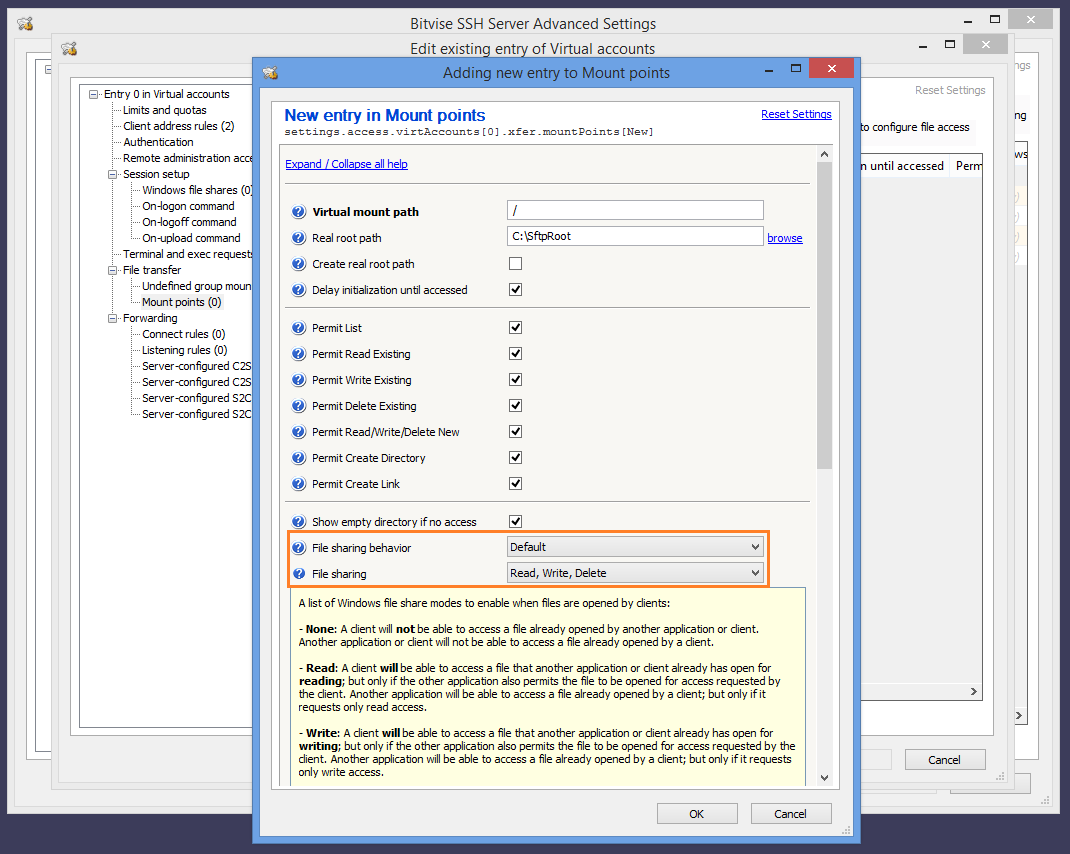
If File sharing behavior is set to Free, then SFTP clients which implement a sufficiently high SFTP version can request different locking than configured in SSH Server settings.
In versions 9.34 and newer, if the SSH Server detects that a file is being uploaded to a network share, it opens the file for unbuffered I/O (the Windows flag FILE_FLAG_NO_BUFFERING). This is intended to improve upload performance, but causes the file to be opened for exclusive access. This is currently not configurable. It will be configurable in a future version.
Q275. How can I configure the SSH Server to provide file transfer access to a directory, but hide specific subdirectories?
For each subdirectory that should be hidden, use Advanced settings to create a mount point with a virtual mount path to match the subdirectory. Configure the setting Mount type to Hidden, access denied.
For example, if you have the virtual mount path "/" mapped to C:\SftpRoot, and you want to hide C:\SftpRoot\Subdir, then create an additional mount point at the path "/Subdir" and set its Mount type to Hidden, access denied.
In versions 8.xx and older, there is no Mount type setting. In this case, configure the Provider type setting for that mount point to FlowSfsNull. Example.
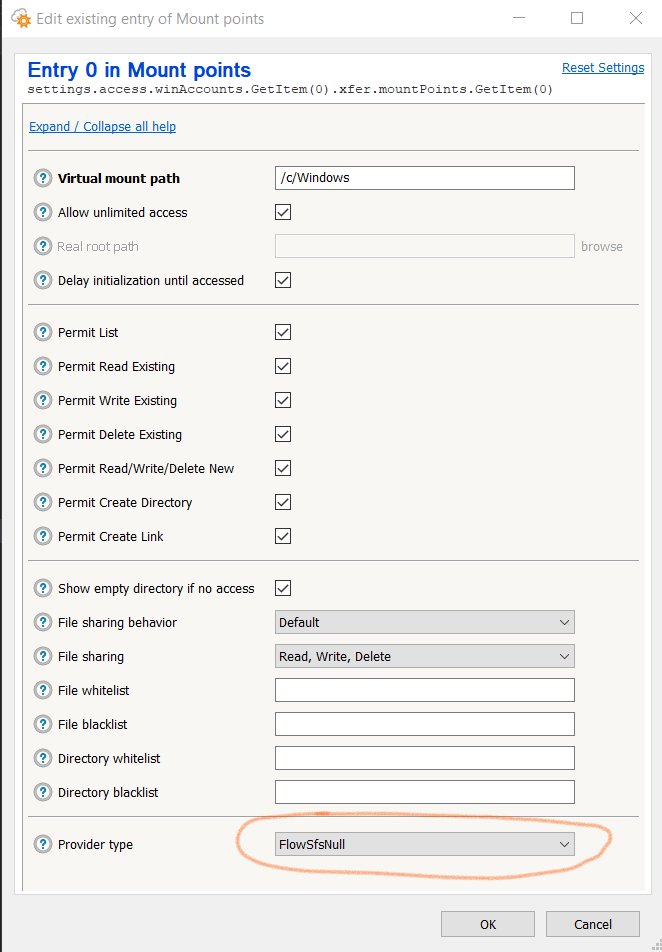
Automated Actions After File Transfers
Q277. How can I configure the SSH Server to automatically delete files older than a number of days?
In Advanced settings, under Tasks and notifications > Task list, you can configure a task of type Execute command, and configure the Command setting as follows:
forfiles /p "C:\Dir\SubDir" /s /d -60 /m * /c "cmd /c del /f @path"
This uses the Windows built-in FORFILES command to recursively enumerate files under C:\Dir\SubDir, and delete files older than 60 days.
You can configure the SSH Server to run this as frequently as you choose, for example on a daily basis. The SSH Server can also be configured to record the task output, and either log or email the results.
Q280. How can I configure email notifications for uploads or downloads?
In SSH Server versions 9.xx, this is easiest to configure using Tasks and notifications. See Examples using I_SFS_TRANSFER_FILE. Under default settings created by SSH Server 9.16 and later, you can find ready-made examples of email notifications for uploads and downloads in Advanced settings, under Tasks and notifications > Task list. You must also configure settings under SMTP sending: see Q535.
For uploads, there is also the option to configure this using an On-upload command: see Q285.
Q285. How can I configure automated processing for uploaded files?
The SSH Server can be configured to execute a command on successful upload. Example PowerShell scripts:
Send on-upload email notifications: OnUploadEmail
In recent SSH Server versions, you can use the integrated Tasks and notifications feature instead.
Move files after upload: OnUploadMove
In recent SSH Server versions, you can use the integrated Move uploads feature instead.
The scripts are renamed to .txt from their original .ps1 extension. They cannot be used as-is: they require that you edit them and insert essential details.
A script like this can be used as an On-upload command in Advanced SSH Server settings. The setting can be configured either in an account settings entry for a single user, or in a group settings entry as a default for multiple users. Example configured command:
PowerShell -c "C:\Path to\OnUploadEmail.ps1"
For more information about environment variables available to an On-upload script, see Environment variable expansion.
SSH Server versions 9.51 and newer implement improvements for custom commands:
The output of custom commands is logged in the SSH Server's textual log files, using events such as I_UPLOAD_COMMAND_OUTPUT. This allows easier diagnostics for scripts that experience problems.
The execution of custom commands is throttled to avoid overwhelming the system with a large number of concurrent commands. Settings for command throttling are configured in Advanced settings > Server > Auto-execute commands.
If you are using custom commands, we recommend SSH Server versions 9.5x and newer.
Q287. How do I set up the Move uploads feature to move files to a UNC path on another server?
We suggest performing such moves indirectly. Reasons:
The Move uploads action is performed in the user's security context. The user's Windows logon session might not have access to the network share.
If you are using Windows accounts, the Move uploads action may need to execute in a variety of security contexts for different users.
Accessing network shares involves potential failures and delays. A separate connection must be made from each logon session that needs to access the share. Each separate network share connection can lead to delays and failures.
Instead of using Move uploads to move files directly to a UNC path, use two stages:
Configure Move uploads to move files to a local staging directory. Configure Windows filesystem permissions to permit this move for each user for whom the Move uploads action will run.
If possible, the staging directory should be on the same filesystem volume from which files are moved. This allows the move to be atomic. If the move is not atomic, this complicates processing in the staging directory.
In Advanced SSH Server settings, under Tasks and notifications, configure a task that periodically runs a script. This script can check for files in the staging directory, and move them to the destination UNC path.
Important: If files may be moved to the staging directory from a different filesystem volume, such a move involves copying the file. This type of move is not atomic. In this case, your script must avoid moving files from the staging directory which are not yet done moving to staging. See example script for this case.
This way:
There is a single security context for the script that needs to access the network.
In the Task profile for the script task, you can configure the security context to a Windows domain account which has implicit access to the network share; or you can configure a Windows file shares entry for the task profile which provides credentials for the network share.
You can set up the task to interact favorably with the SSH Server's Windows session sharing. If the script runs more frequently than the Windows session keep-alive time configured in the task profile, the SSH Server can maintain a single Windows logon session for the task, with a single, long-lived connection to the network share. This improves reliability of network share access and reduces connection load on the network share server.
Q290. I'm trying to configure an On-upload command, but my PowerShell script does not run.
In SSH Server versions 9.51 and newer, the output of custom commands is now logged in the SSH Server's textual log files, using events such as I_UPLOAD_COMMAND_OUTPUT. This allows easier diagnostics for scripts that experience problems.
If you are certain the problem is not due to an error in the script, or due to Windows filesystem permissions, check the PowerShell script execution policy. Be aware that there are separate policies for 64-bit vs. 32-bit PowerShell.
If you don't need PowerShell's features, a Windows Command Prompt batch file is not affected by script execution policy. It's also faster and much more memory-efficient, but more difficult to implement complex logic. If you prefer to use a batch file, you can configure it with:
cmd /c "C:\Path to\OnUpload.cmd"
Q295. I have an On-upload command that uses PowerShell, configured for a user that uploads 500 small files. When the user disconnects, the system bogs down and many of the On-upload commands don't run.
We recommend updating to SSH Server versions 9.5x or newer. Since version 9.51, the SSH Server supports automatic throttling of custom commands to avoid overwhelming the system. Settings for command throttling are configured in Advanced settings > Server > Auto-execute commands.
PowerShell has a heavy memory footprint. A single PowerShell instance uses 60 - 75 MB just to run. 500 PowerShell processes require 30 - 40 GB of RAM. In SSH Server versions 9.5x and newer, execution of such commands is throttled to keep memory consumption reasonable.
A Windows Command Prompt uses on the order of 3 MB. If you want to efficiently run hundreds of concurrent On-upload commands, consider writing a Command Prompt batch file, or even a small C or C++ program. In SSH Server 9.5x and newer, you can then relax the setting Server > Auto-execute commands > Maximum concurrent commands.
Public Key Authentication
If you are having problems related to public key authentication, you may also want to check our page about Public Keys in SSH.
Q300. Someone wants to use public key authentication to log into the Bitvise SSH Server I'm administering. They have already sent me their public key file. How do I tell the SSH server to use the public key file when that user logs in?
In the Bitvise SSH Server Control Panel, open Advanced settings and go to Access Control > Windows accounts (or Virtual accounts if this is a virtual user). If an entry for this user is not already present, you need to add one. For Windows accounts, the name of the entry must match the Windows username that will be used when logging in. Now, click Edit to open the account entry in a new window, and click the 'Public keys' link. A key management window will open which you can use to import the public key.
Screenshots for importing a client authentication public key:
We recommend also the Accounts and groups section of the Bitvise SSH Server Users' Guide for additional important information.
Q310. I am unable to import a user's public key into Bitvise SSH Server's user key management window. I keep getting a dialog box telling me that the public key could not be imported. What could be the problem?
It is most likely that the public key you are trying to import is not in the right format. It might be a private key instead of the public key, or it may be an SSH1 public key file instead of an SSH2 key. The formats supported by Bitvise SSH Server are the standard SSH2 public key format, and the OpenSSH SSH2 public key format. The OpenSSH SSH1 public key format is different and incompatible with SSH2.
Another possible reason you might have trouble importing a public key is if you try to import it into the SSH server's Manage host keys interface, instead of into an SSH account settings entry. The SSH server's host key management interface, which is accessible directly from the Bitvise SSH Server Control Panel, is intended to manage host keys that are used to authenticate the SSH server. The place to import a client authentication keypair is into an individual account settings entry, either in Easy or Advanced SSH server settings.
Q320. The client sent their public key, I imported it into SSH Server settings, but public key authentication doesn't work, and they're still being prompted for a password. Help!
Most likely, the user's client software is doing one or more of the following:
- Not attempting to authenticate using a public key because the keypair is not properly configured in the client.
- Attempting to authenticate with a keypair that corresponds to a different public key than the one you imported for this client.
- Attempting to log into an account that does not match the one for which you imported this public key.
To see which problem it is, check the Activity tab of the SSH Server Control Panel, and/or the SSH Server's textual log files. If the client is not attempting to use public key authentication, you will see this as an absence of any public key authentication messages in the logs. If the client is using a different key, log messages will show that the server does not recognize the key they're using. If the client is attempting to log into a different account, there will be discrepancies between the user name provided by the client, and the one for which the public key has been imported in SSH Server settings.
Q330. How do I set up public key authentication with Bitvise SSH Client?
If you are able to connect to the SSH Server using password authentication, and if the SSH Server administrator has not prohibited users from managing their public keys, the simplest process is:
- Use the graphical Bitvise SSH Client to connect to the server.
- Once connected, open the Client key manager interface.
- Use Generate New to create a new keypair.
- Right click on the keypair and select Upload to server. You should now be able to authenticate using this keypair.
Alternately, if you must configure public key authentication before connecting to the server, or the server does not allow you to manage your public keys:
- Open the graphical Bitvise SSH Client. You do not need to connect to the server.
- Open the Client key manager interface.
- Use Generate New to create a new keypair.
- Use the Export button to export the public key in standard SSH2 format.
- Send the public key file to the server administrator. If you're the administrator, transfer it to the server machine.
- Follow instructions in Q300 (above) to import the public key into Bitvise SSH Server.
Once the public key has been uploaded or imported into the Server, configure the Login > Authentication > Initial Method setting so that the Client will use your generated user keypair for authentication. You can also save your Bitvise SSH Client settings into a profile for convenience, and copy the keypair into the profile using the Client key manager.
If you wish to manage public keys configured for your account on the Server non-interactively, or via the command line, you can also use spksc - a command line public key management client that's included with Bitvise SSH Client. In this case, run spksc from a Command Prompt for help.
Q340. When I use password authentication, I can access EFS-encrypted files, and network shares on the server's Local Area Network. But when I use public key authentication, EFS-encrypted files and network shares are inaccessible. How can I access them when using public key authentication?
In order to access EFS-encrypted files, the server needs to provide Windows with your password. Similarly, to provide you with access to network shares on other computers in the server's network, the server needs to authenticate you with the computer providing the network share.
When you log in using password authentication, the SSH server conveys your password to Windows, and your login session is created in a way which allows Windows to access EFS-encrypted files, and pass your login credentials to other Windows computers in the network, providing you with access to network shares.
When you log in using public key authentication, the SSH Server can create the Windows account login session without knowing the account password. However, a login session created this way does not have credentials necessary to access EFS-encrypted files and network shares.
One way to solve this is to add the Windows account's password to the SSH server's password cache. You can do this through the Manage password cache link on the Server tab of the Bitvise SSH Server Control Panel. The server will remember the password you enter indefinitely. When you log in using public key authentication, the server will use the cached password to create a logon session which will have credentials necessary to access network shares. This will work as long as the cached password remains synchronized with the account's actual password.
If you only need access to network shares (but not EFS-encrypted files), another way is to configure the SSH server, through per-group or per-account settings, to explicitly establish connections to one or more network shares, by providing network share access credentials in the SSH server's configuration. This can be done through the Windows file shares section of an account or group settings entry, in Advanced SSH server settings.
Q350. How can I let users manage their public keys themselves, without administrative intervention?
Bitvise SSH Server supports two ways for users to manage their client authentication public keys without requiring the administrator's manual intervention.
SSH clients that support the Secure Shell Public Key Subsystem (RFC 4819) can use this functionality to add or remove public keys associated with their account in Bitvise SSH Server settings. This feature is enabled for all accounts by default.
Windows accounts that have write access to their Windows profile directory can use the authorized_keys synchronization mechanism. To enable this, the administrator must enable the setting Synchronize with authorized_keys under Access control in Advanced SSH server settings. Windows users can then store a file named authorized_keys in a subdirectory named .ssh under their Windows profile directory. When the user's SSH session ends, Bitvise SSH Server will check for the presence of this file, and if it exists, the public keys encoded in this file will replace the public keys configured for the user in SSH server settings. This feature is disabled by default because some users have existing .ssh/authorized_keys files they are not aware of, which would conflict with intended SSH server settings.
Q360. When I examine the SSH server's log entries for a session, I see a logon attempt using the none method that fails, followed by a logon attempt using the publickey method that fails, followed by public key authentication that succeeds. How can I resolve the two failures?
These failures are a normal part of SSH authentication. First, the client may send a none authentication request, which is intended to fail, but provides the client with information about authentication methods supported by the server. Then, the client may attempt public key authentication without a signature, which is also intended to fail, but tells the client whether the server will accept the client's public key. Then, armed with this knowledge, the client sends the actual public key authentication request, which succeeds.
The client could avoid the preliminary requests if it were to assume outright that the server supports public key authentication, and that the server will accept the public key the client is trying to use. In this case, the client can just send the full public key request directly, as its first authentication request.
However, it is perfectly okay for the client to send the preliminary requests. This is a normal part of SSH authentication.
Q370. The SSH Server Control Panel displays the message: "The BvLsa authentication package cannot be loaded because LSA protection (RunAsPPL) is enabled. Public key authentication, as well as virtual accounts that use a custom security context, will require configuring the password cache as long as BvLsa cannot be loaded."
We recommend updating to SSH Server version 9.51 or newer. The latest SSH Server versions no longer require the BvLsa authentication package for password-less authentication, and do not install it on recent Windows versions.
Since Windows versions released around 2025, the LSA protection setting is now enabled by default. This means Windows does not load LSA authentication packages installed by third party programs unless they carry a Microsoft signature. This prevents the loading of the SSH Server's authentication package. SSH Server versions before 9.51 required this authentication package to create logon sessions where a password is not available. This especially affects login into Windows local or domain accounts using public key authentication.
If you prefer not to update the SSH Server, workarounds are available:
Disable LSA protection in Windows. Or:
Avoid affected types of logon. For example: configure public key authentication for a virtual account instead of a Windows account. Or:
Enter passwords for affected Windows accounts into the SSH Server's password cache. This is configured using the Manage password cache interface on the Server tab in the SSH Server Control Panel.
To disable LSA protection in Windows, you can follow instructions under Disable LSA protection in the Microsoft article Configure added LSA protection. Either set the registry value RunAsPPL to 0, or disable the Windows policy Configure LSASS to run as a protected process.
If the LSA protection setting has been locked into UEFI, it is not sufficient to disable the setting in Windows. In this case, to disable LSA protection, you need to follow the section Remove the LSA protection UEFI variable.
Q380. The SSH Server's log files say password-less authentication across Windows domains is not supported. What can we do about it?
The SSH Server does not implement logic for contacting the domain controller of another domain, i.e. not the SSH Server's domain, to obtain information about an account in that domain. If it did support this, it would likely not be able to contact the other domain controller due to firewall restrictions; or it couldn't obtain the necessary information due to Active Directory security settings.
Currently, therefore, the SSH Server cannot construct a password-less logon session for a user in another domain, even if the domain is in the same forest. However, the SSH Server can construct a normal logon session for the user, by calling the Windows function LogonUser. The SSH Server can do this if you configure one of the following:
Enter the password for the Windows account from the other domain in the SSH Server's password cache. You can do this using the Manage password cache interface in the SSH Server Control Panel, on the Server tab.
Alternately, you can configure the SSH Server to cache the password automatically. You can set this in Advanced settings > Access control > Password cache auto-save behavior. If you change this setting to Public-key accounts or All accounts, the user will need to enter their password the first time they try to authenticate with a public key. However, subsequently, the SSH Server will have the saved password and will be able to create the logon session using only public key authentication.
Account Settings
Q400. How do Bitvise SSH Server account settings work?
We recommend the Accounts and groups section of the Bitvise SSH Server Users' Guide for this important explanation.
Q430. How can I limit a user so that they cannot access files outside of a certain directory?
The answer depends on what sort of access you have in mind. For shell access and remote execution, jailing a user is possible only through Windows file system permissions. On the other hand, if you are permitting the user only file transfer access (using SFTP and SCP), you can configure a limited-access virtual filesystem for the user by editing settings for their account or group in Bitvise SSH Server settings. In settings for the individual account or group, open Virtual filesystem layout > Mount points, and set the 'Real root path' setting for the default mount point ('/') to the directory you want them to access.
Q440. How do I use virtual accounts on a domain controller?
On computers that are not domain controllers, Bitvise SSH Server manages a local Windows account – usually named BvSsh_VirtualUsers – to provide a security context for virtual account login sessions. See Q530 for more information about this account.
On domain controllers, the SSH Server cannot create this account because there is no concept of local accounts on a domain controller. If you would like to use virtual accounts on a domain controller, you need to create or designate a domain account which will provide a security context for your virtual account login sessions. You then need to configure this backing account in Advanced SSH Server settings, either individually for each virtual account settings entry, or in a group settings entry used by one or more virtual accounts.
Q445. How do I configure virtual accounts to use a domain account as security context?
If you would like your virtual accounts to use a domain account as their security context, open Advanced SSH server settings, and edit your Virtual group settings entries as follows:
- Change Security context to A specific Windows domain account.
- Configure the Windows account domain and Windows account name settings to identify the domain account.
Virtual account settings entries will inherit their security context settings from their assigned virtual group by default - unless settings for a specific virtual account are configured differently.
We recommend also adding the domain account's password to the SSH Server's password cache. See Q450.
Q450. If I use an explicitly configured backing account to provide a custom security context for virtual accounts, do I need to enter the backing account's password into the SSH Server's password cache?
When you explicitly configure a backing account for virtual users, you can choose to save the password for this backing account in the SSH Server's password cache using the Manage password cache interface in the SSH Server Control Panel.
If you configure the password cache, the SSH Server will be able to create virtual account login sessions that will have implicit access to EFS-encrypted files and network resources (e.g. Windows shares) accessible to the backing account. If you do not configure the password cache, the virtual account sessions will still work, but without access to such resources. See also Q340, which describes the same issue when using Windows accounts with public key authentication.
Q460. I installed Bitvise SSH Server on a computer that's not a domain controller, but there is no BvSsh_VirtualUsers account. What's happening?
The BvSsh_VirtualUsers account is not created at installation time, but later when the SSH Server determines that it is needed. If it does not yet exist, it is possible that the SSH Server has not been started. If it was started, it is possible that the settings do not yet contain virtual accounts that would need this security context.
If the SSH Server was started; and its settings do contain virtual accounts – the SSH Server installer supports multiple concurrent installations on the same computer. Separate SSH Server instances are distinguished from each other by name, and the directory in which they are installed. Because the instances are independent, they create separate automatically managed accounts with different names.
The default, unnamed instance uses the account name BvSsh_VirtualUsers. For named instances, the name of the account will start with BvSsh_, and the remainder depends on the instance name.
If you have multiple SSH Server instances, and wish to discover the name of the automatically managed account associated with one, use Open log folder viewer in the SSH Server Control Panel for that instance, and open one of the textual log files. Look for the event I_AUTO_ACCOUNT_ENABLED. The name of the account will appear in this event, as follows:
<parameters account="BvSsh_VirtualUsers"/>
Q465. What is the difference between Client IP address rules configured in account and group settings entries, and the server-wide Client IP address rules configured under Advanced settings > Access control?
The global Client IP address rules in Advanced settings > Access control take effect at a different stage than Client IP address rules defined in an account or group settings entry.
Server-wide Client IP address rules apply to all connections. They take effect as soon as a connection is received. If the IP address of the client is not permitted according to server-wide rules, the SSH Server does not receive or send any connection data. Instead, it immediately terminates the connection.
The Client IP address rules configured in account and group settings entries are applied later in the SSH or FTPS connection. They are applied after SSH or TLS key exchange, during user authentication. The SSH Server cannot apply these rules until the connection reaches this stage, because it must know which account and group settings apply to the user.
When the client is authenticating, if the account settings entry does not contain any Client IP address rule matching the IP address of the client, the SSH Server checks Client IP address rules in the group settings entry. If the group settings also do not contain a matching a rule, the SSH Server denies the login attempt.
The global Client IP address rules were already processed for the connection to be accepted at all. They are not applied again when the client is authenticating.
Q470. How can I export a list of accounts from SSH Server settings in a textual format?
There are multiple ways:
Since SSH Server 8.xx versions, you can export accounts in CSV format from Easy or Advanced settings. Exporting from Advanced settings will include more complete information.
Alternately, you can open an administrative, elevated Command Prompt or PowerShell window and navigate to the SSH Server's installation directory. There, run the command:
BssCfg settings exportText
This exports the complete SSH Server settings in a format that is textual and suitable for use in scripting SSH Server settings using PowerShell.
In the SSH Server installation directory, you can find an example PowerShell script named VirtAccountExporter.ps1. You can either use this script as-is or adapt it for your purposes to export specific aspects of account settings.
Q480. I would like to apply a change to a large number of account settings entries. How do I avoid having to do it manually?
There are two main ways you can save time if you need to apply a change to a large number of account or group settings entries:
You can use the SSH Server's support for scripting settings using PowerShell, .NET and other languages.
You can use the BssCfg command line configuration utility to export settings in textual format, modify them in your favorite text editor, and use BssCfg again to import the modified settings. To do this, open an elevated, administrative Command Prompt or PowerShell window, change to the SSH Server's installation directory, and run:
BssCfg settings exportText <filename> edit the exported settings using text editing tools BssCfg settings importText <filename>
The textual and scriptable settings formats are the SSH Server's secondary settings format. They are first-class formats which allow access to all of the SSH Server's settings, but they are not guaranteed to work 100% the same after upgrading to newer versions.
The SSH Server's binary settings format is the primary format which does guarantee 100% compatibility when upgrading.
Usage Issues and Operation Concerns
Q502. We have been using your software and have not updated it for X years. People who set it up left the company years ago. Yesterday, critical connections started failing. We don't understand the software and can't describe the issue. Please join our Zoom session or conference call!
Bitvise will not join your Zoom or WebEx session or conference call.
Bitvise provides a product, not a product with a service. We have two main objectives when we provide support:
- To detect and fix issues in recent versions of our software.
- To learn about opportunities for new features and improvements.
Over the years, we sometimes see the following pattern:
- A company had skilled administrators who found and liked our software.
- The administrators configured the software and it worked.
- These administrators leave the company or get replaced.
- The new administrators do not learn about the software because it works.
- The software does not get updated. Settings are maintained in routine ways.
- Years pass without issue. Then, a new and unexpected event occurs.
- This event requires understanding of the software.
- The company no longer has anyone who has this understanding.
- Bitvise – help! Help! Join our conference call!
Bitvise is not geared to provide this type of support.
If you contact us about an issue, we can help if you provide technical information by email. This includes:
- A detailed description of the steps you are taking.
- A description of what you expect to occur, vs. what actually occurs.
- Relevant client-side screenshots, errors or diagnostics.
- Excerpts from the SSH Server's textual log files which correspond to the issue.
You will need an administrator who can collect this information, and who can interpret and act on our replies.
If such a person does not exist, you are not fundamentally experiencing a technical issue. It is a human resource issue, and Bitvise cannot fix this for you.
Q505. What versions of TLS does Bitvise SSH Server use?
Bitvise SSH Server is primarily an SSH server, not a TLS server. SSH is a different and independent protocol from TLS.
In its default configuration, Bitvise SSH Server does not accept client connections using TLS, but using SSH version 2. This is the most recent SSH protocol version. Recent Bitvise software versions implement a set of current recommended cryptographic algorithms for use in SSH.
Since SSH Server versions 8.xx, you can also enable support for FTPS. FTPS is different from SFTP or SCP, which are both file transfer protocols secured using SSH. FTPS is the older FTP protocol, secured using TLS. In this case, the SSH Server does not have its own TLS implementation, but uses Windows Schannel for TLS. If you enable FTPS, you can use Advanced settings in the SSH Server Control Panel to selectively enable or disable TLS 1.0, 1.1, 1.2 or 1.3. Use of TLS 1.3 requires a recent version of Windows, with an Schannel component that supports TLS 1.3.
If you want to configure TLS cipher suites in more detail, you can do this using Windows registry settings that apply to Windows Schannel.
Q507. I'm using the SSH Server for FTPS in addition to SSH/SFTP. I was previously able to import a TLS certificate in PFX format. Now I must import a new certificate, but importing the new PFX file fails.
A new PFX file (PKCS #12) might not be compatible with older SSH Server versions, or with older versions of Windows. In this case, you may be able to re-encode the PFX file into a format which works, using the openssl utility.
An openssl utility is included in software such as Git for Windows, Strawberry Perl, and others. It is also available via WSL, the Windows Subsystem For Linux. Using a Windows Command Prompt, you can run where openssl to see if it's already set up in a directory which is in your PATH environment variables.
You will need at least two commands to re-encode the PFX file:
Convert the source PFX to PEM:
openssl pkcs12 -in Original.pfx -out Temp.pem
You will receive password prompts to decrypt the PFX, and to encrypt the private key in output. You can avoid the output prompts using the parameter -nodes. In this case, the private key in the temporary PEM file will be unencrypted. Such a file needs to be securely deleted, using a tool such as sdelete.
Convert the temporary PEM to PFX:
openssl pkcs12 -export -in Temp.pem -out New.pfx
If you are using a newer OpenSSL version, and must import the PFX on an older Windows version, specify the -legacy parameter. This avoids newer PKCS #12 encryption formats which are not supported on older versions of Windows.
Q510. How can a user change their password remotely?
The SSH Server supports changing passwords in multiple ways:
During SSH user authentication by using a client that supports this feature, such as Bitvise SSH Client.
If the user's Shell access type is configured to BvShell (typical for virtual accounts), the user can change their password using the passwd command.
If the user's Shell access type is configured to Command Prompt or PowerShell (common for Windows accounts), the SSH Server comes with a bvPwd utility. This allows a Windows account to change their password if they know what it currently is. The utility can be found in the SSH server installation directory. Run it with bvPwd -h for help.
An administrator can use the net user command, intrinsic to Windows, to change any user's password. Type net help user in a Command Prompt or PowerShell window for help.
An administrator can change virtual account passwords in SSH Server settings or using the BssCfg command-line configuration utility.
Q515. My SSH client logs me into a different account than I intend when I connect from a computer in the same domain. Why does this happen, and what can I do about it?
Some clients, including OpenSSH and PuTTY, will automatically try to log you in using Kerberos + GSSAPI, using the Windows domain account with which you are logged into the client computer. The clients will do this even if you specify a different username for authentication, and have no intention of using Kerberos to authenticate.
In SSH Server versions 8.xx and newer, the setting that prevents this is in Advanced SSH Server settings, under Access control > Client version rules. Find or create a client version rule that applies to the client software with which you experience the issue, or edit the default version rule for all clients. In the client version rule, enable the setting SSH username must match GSSAPI.
In new SSH Server installations, this requirement is already enabled for all clients except Bitvise SSH Client by default.
Q516. I'm trying to use Kerberos authentication with delegation, so that the client can access a network share, but delegation does not appear to work.
Windows supports two types of delegation: constrained and unconstrained.
Unconstrained delegation will be available if:
Active Directory settings permit it. For example, in the Active Directory entry for the server computer, under Properties > Delegation, the following setting is enabled: Trust this computer for delegation to any service.
The SSH client requests it. Bitvise SSH Client requests delegation if the checkbox Request delegation is enabled.
Windows is not using cached Kerberos tickets from before any delegation-related settings changes were made.
If a login is made using Kerberos and unconstrained delegation is available, the SSH Server will record this in the log event I_LOGON_AUTH_SUCCEEDED with the attribute:
tokenType="Kerberos5Obtained, DelegationCapable"
On the other hand, constrained delegation will be available if:
Active Directory settings permit it. For example, in the Active Directory entry for the server computer, under Properties > Delegation, the following setting is enabled: Trust this computer for delegation to specified services only.
Windows is not using cached Kerberos tickets from before any delegation-related settings changes were made.
Whether the SSH client requests delegation makes no difference on whether constrained delegation will be available or not.
The SSH Server does not currently log information about whether, or to what extent, constrained delegation is available. To examine a Kerberos ticket for constrained delegation, connect with an SSH client that can open a terminal shell and use the klist utility included in Windows. Example commands:
klist query_bind klist sessions klist tickets -lh ... -li ...
Q517. I'm trying to set up an embedded device (e.g. a Brocade ICX switch), which uses an SSH client such as RomSShell, to upload logs to Bitvise SSH Server. The client disconnects before user authentication with "Not expecting new keys message". What's happening?
If you see this particular message, the cause is most likely that the client does not support RSA host keys larger than 2048 bits, and the SSH Server generates a 3072-bit host key by default.
You can avoid this issue by using the Manage host keys interface in the SSH Server to dismiss the 3072-bit RSA host key, and instead generate and employ a 2048-bit RSA host key.
If the server's host key has already been set up for use with other clients, note that replacing the host key will require changes to the configuration of such clients, so that they will trust the server's new host key.
Q520. I'm seeing pop-ups from Bitvise SSH Server showing unknown IP addresses trying to guess usernames and passwords. What can I do about this?
In order to refuse access to unauthorized users, while still allowing authorized users to log in, the SSH server must accept connection attempts coming from permitted sources, and must allow those connections to reach a point where the client can provide authentication credentials.
When installed with default settings, Bitvise SSH Server will take several steps to thwart unauthorized attackers.
One way is by imposing a delay between login attempts. The default delay is 3 seconds. Without any other countermeasures, this 3 second delay would ensure that even an account with a weak password, e.g. 6 letters chosen randomly from an alphabet of 26, would on average take years of back-to-back attempts to guess. (Note that passwords this short are very weak and are highly disrecommended.)
Another way Bitvise SSH Server tries to thwart attackers is through automatic blocking of IP addresses that have recently initiated multiple failed login attempts. In default settings, the SSH Server will block for 1 hour any IP address that initiates more than 20 failed login attempts in 5 minutes.
If you wish to see fewer password guessing attempts, an effective mitigation is to configure the SSH Server to accept connections on a port other than 22. This would not be very effective against a determined attacker, but will avoid random hackers looking for low-hanging fruit. Any random port number between 1024 and 49151 is suitable. The main drawback is that any legitimate client that tries to connect to your server will then need to be configured with the port number in addition to the host name. Some Internet Service Providers may also block connections on non-default ports.
If all of your legitimate connections come from Bitvise SSH Client, you can enable SSH protocol obfuscation in the SSH Server in Advanced settings, under Bindings and UPnP. If you enable obfuscation, only Bitvise SSH Client will be able to connect, and then only if configured with the correct obfuscation keyword.
You can also block connections from specific geographic regions outright. If you never expect to receive legitimate connections from specific regions or countries, you can block them in Advanced settings > Access control > Client address rules. If you block all connections except specific countries, remember to also add IP address allow rules for connections not associated with a country (e.g. from the LAN).
Despite these countermeasures, it is very important to make sure that your accounts are configured with complex passwords, and to lock down your settings so as not to grant access that you don't need to. For more information and for password complexity guidelines, see Securing Bitvise SSH Server.
Q521. I never want my SSH Server to accept connections from certain continents and countries. How can I block connections based on the geolocation of the client IP address?
You can configure country-based and continent-based IP blocking in Advanced settings > Access control > Client IP address rules.
Q525. On Windows 10, I can launch apps through an SSH terminal shell which appear on the interactive user's desktop. How do I avoid this?
On Windows 10, graphical apps launched through an SSH terminal shell can appear on the interactive user's desktop under the following conditions:
- The SSH terminal shell has administrative permissions.
- The app is a Windows modern app. For example, the Calculator is a modern app in Windows 10.
- The app was previously run in the interactive user's logon session.
At this time, our investigation does not indicate that this behavior violates Windows security permissions. Since the terminal shell must run with administrative rights, what's happening is not different than if the administrator that is logged in via SSH used a utility such as bvRun or psexec to cause a graphical application to run on the interactive desktop. Still, it is peculiar that Windows 10 will do this by default, and in an inconsistent manner. This may be an oversight in current Windows.
As far as we can tell, this issue will not occur for SSH login sessions that do not have administrative permissions. Administrators should be aware that launching modern apps may cause them to appear on the interactive desktop.
Q530. When I install Bitvise SSH Server, it creates a local Windows account named BvSsh_VirtualUsers (or similar). What is the purpose of this account?
When you configure virtual users in Bitvise SSH Server settings, the SSH server needs to provide some kind of security context for actions taken by those users when they connect. Advanced SSH server settings allow you to configure a specific Windows account that should be used as security context for virtual users. If you don't take explicit steps to configure this, the SSH server will use as security context a default local Windows account, which it creates and manages for this purpose. In a default (unnamed) SSH server installation, this account is named BvSsh_VirtualUsers. (If your first installation was a version prior to 5.50, the account is named WinSSHD_VirtualUsers.)
You can use Windows Explorer, and other Windows administration tools, to apply Windows filesystem permissions to the BvSsh_VirtualUsers account. In this way, you can control what parts of your system a virtual user will be able to access. These Windows security permissions will apply to virtual users even if they are permitted to use terminal shell or exec requests, in which case, the virtual filesystem configured in SSH server settings does not apply.
You should not attempt to delete the BvSsh_VirtualUsers account, or change its password. Such changes will either be detrimental to your SSH server's operation, and/or will not be effective. The SSH Server will automatically enable this account when the server is started, and disable it when stopped. The SSH server sets this password to an extremely long, extremely complex random value. It will not be possible to log into this account, other than by allowing the SSH Server to use it as a security context for a virtual account.
In SSH Server version 8.48, the password for the BvSsh_VirtualUsers account is generated as 41 cryptographically random characters from an alphabet containing A-Z, a-z, 0-9, and special characters. The cryptographic strength of this password is on the order of 256 bits. The SSH Server will change the password if it expires according to your password expiration policy configured in Windows.
For more information: Security architecture in Bitvise SSH Server
Q535. I want to configure the SSH Server to send email notifications. How do I configure SMTP settings?
SMTP settings can be found in Advanced settings > SMTP sending. The settings depend on your SMTP server. Example settings using an on-premise SMTP server:
- Email sending: Send via outgoing SMTP server
- From address: An email address from which the SMTP server permits you to send.
- Sender computer name: A DNS name identifying the SSH Server computer. The SMTP server usually does not verify this, but it has to be specified and has to use DNS name syntax.
- IP version preference: None
- Host: The DNS name of the SMTP server. If you specify an IP address instead, you have to reduce the TLS requirement.
- Port: 465 if the SMTP server supports implicit TLS from the start of the connection; 587, 25, or 2525 if the SMTP server supports explicit TLS using STARTTLS. Other port numbers are also possible; check with the administrator of the SMTP server.
- Implicit TLS: Enable if port 465; disable if port 587, 25, or 2525.
- TLS requirement: If the SMTP server has a properly configured TLS certificate, set this to TLS, server name is exact match. Otherwise, use an appropriate lesser setting.
- Sender authentication: PLAIN authentication is usually best when using TLS. For Office 365, use LOGIN authentication.
- Username: Your SMTP username
- Password: Your SMTP password
Example using Microsoft Office 365:
- Email sending: Send via outgoing SMTP server
- From address: An email address from which Office 365 permits you to send.
- Sender computer name: A DNS name identifying the SSH Server computer. The SMTP server usually does not verify this, but it has to be specified and has to use DNS name syntax.
- IP version preference: None
- Host: smtp.office365.com
- Port: 587
- Implicit TLS: Disable
- TLS requirement: TLS, server name is exact match
- Sender authentication: LOGIN authentication
- Username: Your SMTP username
- Password: Your SMTP password
See also Microsoft article.
Q540. The SSH Server's log files are very detailed. How do I extract just the information I'm looking for?
The SSH Server's log files are intended to be machine processable. Log files use the XML format, which can be handled by utilities such as Microsoft Log Parser, or custom applications. It's straightforward to process XML files using any .NET language.
For more information, see also Interpreting SSH Server log files using Microsoft Log Parser.
Q545. How can my program programmatically inspect sessions currently connected to the SSH Server?
The SSH Server comes with a command line utility, BssStat, which supports several parameters including the ability to list currently connected sessions and channels. Like the BssCfg utility, BssStat needs to be run from an elevated, administrative Command Prompt or PowerShell window, or from a program that has administrative permissions. Run it without parameters for help.
The SSH Server also comes with C++ source code for BssStat included in the SSH Server installation directory. This source code requires minimal dependencies, and can be incorporated into an application that wishes to connect to the SSH Server and monitor it directly.
Q550. I enabled the Omit server version setting, but the server still sends the name of the product in the SSH version string. How can I completely remove product information from the version string sent to clients?
You can remove the exact server version from the SSH version string by enabling the setting Omit server version in Advanced settings, on the Connections page. (In versions before 9.xx: the Server page.) However, we do not support completely removing the product name.
Any hacker who can exploit a server-specific vulnerability can also identify the server product based on the contents of the KEXINIT packet the server sends. KEXINIT packets are sent in plaintext and have specific patterns which are sufficient not just to identify the make of the server, but also a particular version subset.
Even if KEXINIT was not identifiable, it is always possible to narrow down the operating system make and version by the mere behavior of the TCP/IP stack on the server. The SSH Server cannot do anything about this.
As a result, removing the server software name from the version string only denies useful information to legitimate clients, while not significantly preventing attacks. Meanwhile, legitimate clients need this information for compatibility measures.
In general, we recommend the following measures to reduce the annoyance of drive-by hacking attempts:
- Instead of using the default SSH port (22), configure the SSH Server to accept connections on a random port between 1024 and 49151.
- If you only connect to the SSH Server using clients that support SSH protocol obfuscation (e.g. Bitvise SSH Client), enable obfuscation with a keyword.
Q560. How do I import a list of IP addresses I want to block from a file?
You can do this using the SSH Server's scriptable configuration language. For example:
$cfg.settings.access.clientAddresses.new.addressRule.addressType = $cfg.enums.AddressVer6Type.ipv4 $cfg.settings.access.clientAddresses.new.addressRule.ipv4 = "10.2.3.4" $cfg.settings.access.clientAddresses.new.instr.allowConnect = $false $cfg.settings.access.clientAddresses.NewCommit()
After adding entries, edit the rule list to make sure that their order is correct - for example, that individual IP address block rules appear in the list before a blanket allow-all rule.
Q570. How many simultaneous client connections does the SSH Server support?
The answer depends on the type of connections, their activity, the lowest performance you find acceptable, and hardware resources available to the server.
In versions 9.xx, the SSH Server is configured by default to allow up to 500 concurrent connections. This is configured with the Maximum connections settings, found in Advanced settings, under Connections.
Separate limits can be configured for connections with and without child processes. Connections with processes include file transfers, terminal shell, and exec requests. Connections that do not use child processes include those that only use port forwarding, or SSH Server Remote Control, or the SSH public key subsystem.
Very old Windows, such as Windows Server 2003, will run out of a kernel resource called desktop heap space if more than 50-60 Windows sessions with processes are created. In SSH Server versions 9.xx, the number of sessions may be less than the number of connections if you enable Sessions > Windows session sharing.
In all more recent versions of Windows, desktop heap space is not statically limited. In this case, the SSH Server's ability to support a greater number of connections will depend on their activity and the server's hardware resources. If most connections have low activity, hundreds can be supported. However, if all connections attempt to perform file transfer at maximum available speed, they will quickly start competing for CPU and bandwidth.
Given unlimited hardware resources, the SSH Server can support several hundred simultaneous sessions on a 32-bit platform, and several thousand on a 64-bit platform. For reasons related to US cryptography export restrictions, the SSH Server has a maximum hard limit of 2,498 simultaneous authenticated connections. You are likely to run into CPU or bandwidth limitations before that, and should restrict the maximum number of connections to a smaller number.
Q572. We have clients that connect but never disconnect. The SSH Server's maximum configured number of sessions is reached, and then no new connections are accepted. What can be done about this?
The main thing to do is to ensure you are assigning separate accounts to different clients, and then configure per-user limits for the clients. These limits can be configured in Advanced settings, either for an individual user in their account settings entry, or in a group settings entry as a default for multiple users. The settings can be found in the account or group settings entry under Limits and quotas.
You can also configure a server-wide Connection timeout setting in Advanced settings, under Connections. (In versions 8.xx and older, the setting is Session timeout, under Session.) An automatic connection timeout is disabled by default because the SSH Server cannot prevent clients from reconnecting. The connection timeout will also not trigger if the client generates regular activity of any kind, for example if it performs repeated directory listings.
Check also Q570 for information about raising the maximum number of allowed connections. The maximum connection limit configured on your system may be too low for the number of simultaneous connections you want it to handle. However, if you don't configure per-user connection limits, then if you have a client that keeps connecting but never disconnects, this can exhaust the maximum number of connections regardless of how high it is set.
Q575. Sometimes, login attempts fail with the message "This login attempt was serialized and could not be processed in the time configured", or "The logon attempt expired due too many concurrent logon attempts." How do I fix this?
A message like this means the login attempt was serialized and could not be processed in the time configured in Delayed login expiration, found in Advanced settings > Connections.
This happens if another simultaneous login attempt for the same account or from the same IP address is taking too long. It can also mean there are too many concurrent login attempts for the same account or from the same IP address, and they all use a method like "password" that is subject to the Penalty login attempt delay setting.
The purpose of this functionality is to protect your server from password guessing.
To avoid this situation, change any of the circumstances involved:
Make sure there aren't so many simultaneous connections using "password" authentication from the same IP address, or using the same user name.
If you are using the same account for many different clients, it is more secure to use a different account for each client.
If the SSH Server is behind a load balancer that hides the real IP addresses of clients, recent SSH Server versions support enabling the PROXY protocol in Advanced settings, under Bindings and UPnP. The PROXY protocol allows a load balancer to relay the client IP address to the SSH Server, so that the connections do not appear to all be coming from the load balancer IP.
Use public key authentication instead of password. Public key authentication is not subject to defenses that are enabled by default against password guessing.
You can disable the defenses against password guessing. The main way to do so is to remove or lower the setting Penalty login attempt delay. This is configured in Advanced settings, under Connections. (In SSH Server versions 8.xx and older, the location is under Session.)
If you remove defenses against password guessing, you must ensure that all passwords which could be used to connect to the SSH Server are long, randomly generated and highly complex. Furthermore, check your SSH Server settings to ensure that users are not allowed to change their passwords to weaker values.
Q578. A client is attempting 200 file transfers in 200 simultaneous connections. All connections are made in the same second. The SSH Server interprets this as a Denial of Service attack and most of the transfers fail. What settings can I relax to make this work?
Depending on the number of simultaneous connections and the authentication method used, the following settings may need to be adjusted:
Ensure that the client's account is permitted more than the required number of concurrent connections. This is configured in Advanced settings, either in the account settings entry that applies to the client, or in a group settings entry, as a default. The connection limits are configured under Limits and quotas.
Screenshot in account settings; Screenshot in group settings (defaults).
Advanced settings > Connections: Ensure that Maximum connections from users and Maximum connections with processes permit more than the required number of concurrent connections from all users. Screenshot.
Advanced settings > DoS protection: Under default settings, the SSH Server will begin to drop connections on arrival if more than 200 connections are received within 10 seconds. This is controlled by the settings Enable accept delay threshold (default 200) and Enable accept delay window (default 10 seconds). Screenshot.
If this is the cause of connections being dropped, the SSH Server records the Info-level event I_SERVICE_CONNECTIONS_DISCARDED. If the SSH Server does not log this event, and the event is not disabled in Advanced settings > Logging, then DoS protection is not being triggered.
To relax this setting, either increase Enable accept delay threshold to a higher value, or reduce Enable accept delay window to a lower value.
If you relax these settings, it becomes easier for an unauthenticated remote attacker to exhaust all TCP sockets available to the SSH Server. If the sockets are exhausted, this prevents further connections from any client until some existing connections end.
Advanced settings > IP blocking: If the aggressive client is connecting from predictable IP addresses, add these addresses to IP blocking > IP whitelist.
If the client's IP addresses are not predictable, you may need to increase the setting IP blocking > Total threshold. When a client starts an authentication attempt, the SSH Server gives the client a temporary, lightweight penalty. This counts toward the Total threshold setting, and is reset if the client authenticates successfully. But if the client makes hundreds of simultaneous connections, the Total threshold can be exceeded before any authentication attempt succeeds.
If the client is using password authentication, you may also need to relax Advanced settings > Connections > Penalty login attempt delay. Screenshot.
If the aggressive client can use public key authentication, this is a much better choice. If not, then in order to allow the aggressive client to reliably connect, you must sacrifice protection against brute force password guessing. This is done by reducing the Penalty login attempt delay to either 1 second or 0 seconds.
If you reduce the Penalty login attempt delay to 0 seconds, protection against brute force password guessing will be completely disabled. In this case, you must ensure that all accounts which can conceivably log in using password authentication can only use secure, long, randomly generated passwords.
To achieve 128-bit security, all passwords must consist of 22 random characters from the alphabet A-Z, a-z and 0-9. Adding special characters can create interoperability issues, and only reduces the needed password length to e.g. 20 instead of 22 characters.
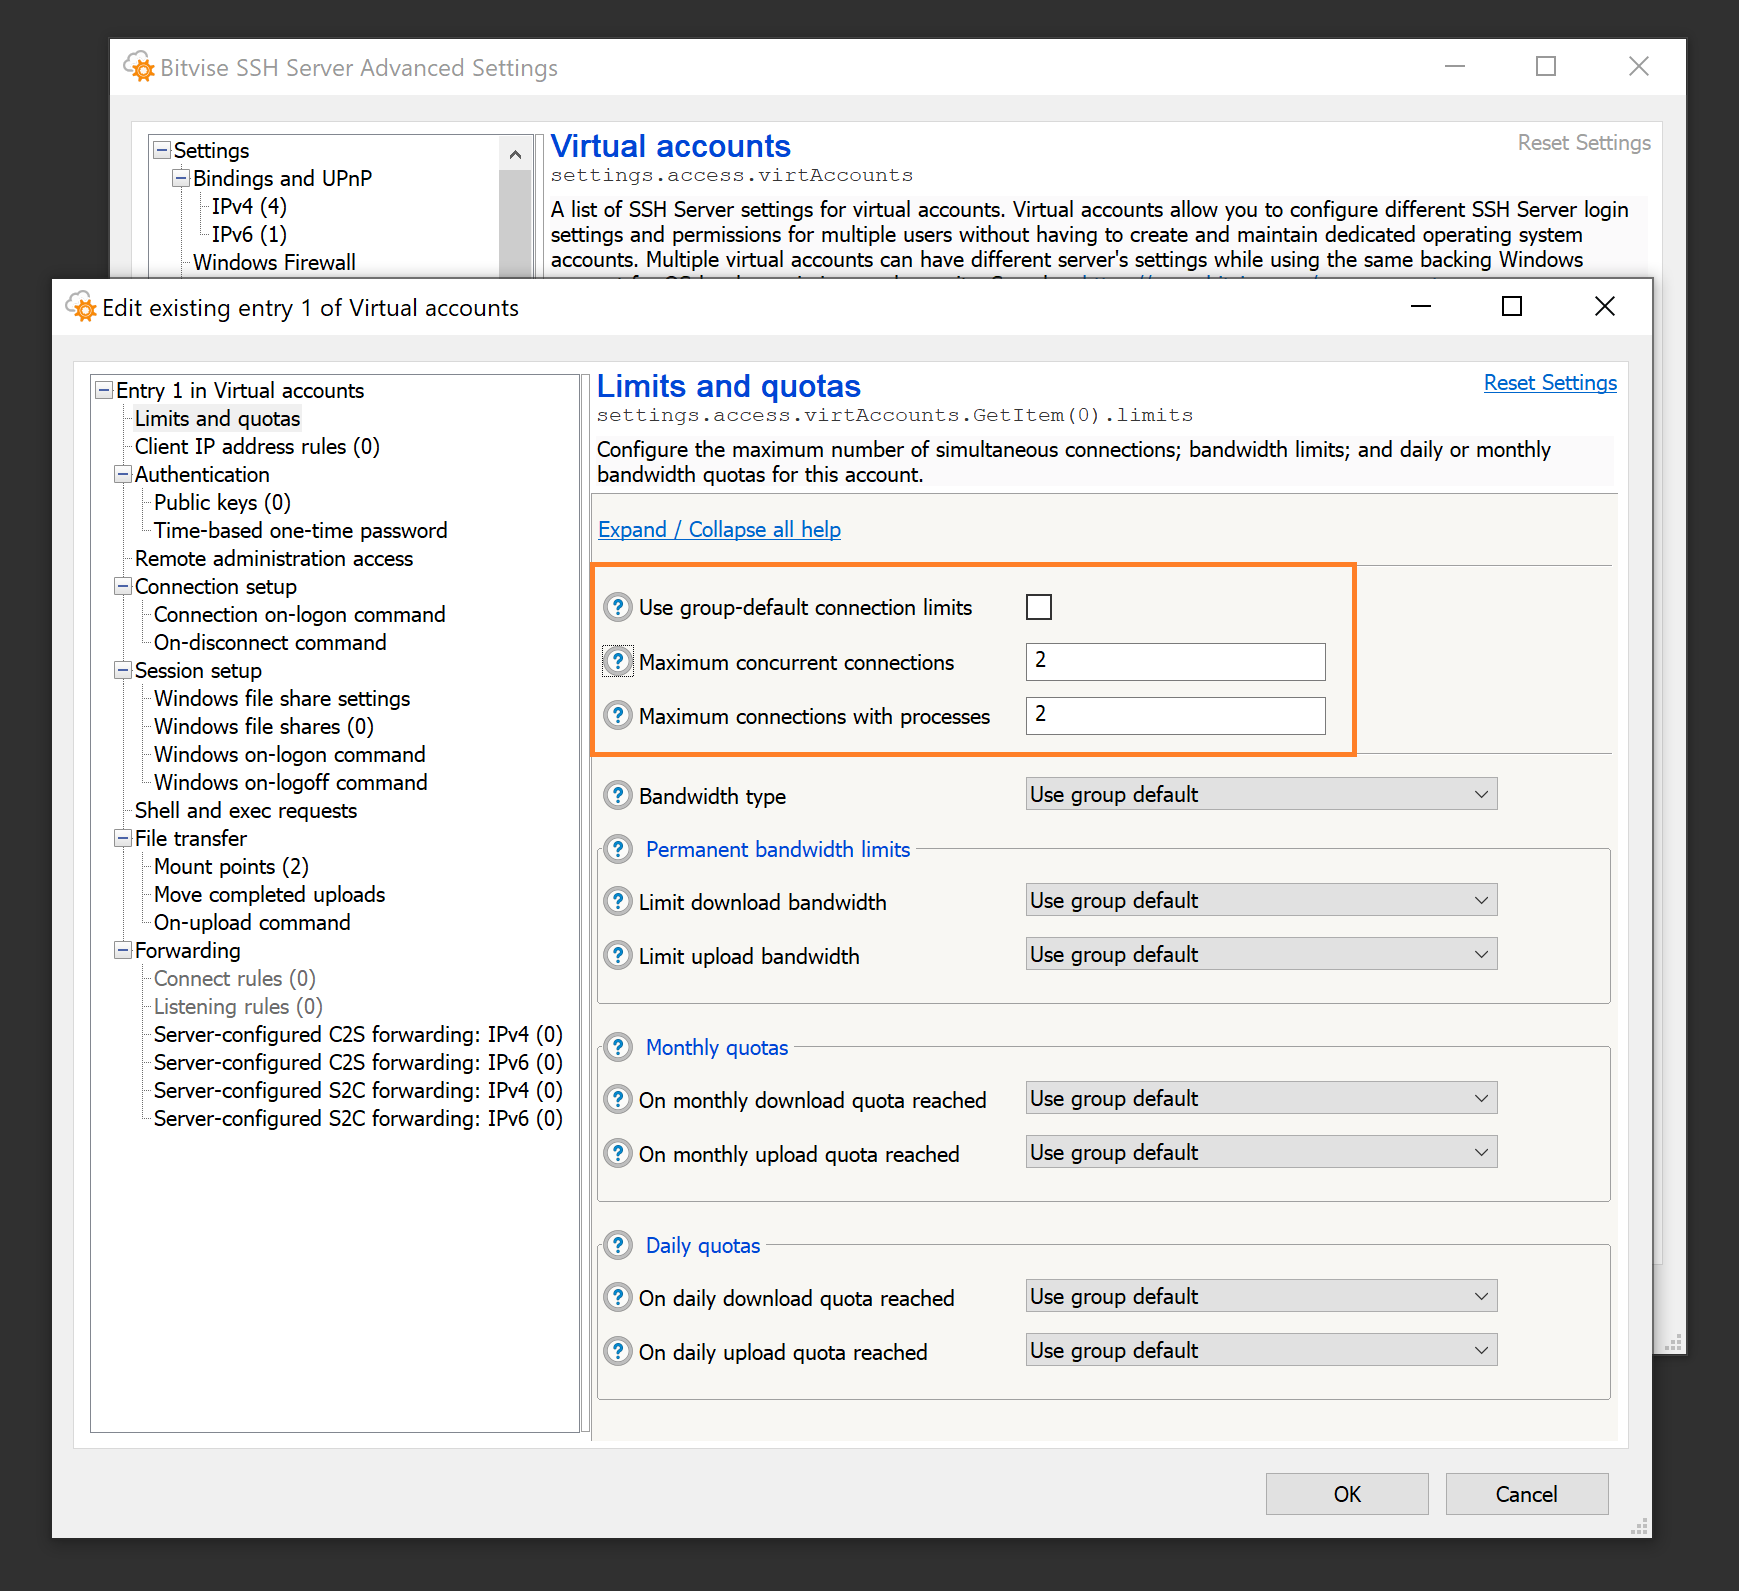
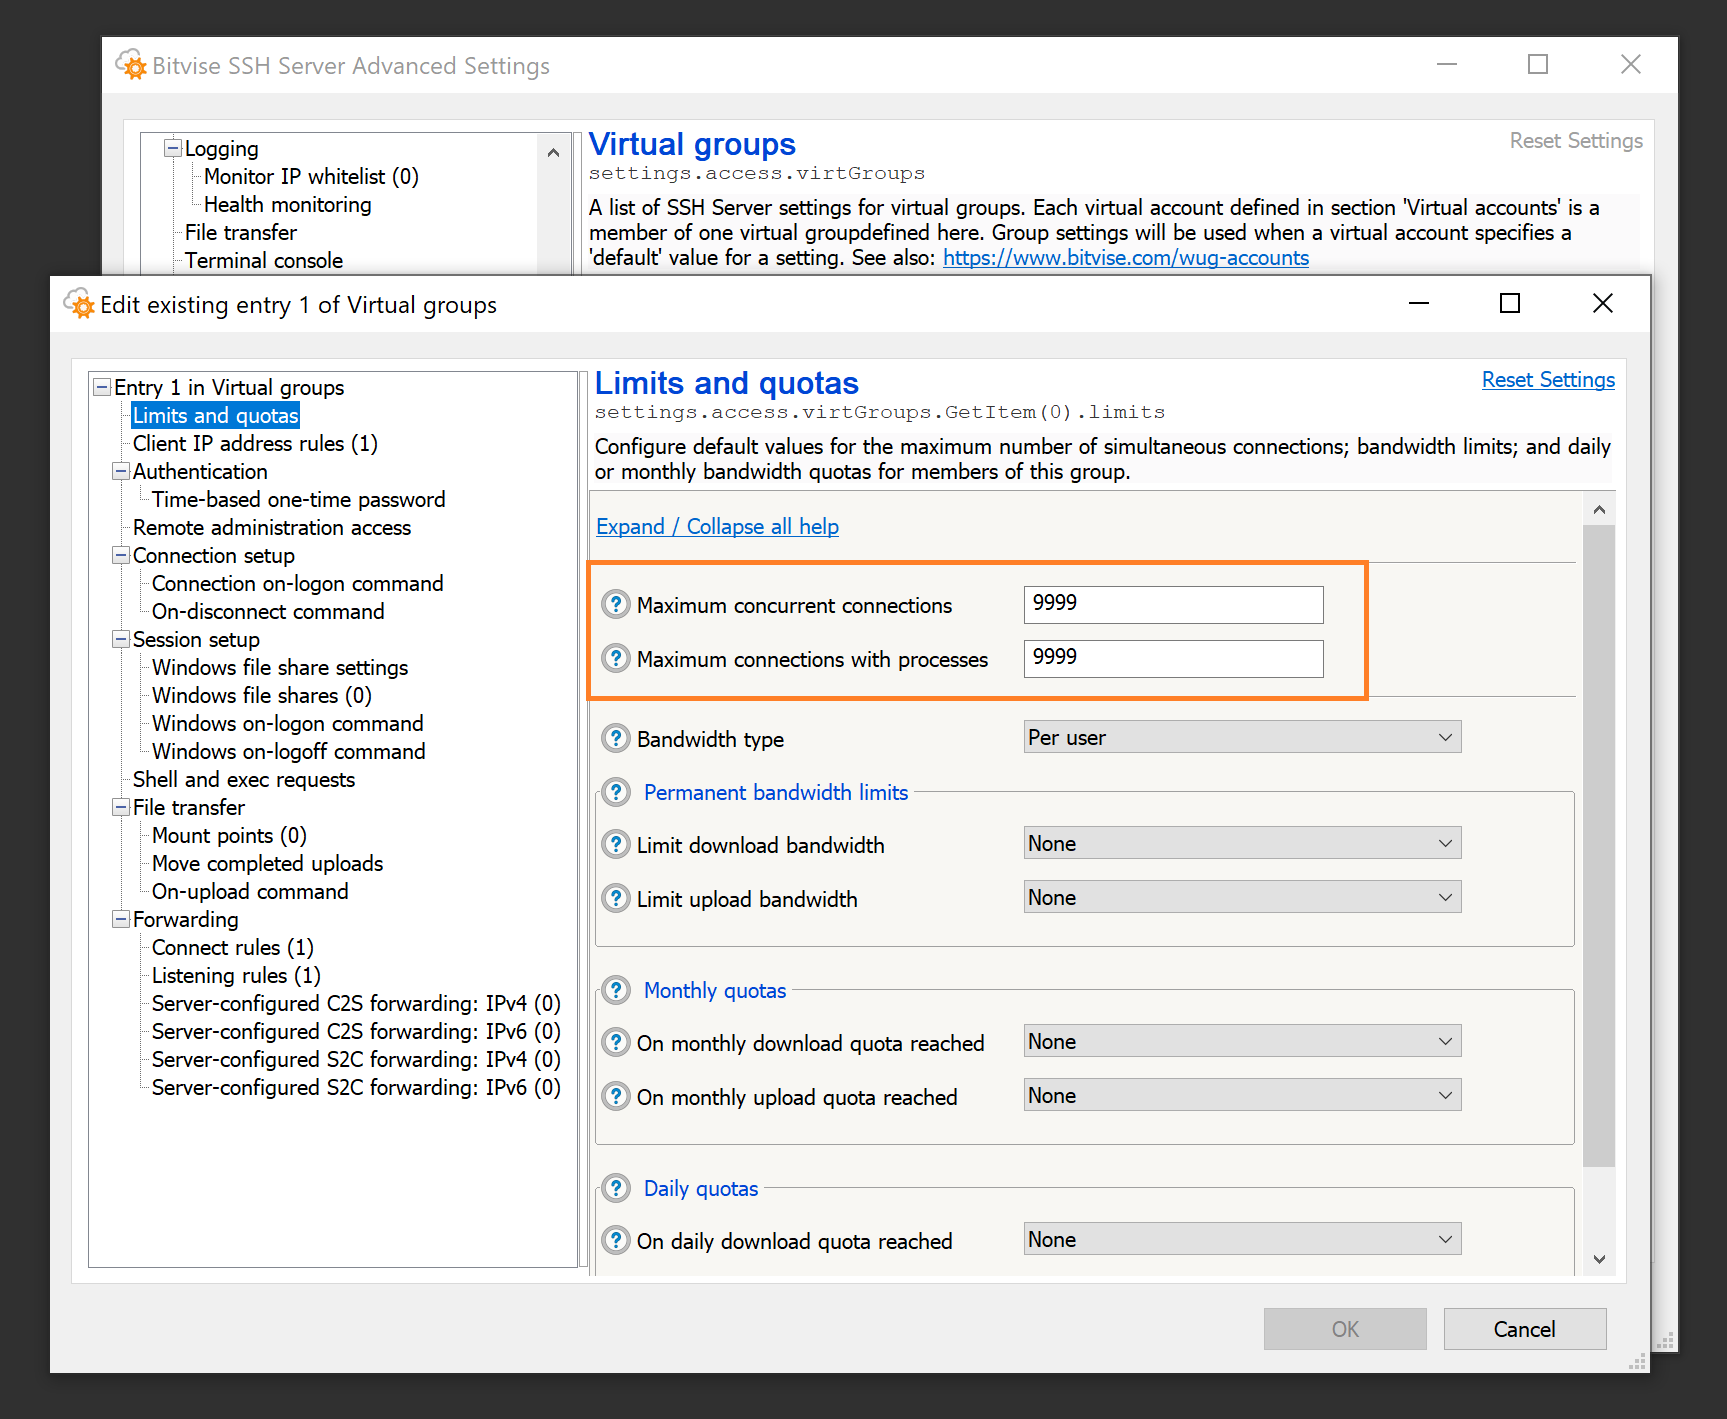
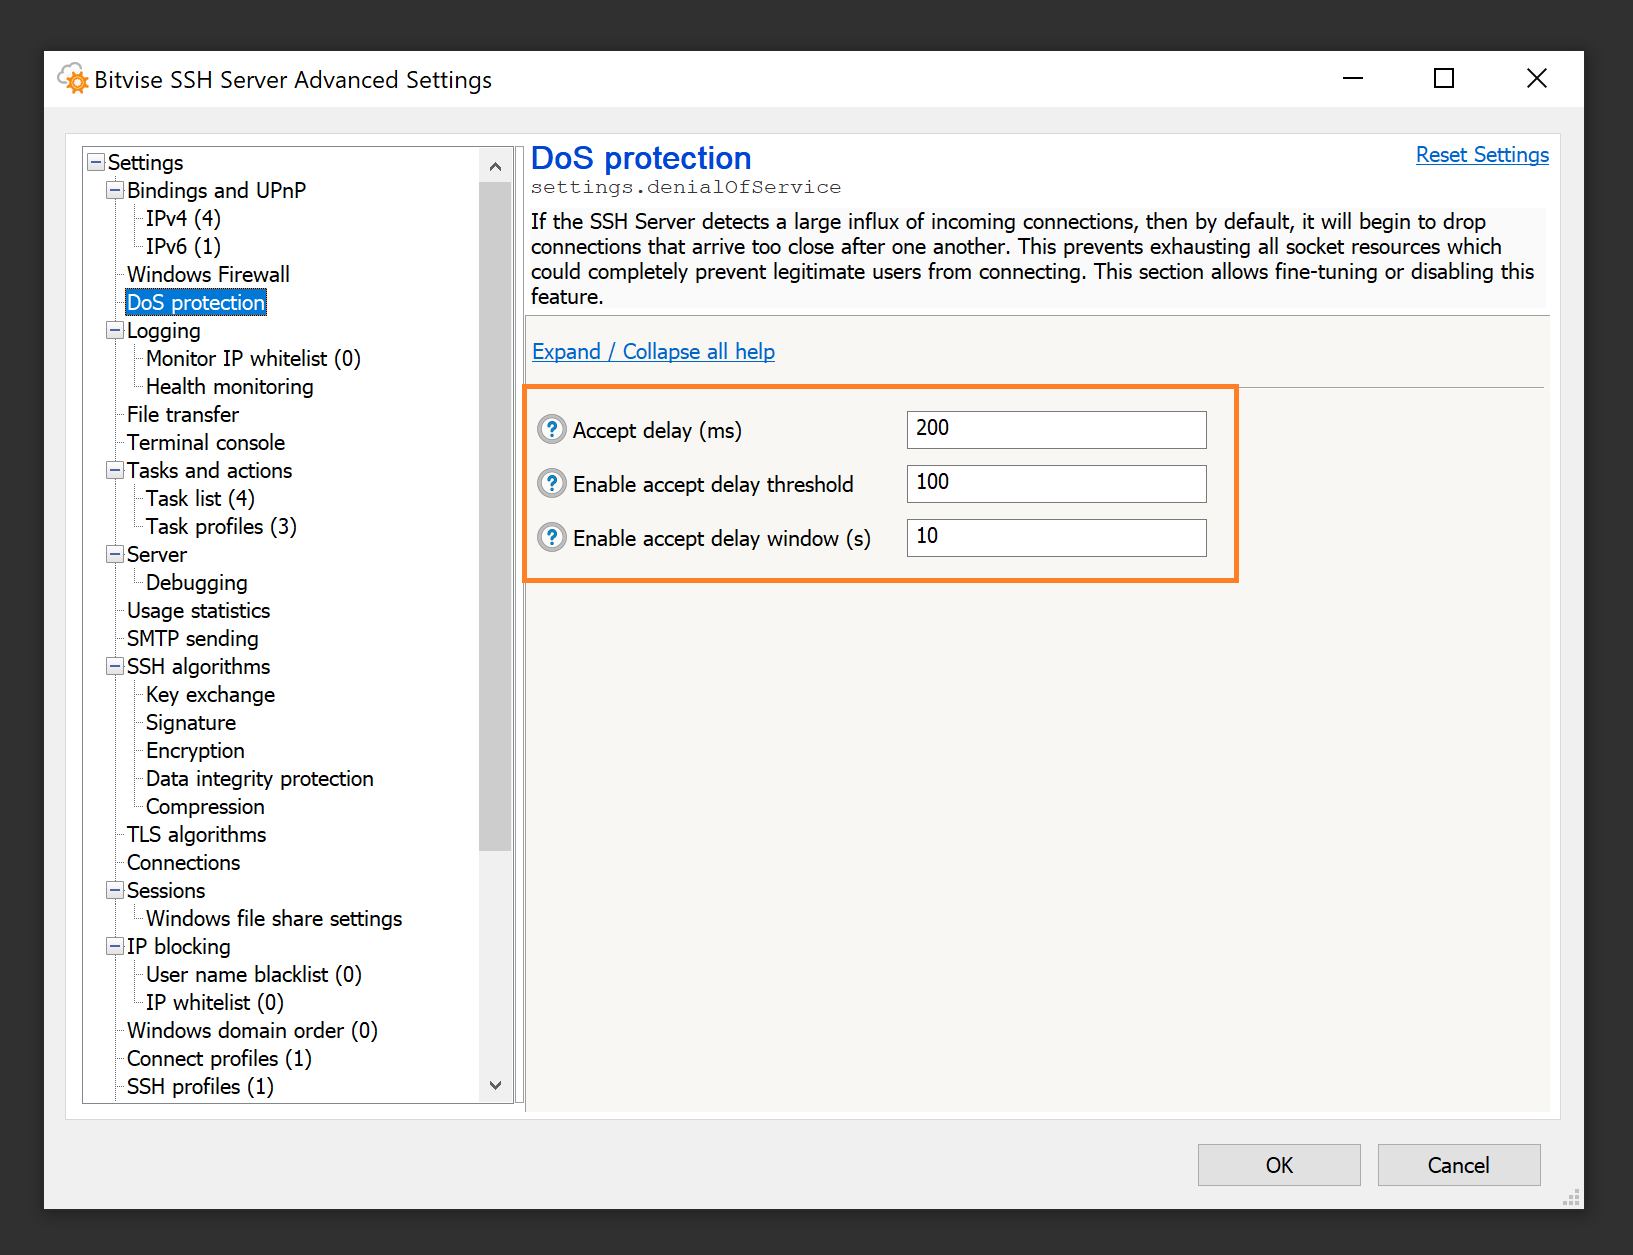
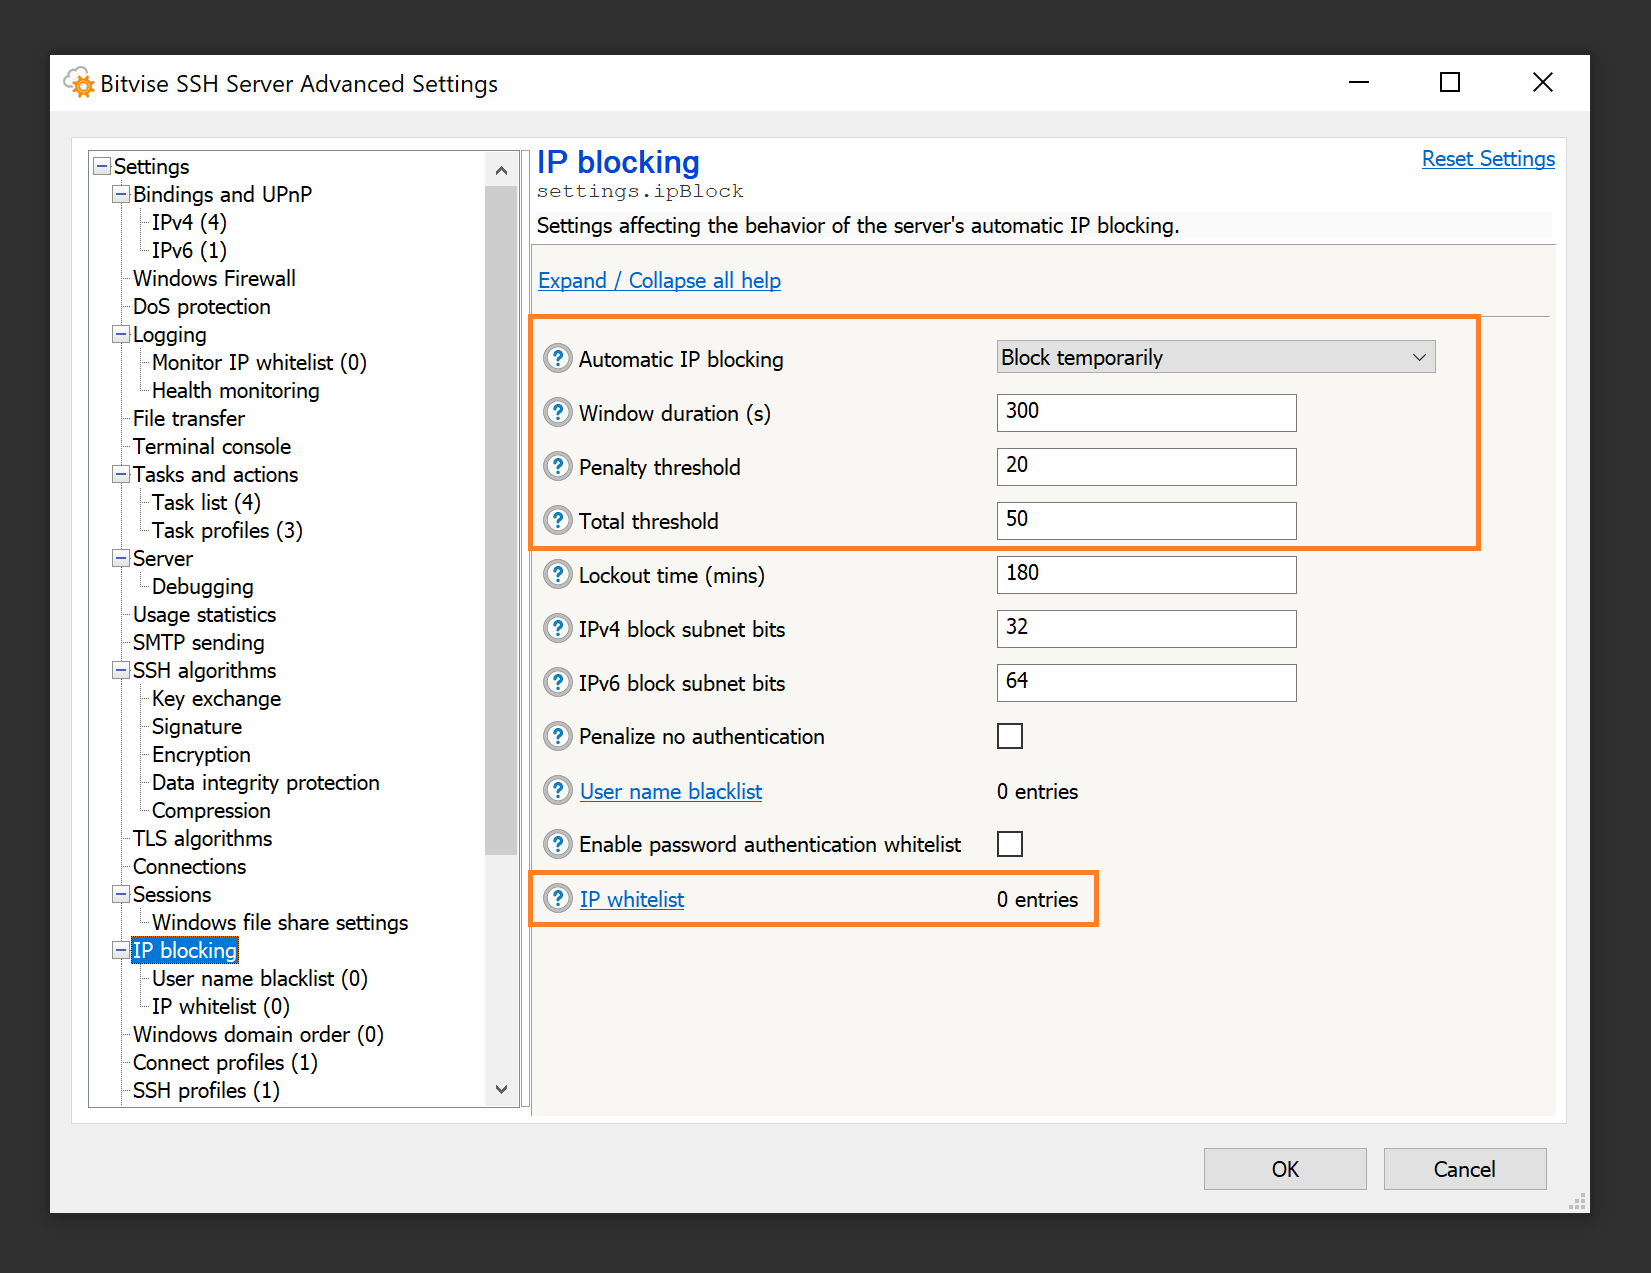
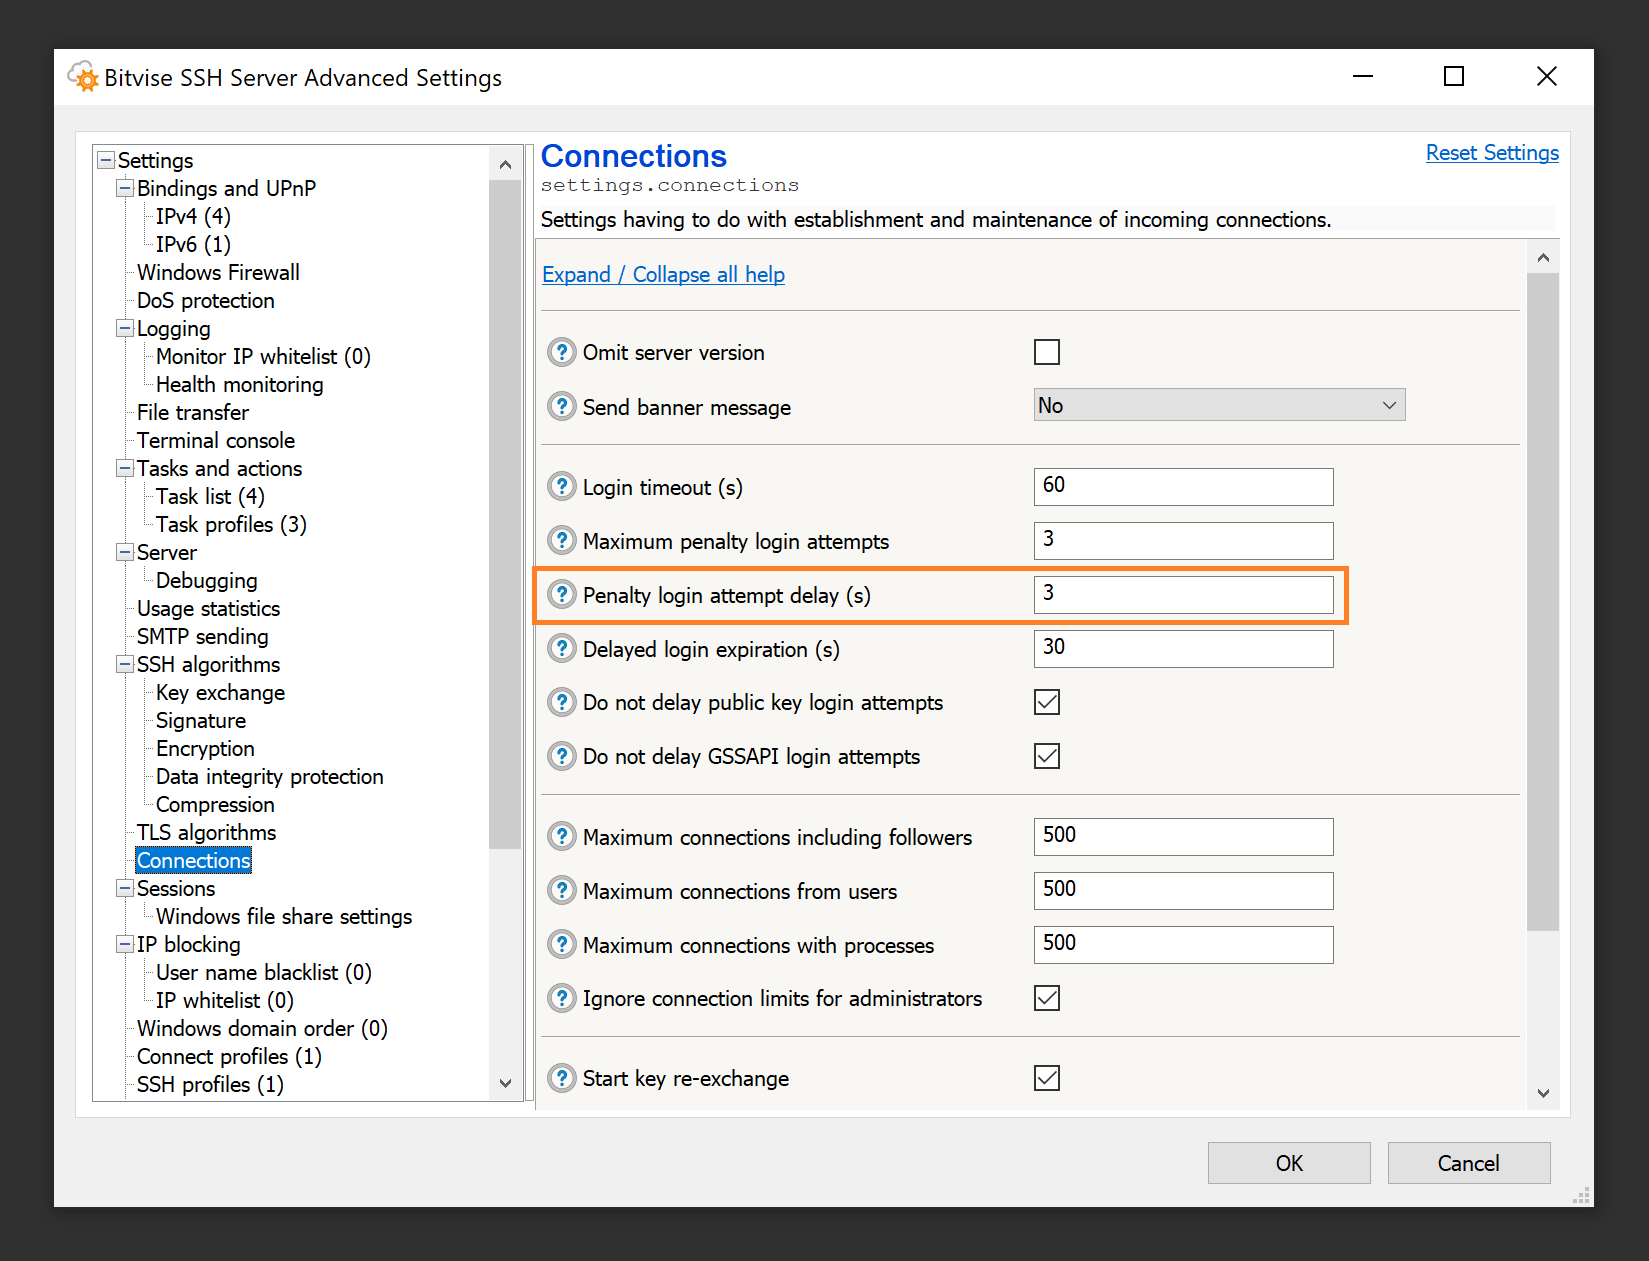
Q580. While testing in a domain environment, I find that when using the gssapi-with-mic authentication method, the SSH Client allows me to log into the SSH Server with no password. Is this secure?
Yes, this is secure. In order for this type of logon to work, all of the following has to be true:
- Both the client and server computers have to be part of a Windows domain. The client can also be in a Unix realm.
- The client and server must be either in the same Windows domain, or in separate domains or realms that have an established trust relationship.
- The user has to be logged into the client computer as a domain account that can also log into Windows on the server.
- Bitvise SSH Server has to be configured to allow login with this domain account.
- GSSAPI authentication (Kerberos and/or NTLM) has to be enabled in the SSH Server. Because it only works in strict conditions, it is enabled by default. It can be disabled in Advanced SSH Server settings, under Access control.
If all of the above conditions are met, then the user is already logged into Windows on the client machine with an account that has permissions to log into the SSH Server. In this circumstance, the Windows domain infrastructure allows the user to use the gssapi-with-mic authentication method to perform single-sign-on authentication into the server, without having to authenticate again. This is a security advantage: it allows the user's password to be more complex, because it does not have to be entered as often.
If you would like to prevent this, make a change to any of the conditions enumerated above. The most common situation where this could be a problem is if the SSH Server is configured to accept login from domain accounts that you do not in fact want to log in. In this case, configure the SSH Server more strictly to accept login only using accounts you approve of.
Q582. We have a Windows account that keeps getting locked out by Windows. How could this be caused by our SSH Server settings?
There are multiple possible configurations that could cause a Windows account to get locked out due to SSH Server settings. All of them boil down to that login is being attempted, somewhere, using an incorrect password. The following are some possibilities:
Password guessing by unauthorized third parties. If your SSH Server settings permit login into Windows accounts using password authentication, then anyone who is permitted to connect to the SSH Server (as configured in Advanced SSH Server settings > Access control > Client IP address rules) can attempt to authenticate using a username and password which the SSH Server will submit to the Windows LogonUser function. This is because usernames and passwords for Windows accounts must be verified by Windows, and cannot be verified by the SSH Server.
This means, if you permit login into Windows accounts using password authentication, then anyone connecting from an IP address which is allowed to connect to the SSH Server can attempt username and password combinations which can lead to Windows accounts being locked out.
You can prevent this by disabling password authentication for Windows accounts. You can configure this in Easy settings, on the Server settings tab, using the Password authentication setting. You can also configure this in Advanced settings, under Access control.
If you disable password authentication for Windows accounts, then if you want to support login into Windows accounts, they will need to log in using a different authentication method. For example, Windows accounts can log in using Kerberos (via GSSAPI) or using public key authentication.
Incorrect password in a legitimate client. You may have set up an SSH or SFTP client which connects to the SSH Server using a username and password. The client logs into a specific Windows account, to perform specific actions. This client might be scripted and connects every several minutes.
Suppose that you change the password for the Windows account, but you don't update the configuration of this client. The client is still connecting to the SSH Server using the previous password, and the login now fails each time the client connects. This can result in the Windows account being locked out by Windows.
Incorrect password in a Windows file shares settings entry. Suppose you configured the SSH Server to provide access to a network share. This network share could be configured for any Windows or virtual account. Suppose that you configured specific credentials in a Windows file shares settings entry in Advanced SSH Server settings, so that access to the network share occurs with a specific username and password.
Suppose that you change the password for the Windows account which is used to access the network share, but you do not update the Windows file shares settings entry with the new credentials. Now, whenever a user connects which is configured with this Windows file shares settings entry, the SSH Server will call the Windows function WNetAddConnection2, specifying the stored username and password, which is now incorrect.
This can result in Windows locking out the account that's configured in the Windows file shares entry; not the account that is logging into the SSH Server.
Incorrect password in the SSH Server's password cache. Suppose you configure the SSH Server so that a Windows account can log in using public key authentication. This account needs implicit access to network resources, so you configure the password for this Windows account in the SSH Server's password cache. This allows the SSH Server to create a logon session which has access to network resources, even when using public key authentication.
Suppose that you change the password for this Windows account, but you do not update the password stored in the SSH Server's password cache. By default, the SSH Server is not configured to clear the password from the password cache if login fails. If the user tries to log in multiple times using public key authentication, the SSH Server will try to use the password in the password cache, which is now incorrect. This can cause the Windows account to be locked out.
In this case, if you want to remove the password from the password cache on failure, this is configured in Advanced SSH Server settings, under Access control > Clear password from cache on failure.
Q585. File transfers sometimes get interrupted with an error like "MAC error", "data integrity failure", or "integrity check failed". What is the cause?
This type of error can be caused by:
An incorrect MTU setting. The Maximal Transmission Unit setting might be set to a too high value at one of the computers or network components involved in the connection.
This is a likely cause if the error:
- occurs with multiple types of client software over the same link;
- occurs early in the session, e.g. soon after starting the first upload or download, or even during authentication.
Accidental corruption of data in transmission that is not detected at a lower network layer. The TCP/IP protocol will detect errors in transmission with a probability of 65535 out of 65536, leaving a 1 in 2^16 chance that a transmission error will not be detected. If you are transferring a large file using a wireless link, or another type of connection that is prone to transmission errors, then any errors not detected by TCP/IP will cause an integrity check failure at the SSH layer. In this case, it is best to either switch to a more reliable link, or to use a client that is able to reconnect and resume transfer.
This is a likely cause if the error:
- occurs with multiple types of client software over the same link;
- occurs on the order of once per gigabyte of data transferred (depends on transmission error rate).
Implementation problem. The client that's interacting with the SSH Server might have a bug where it occasionally writes over the data it's sending or receiving, resulting in this error.
This is a likely cause if the error occurs with a single type of client software, but not other client software over the same link.
Intentional data corruption by an attacker with access to the network connection. This is usually least likely, but is the kind of attack that SSH is designed to detect. If an attacker tampers with data in transit, the SSH protocol cannot continue the connection, but it can detect and report that tampering may have taken place.
This is a possible cause if prolonged investigation of other causes does not yield results.
Q590. I keep getting the error: "The Bitvise SSH Server settings file is currently locked by another process." How do I resolve this?
This message indicates that some process on the system is keeping SSH Server settings open. This could be e.g. a settings window left open in an idle Remote Desktop session; it could be a BssCfgManip script that's intended to modify settings automatically, that has hung for some reason with locked settings; it could be the settings interface is open by an administrator through an SSH Client via the SSH Server Remote Control Panel.
If you cannot identify the program that is locking the settings, the easiest way to resolve the issue would be to restart Windows. This will interrupt any SSH connections or Remote Desktop sessions that could be keeping the settings locked.
If the problem persists after restart, the most likely explanation is that the settings are being locked by an automated process. However, in most cases, the settings are just open in another logon session.
Q595. Users are getting the error: "Logon was successful, but the server has encountered logging problems. Only administrators can connect at this point." How do I resolve this?
You need to resolve the logging issue.
This error means that the SSH Server is unable to log to its textual log files. In Advanced SSH Server settings, under Logging, there is a setting that controls how the server should react when this happens. The default option is Allow connections from administrators only, and this option is being activated if you're seeing this message.
As server administrator, you need to investigate what's going on with the textual log files. Does the configured textual log file directory exist? We recommend that this directory is on a local drive; if it's configured as a network share, this may not be available to the SSH Server reliably.
Is there space on the drive where the log directory is located? If the drive is out of space, this issue would occur.
Is logging set to a higher level than needed? If yes, this can fill up disk space. The log level we recommend for textual log files is Errors, Warnings, Info. We do not recommend logging Trace or Debug events unless you are trying to debug a specific problem.
Q597. How can I debug the raw content of packets exchanged during an SSH session?
To debug packets exchanged during an SSH session, use Advanced SSH Server settings > Logging to change the log level for textual log files to Custom events. Enable the events D_FLOWSSH_PACKET_IN and D_FLOWSSH_PACKET_OUT. Use the Log Folder Viewer from the SSH Server Control Panel to roll over the log file. Make a connection which reproduces the problem in which you are interested. Once you are done, roll over the log file again and change the log level for textual log files back to Errors, Warnings, Info.
Q599. My settings enable non-recommended algorithms such as diffie-hellman-group1-sha1, or encryption algorithms that use CBC mode. How do I disable these algorithms? How do I check if any clients are still using them?
You can disable these outdated algorithms in the SSH Server Control Panel, in Advanced settings > SSH algorithms.
One way to check if any clients are still using these algorithms is to perform a text search for the algorithm names in your textual SSH Server log files.
A more thorough approach is to process the log files using a tool or script. For an example, see Interpreting SSH Server Log Files using Microsoft Log Parser.
Upgrading and Moving
Q600. How do I upgrade my Bitvise SSH Server to the latest version?
There are two parts to the upgrade process:
Ensure that you have a license with upgrade access for the SSH server version to which you are upgrading. You can verify your upgrade access expiry date by logging into your License Overview.
If your upgrade access has expired, you will be able to add the desired number of license-years through the Place a New Order section under the license information. The expected new upgrade expiry date will be displayed on the page when you enter the desired number of license-years. The full cost will be displayed on the next page, at checkout.
Download the installer for the latest version from our website. Run the installer on the computer where you want to upgrade your SSH server installation, and follow the process.
If the activation code needs to be updated, you can apply the new activation code in the Bitvise SSH Server Control Panel either before or after the upgrade.
Q610. Will my settings and keys be preserved when I upgrade?
In general, yes. The upgrade process is intended to preserve your keypairs, your password cache, and your settings.
We do recommend making a backup of your settings before you upgrade. Settings can be exported using the Export function in the Bitvise SSH Server or WinSSHD Control Panel. A settings backup may be useful if the new version encounters a problem reading your settings, or if you decide to downgrade to the previous version again. The older version may not be able to read your settings once the new version has upgraded them.
Q620. I would like to move my SSH server to a different computer. How do I move my settings, password cache, and keypairs?
Settings. To move SSH Server settings, use the Export feature on the Server tab in the SSH Server's Control Panel.
On the new SSH Server installation, use the Import feature to import the settings.
Moving the settings will also move any client authentication public keys configured for user authentication.
Host Keypairs. It only makes sense to move keypairs used for SSH server authentication if the SSH clients accessing the server will continue to access the server using the same port, IP address, and/or DNS name. If there is any change in what address or port the SSH clients use to access the SSH Server, the clients will need to re-verify the server's host key. In this case, there is no benefit to transferring keypairs to the new installation.
If the clients will continue to access the server at the same address and port, the host authentication keypairs can be moved using the SSH Server Control Panel > Manage host keys.
Very old WinSSHD versions (e.g. versions 4.xx) do not contain a user interface function to export a host authentication keypair. Depending on the version, you may be able to use the wcfg command line configuration utility to export the keypair. Alternately, you could upgrade to a more recent version in place, and export the keypair using the new version.
Password Cache. In the latest SSH Server versions, the password cache is usually necessary only if:
You use Windows domain accounts that need to log in using public key authentication, and also need to have implicit access as that account to network resources on other computers.
You use virtual accounts which are configured to run in the security context of a Windows domain account, and also need to have implicit access as that account to network resources on other computers.
In the latest SSH Server versions, the password cache can be backed up into, and restored from a file, using the SSH Server Control Panel > Manage password cache > More > Backup items to file. If you want to move the password cache, but are using an older SSH Server version which does not support password cache backup, you can update the existing installation to a newer version that supports password cache backup, before moving.
External resources. The way you are using the SSH Server may depend on resources configured outside of the SSH Server. Such resources may be required for the setup to work properly. This can include:
- Windows accounts
- Windows filesystem directories, such as those used for file transfers
- Windows filesystem permissions on those directories
Such external resources are not transferred as part of migrating SSH Server settings. The administrator needs to recreate these parts of the setup on the new installation, in order for migrated settings to work properly.
For additional information, we recommend:
- Understanding and replacing Bitvise SSH Server host keys
- Storage and backup of Bitvise SSH Server configuration
Q625. I would like to update to a new SSH Server version, but I'm concerned I might encounter a problem. How do I downgrade if I need to?
The more time has elapsed since the release of the latest version, the lesser the risk that you'll run into a new issue. We try to be conservative with new releases, especially minor releases, to minimize the risk of new issues due to an upgrade. Nevertheless, all changes involve some risk, and all unexpected new problems must first be encountered by someone. Therefore, it can be prudent to prepare.
If you want to be able to downgrade, preserve the installer for your existing version. You should be able to find the installer in the Updates subdirectory of your SSH Server installation directory.
If the downgrade is between minor versions, you should only need the installer. To downgrade, run the older version installer and select the option to replace the existing installation. Your settings should continue to work.
An upgrade or downgrade is between minor versions if both versions use the same settings format. For example, all SSH Server versions between 9.15 and 9.4x use the 9.15 settings format. However, 9.51 is intended to be a release with new features, with a new settings format.
If the downgrade is to a version which uses an older settings format, then by default, the SSH Server performs automatic settings backups. These may be found in the Config\Backup subdirectory of the SSH Server installation directory. After you downgrade, you should be able to use the Restore feature in the SSH Server Control Panel, on the Server tab, under Settings, to restore settings last saved by a compatible version.
To be completely thorough, you can prepare for a possible downgrade or recovery by backing up SSH Server host keys and settings, in the same way as if you were preparing to move the SSH Server to another installation. In this case, take the steps under Q620.
Q630. I would like to upgrade an SSH Server installation on a remote computer, but I can only access it over the SSH Server itself. How do I preserve access if there is a problem during upgrade?
What we recommend in this case is to have two separate SSH Server installations, one for normal use and one for maintenance access. That way you can upgrade one instance while accessing the computer through the other.
To install a second instance, simply run the SSH Server installer, and give the new instance a unique name instead of replacing or upgrading the existing instance.
You will not need an additional license to run two concurrent instances on the same computer. You just need to configure the second instance to accept connections on a different port.
Q650. What are your versioning and end of life policies?
The versions of Bitvise SSH Server, SSH Client and FlowSsh are maintained together. When one of the products receives new features that warrant changing the version number, the other products receive the new version as well.
A new major version, such as from 7.xx to 8.xx, means that at least one of our products has changed in such a way that not everyone might experience a smooth upgrade. Usually, the product that affects this is Bitvise SSH Server.
As much as possible, we try to ensure that upgrades are effortless, painless, and that all settings work after an upgrade as they did before. The main aspect where this is difficult for us to achieve is the SSH Server's scriptable configuration language. If you use scriptable configuration, some interfaces may change significantly between major versions. We try to minimize changes between minor versions.
When we introduce a new major version, we will continue to maintain the previous branch with security and reliability fixes until we are confident that there are no issues that would prevent users from upgrading. Since users who use scriptable configuration must adjust their scripts; and since it takes time to receive feedback if there exist upgrade issues; users can count on that we will maintain the previous major version series with security and reliability fixes for at least one year. This time may be extended if we become aware of substantial issues that prevent users from upgrading. The time may be reduced for Bitvise SSH Client and FlowSsh, which are likely to receive a new major version without experiencing major changes.
If you use automatic updates in versions 9.xx and 8.xx:
If you are on the strongly recommended channel, we will do our best to avoid breaking changes within a reasonable time frame. This channel may upgrade you from e.g. version 9.32 to 9.39. An update like this will be a rare security fix or a reliability fix. This is a suitable channel for production users who rely critically on scriptable configuration features.
But note: security fixes, and important reliability fixes, are marked strongly recommended. If you're still using a previous major version when it is no longer receiving updates, a strongly recommended update can eventually cause an automatic upgrade across major versions, which can break scripts.
If you are on the recommended channel, there may be small breaking changes for some setups, though not most. For example, there may be small adjustments needed for automated configuration scripts. Other setups may experience breaking changes inadvertently, such as from unforeseen interactions. This channel may upgrade you from e.g. 9.39 to 9.44. An update like this may include compatibility fixes, and may include other new improvements from recent releases. This is a suitable channel for production users who may use scriptable configuration from time to time, but do not rely on it critically.
If you are on the latest version channel, there may be significant breaking changes for some setups. For example, there may be non-trivial changes needed for automated configuration scripts. This channel may upgrade you from e.g. 9.44 to 9.45. This is a suitable channel for casual users and enthusiasts.
Q655. I'm currently using version A.BC, but the current latest version is X.YZ. What is the EOL date for my version?
Bitvise uses a linear release system. Each version is final when released. When we release version A.BC, we will not release another, different version A.BC.
All updates for past versions come in the form of new versions. All new versions are intended to be backward-compatible, to allow for straightforward updates.
This means:
There is no EOL date for your version. It is still maintained! The latest version, X.YZ, is the compatible update for your existing version, A.BC.
The question itself is a paradox. If you're still using version A.BC, when X.YZ is available, it suggests you don't want "life" in your SSH Server versions. So, what do you mean by "end of life"? You want updates... but not updates that change anything? We already try to avoid breaking changes in new versions.
Important exception: scriptable configuration is the main SSH Server feature which is affected by major updates. See also: Q650.
Contacting Support
Q. I read the FAQ, but it didn't help me solve my problem. What do I do?
Contact us through our Contact page, and describe your problem in as detailed manner as possible. The more information you provide, the greater the chance of a swift and effective resolution.
Chapter 2.2
Public keys in SSH
This page attempts to explain public keys, as used in SSH, to readers unfamiliar with the concept.
The following concepts need to be understood by everyone, including beginner users:
A private key is a very large, pseudo-randomly generated number, that contains your secret information in any operation involving public keys. You generate the private key on your computer, using one of a variety of programs, and store it securely. You need to keep your private key secure; you never send it to anyone.
A public key is a very large number, mathematically derived from your private key. It is derived in such a way that the two numbers are linked, but so that the private key cannot be discovered by anyone who only knows the public key. The public key is what you send to other parties, to whom you want to authenticate yourself, or to whom you want to send encrypted messages. The public key is not sensitive, and does not need to be protected. It is public.
A signature is a result of a cryptographic calculation that can be performed only by a person who holds a private key, and can be verified by anyone who knows the corresponding public key. If a person is able to produce a valid signature of random data on demand, this proves that they have access to the private key associated with a particular public key.
A keypair is the combination of the private key and the public key. A keypair by necessity includes the private key, so a full keypair ought to be protected just like a private key.
A fingerprint is a cryptographic digest that can be used to uniquely identify a public key. Fingerprints are used for practical purposes, to compare keys which would otherwise be too large and unwieldy to compare manually. The most common fingerprint formats used in SSH are the SHA-256 format (example - "C+VpXsf..."), the MD5 format (example - "43:71:be:ab:d3:..."), and the Bubble-Babble format (example - "xubem-kiloc-getad-ponyh-..."). Like a public key, the fingerprint is not sensitive information, and can be disclosed indiscriminately.
A certificate is a public key, cryptographically signed by a certification authority (CA) in a public key infrastructure (PKI). The most widely used certificate standard is X.509. In the way SSH is most commonly used, it does not support certificates. Certificates are used primarily in TLS (SSL), which is a different protocol from SSH that serves a similar purpose. Most common SSH implementations only use raw public keys and private keys.
SSH sessions use public keys for two main purposes: server authentication, and client authentication. Both processes work very similarly, but they involve separate sets of keys. When discussing a specific public key in the context of SSH, it is important to be aware whether the key is intended to authenticate the server, or a client.
In Bitvise SSH Server
In Bitvise SSH Server:
Keys that are used for server authentication in SSH are displayed in the Host keys section of the Bitvise SSH Server Control Panel, and can be configured through the link Manage host keys. This section manages private keys, which are stored by the SSH server so it can authenticate itself to clients that connect to it.
In Keypair management, you can use the Export feature to export the public key associated with each host authentication keypair. You can send such a public key to an SSH client, so it will be able to authenticate the SSH server when it connects to it. If you do not send the client the whole public key, you should at least provide the user with your server's host key fingerprint, so that the user can confirm the server's public key is correct when they see it. The server's host key fingerprints can be viewed and copied from the main screen of the Bitvise SSH Server Control Panel.
Keys that are used for client authentication are managed through individual account settings entries. To view or configure these keys, open Easy or Advanced SSH server settings, and open a specific Windows or virtual account entry. Within this entry, find the link named "Public keys". This link opens a dialog which can be used to import, export, or remove public keys that the client can use to log into the server.
The SSH server will allow a client to add or remove keys themselves if "Allow public key management" is enabled in the user's account or group settings entry in Advanced SSH server settings, or if "Synchronize with authorized_keys" is enabled in Advanced settings > Access control.
If you are trying to configure public key authentication for a client connecting to Bitvise SSH Server, check also the Public Key Authentication section of our Bitvise SSH Server Usage FAQ.
Since versions 8.xx, the SSH Server also supports FTPS. FTPS is a file transfer protocol which uses TLS, not SSH; and TLS does use X.509 certificates. The SSH Server Control Panel includes a Manage certificates interface which allows you to generate a self-signed certificate or a certificate signing request (CSR) to obtain an X.509 certificate from an issuer (a CA). The SSH Server uses a certificate only for FTPS, where it is used to authenticate the server to the FTPS client.
In Bitvise SSH Client
In Bitvise SSH Client:
Public keys of hosts you have connected to can be viewed in Host key manager. When you connect to an SSH server for the first time, and the client has no record of the server's host key, the client will display the server's host key fingerprint, and will ask you to verify the key. It is very important to verify the server's host key fingerprint at this point, which should be done against a fingerprint you received through other means from the server's administrator. If you verify that the key is correct, the client will save it, and trust it for further connections to the server.
If you do not verify the server's host key, then the client cannot verify that the server you are connecting to is in fact the server you think you are connecting to. Not verifying the server's host key enables a man-in-the-middle attack - a situation where you aren't actually connecting to the server you think you are connecting to, but rather to another server that impersonates you to the destination server, and the destination server to you. Such a man-in-the-middle is able to observe all data sent over the SSH session, as well as modify what's being sent in real time. The only way to defend against such an attack is to make sure to verify the server's host key.
Private keys used for client authentication can be generated, imported and exported in User keypair manager. This interface allows you to generate a keypair for client authentication; you should keep the private key that's part of this keypair private. You can use the Export function to export the public key portion of a keypair, and send it to a server administrator, who can import it to allow you to authenticate using that key. The only thing you need to send to the server administrator is the public key; you should never send the private key, or the whole keypair.
Chapter 2.3
A short guide to SSH port forwarding
SSH port forwarding, or TCP/IP connection tunneling, is a process whereby a TCP/IP connection that would otherwise be insecure is tunneled through a secure SSH link, thus protecting the tunneled connection from network attacks. Port forwarding can be used to establish a form of a virtual private network (VPN).
To illustrate how port forwarding works, let us use an example. Suppose you are the network administrator in a company that has two buildings. In Building #1, there are numerous workstations residing in the subnet 10.1.1.*. In Building #2, there are multiple servers residing in the subnet 10.2.2.*. The two buildings are separated by a busy street with parking spaces on each side, and the subnets in the two buildings are linked wirelessly through an antenna on the roof of each building. The workstations in Building #1 are running a legacy client application that uses an unencrypted TCP/IP session to communicate sensitive data with the servers in Building #2.
One day, someone in your company notices that an unmarked black van has remained parked on the street between the two buildings for several days. As your CEO realizes that sensitive data is being transmitted unencrypted between the two buildings, he becomes worried that the van parked outside might be collecting the company's confidential information. He orders you to solve the problem ASAP.
What you do is this:
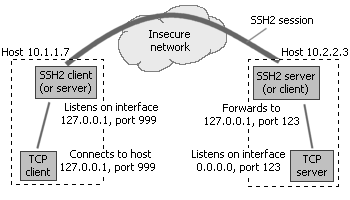
On each of the client workstations in Building #1 (in the above example, workstation 10.1.1.7 is shown), you install an SSH client. On the machine in Building #2 that runs the server for your legacy application, you install an SSH server. You configure the SSH client with the following client-to-server port forwarding rule: for each connection that comes on interface 127.0.0.1 and port 999, forward that connection to the SSH server, and request the SSH server to forward that connection to host 127.0.0.1 (relative to the server), port 123.
Now, your application client doesn't connect to the server directly anymore. Rather, it connects to the SSH client, which encrypts all data before transmission. The SSH client forwards the encrypted data to the SSH server, which decrypts it and forwards it to your application server. Data sent by the server application is similarly encrypted by the SSH server and forwarded back to the client.
Previously, the data that was being radioed between the two buildings was sent in plaintext and could be captured by anyone parking on the street below. Now, the data is encrypted using the SSH protocol, and is virtually impossible to decipher. The next day after installing SSH, you observe that the black unmarked van is gone.
Now, let us comment on the above example. It corresponds with the following C2S (client-to-server) port forwarding rule in the SSH client:
- Listen interface: 127.0.0.1 (this ensures that only connections from the local client machine, or loopback connections, are accepted for forwarding)
- Listen port: 999
- Destination host: 127.0.0.1 (important: the target address is relative to the server, not the client, so 127.0.0.1 will work fine if the target application server is listening on all interfaces - 0.0.0.0)
- Destination port: 123
Note that the listening interface configured on the SSH client is 127.0.0.1. By configuring the listening interface, you tell the SSH client what kinds of connections it will accept. If you configure the listening interface to 127.0.0.1, the SSH client will only accept connections originating on the same machine. If you configure the listening interface to equal the IP address of one of the network cards on the machine, the SSH client will accept only those connections that arrive through that network card. If you configure the listening address to 0.0.0.0, the SSH client will accept connections regardless of their origin.
Next, you will note that the listening port has been set to 999. The listening port could be set to any figure between 1 and 65535 that is not already occupied by another application listening for connections on the same machine. In this case, the SSH client listening port has been set to 999, but it could just as well have been set to 123, the same port at which the application server is listening.
Now comes the most confusing part: the address of the destination host. It is important to understand that, in a client-to-server port forwarding rule, the target host address is relative to the SSH server, not the client. This is the address that the SSH server will connect to when a connection needs to be forwarded. In this case, the target host address is set to 127.0.0.1 to have the SSH server connect to the application server which is running on the same machine.
Finally, the destination port specifies the port on which the target TCP/IP server is listening - in this case, 123.
The port forwarding configuration shown in the above example is strict: it minimizes the exposure of unencrypted data by constraining the SSH client to reside on the same machine as the application client, and the SSH server to reside on the same machine as the application server.
On the other hand, if you are only concerned about eavesdropping between the SSH client and the server, and do not mind unencrypted data in the local subnets, you might configure your SSH port forwarding rules like this:
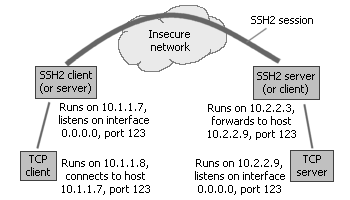
This corresponds with the following C2S (client-to-server) port forwarding rule in the SSH client:
- Listen interface: 0.0.0.0 (this opens up the SSH client's forwarding socket to connections from other machines)
- Listen port: 123
- Destination host: 10.2.2.9 (the target application server is not on the same machine as the SSH server, so we need to enter its address as visible from the SSH server)
- Destination port: 123
With this setup, you only need one SSH client to forward the connections of multiple application clients; since the SSH client's listening address is configured to 0.0.0.0, the application clients do not need to reside on the same machine. With appropriately configured port forwarding rules, you can use the same SSH session to forward connections to multiple application servers, which can reside on machines different from the SSH server.
Even though our examples above only discuss client-to-server port forwarding rules, the concept of server-to-client port forwarding is entirely symmetric. Only the roles are reversed: with S2C forwarding, the listening address is relative to the SSH server, and the destination host address is relative to the SSH client.
It is a common mistake to define both a C2S as well as an S2C rule for the same forwarded connection. This is not necessary and will not work. S2C rules are required only if you are forwarding other connections which are established in the direction from the server to the client. Such connections are normally independent from, and unrelated to, those established from client to server. Only one type of rule is necessary for each connection.
Chapter 2.4
Web browsing over SSH
It is possible to configure most browsers to use a SOCKS proxy for outgoing HTTP connections. This makes it possible to forward web browser traffic over an encrypted SSH connection.
The recommended browser for this purpose is Firefox, because it can be configured to resolve DNS names through the SOCKS proxy, so the names of the websites you're browsing don't leak out through DNS queries.
You will need an account at an SSH server which allows you to use port forwarding. Configure Bitvise SSH Client to connect to that SSH server, and enable the SOCKS proxy feature under the Services tab.
In Firefox:
Configure Bitvise SSH Client as the SOCKS proxy in Firefox menu > Settings > General > Network Settings.
Use Manual proxy configuration, enter 127.0.0.1 under SOCKS Host, and port 1080. This assumes you left SOCKS proxy settings in the SSH Client at their defaults.
Select SOCKS v5. Enable the setting Proxy DNS when using SOCKS v5.
Make sure that the HTTP Proxy and HTTPS Proxy settings remain empty.
You are now done. Firefox will connect to websites through Bitvise SSH Client's SOCKS proxy feature, and your web traffic will be tunneled over the encrypted SSH connection between your SSH client and the SSH server.
Privacy limitations
The part of the traffic between the SSH server and the web server(s) will remain unencrypted. By using SSH tunneling, you are shielding your web traffic from prying eyes in your local network or at your local Internet Service Provider. However, the plaintext of your web sessions will now be available to the SSH server administrator, as well as to the ISP through which the SSH server connects to your destination web servers.
Chapter 2.5
X11 forwarding with Bitvise SSH Client
The X11 forwarding feature in Bitvise SSH Client provides one way for an SSH connection to access graphical applications running on the SSH server. X11 forwarding is an alternative to forwarding a Remote Desktop or VNC connection. It differs from Remote Desktop or VNC in that remote application windows appear seamlessly in the client's desktop, without forwarding a complete desktop. X11 forwarding is best used with Unix-style servers running applications intended to run under X11. For connections to Windows servers, Remote Desktop is the native option.
Installing an X11 server
In order to use X11 forwarding, an X11 server needs to be installed on the client. One such server is available as part of Cygwin.
To install the Cygwin X11 server without installing the entire (and large) Cygwin platform, perform the following steps in the Cygwin installer:
Proceed to the Select Packages page. On this page, you should see a package tree with All as the root.
Unless you're installing other parts of Cygwin, keep the New column setting for All set to Default. (screenshot)
Find the package All / X11 / xorg-server and change its New column setting to the current stable version. (screenshot)
Proceed to the next page and complete the installation.
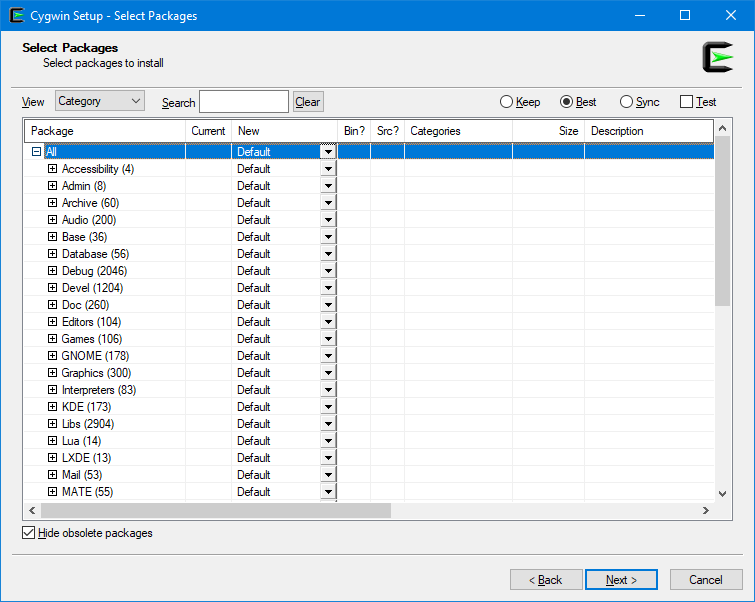
Starting the Cygwin X11 server
You can start the Cygwin X11 server by executing:
C:\cygwin64\bin\XWin -listen tcp -multiwindow
If the X11 server starts successfully, a new X-resembling icon will appear in the task bar notification area (the system tray). To close the X11 server, right click on the icon and select Exit from the right-click menu.
If the X11 server fails to launch, an error message will be displayed. A common failure reason is that an X11 server is already running. It is possible to run multiple X11 servers on the same computer, but each will need to be associated with a unique display number. For example, to start the X11 server on display 3, you would execute:
C:\cygwin64\bin\XWin :3 -listen tcp -multiwindow
Notes:
- We do not recommend opening the firewall for the X11 server (the XWin.exe process).
- Your Cygwin directory may be in a different location. For example, it could be C:\cygwin on a 32-bit system.
Setting up Bitvise SSH Client
In the SSH client's Terminal tab, enable X11 forwarding. If your X11 server runs on a non-default display (a display other than 0), the setting X11 Forwarding - Display will need to be changed, as well. For example, if your X11 server runs on display 3, change the setting to: 127.0.0.1:3.0.
Use the Login button to establish an SSH connection. Open a terminal console, and in it, run an X11 program (e.g. xemacs). The program should appear in a new window on your screen.
Chapter 2.6
Single-click Remote Desktop forwarding
After connecting to an SSH server using Bitvise SSH Client, clicking the New Remote Desktop button launches a port forwarded Remote Desktop session. The SSH Client will setup all the settings and launch the Windows Remote Desktop client for you.
Accessing Remote Desktop over the SSH Client offers the following advantages:
Outside of a domain environment, the Windows Remote Desktop client cannot itself verify the authenticity of the server to which it is connecting. This renders the session vulnerable to a man-in-the-middle attack. When Remote Desktop is port forwarded over SSH, the SSH Client verifies the authenticity of the SSH server using the server's host key. This prevents a man-in-the-middle attack between the SSH Client and the SSH server.
A server firewall can be configured to disallow direct Remote Desktop access, and only permit it through SSH. This allows the use of additional defenses. The SSH user can be required to log in using public key authentication; if password access is not permitted, attackers will not be able to guess a password. If using Bitvise SSH Server and SSH Client, access to the server can be further obscured using SSH protocol obfuscation: this prevents any type of probing by attackers unless they know the obfuscation keyword.
Requirements
The only requirement for single-click Remote Desktop forwarding is that the computer on which the SSH server is running accepts Remote Desktop connections. This is supported in Windows Server editions, and Windows desktop editions including Professional and Enterprise. Linux servers can support Remote Desktop using the Xrdp server.
Note: Windows Home editions do not support accepting Remote Desktop connections.
If the server accepts Remote Desktop connections on the default port (3389), Remote Desktop forwarding will simply work as-is. No configuration or settings changes are needed.
If the server runs an appropriate version of Windows, you can verify that Remote Desktop access is enabled via Control Panel > System and Security > System > Advanced system settings > Remote tab. You can get there from the Start menu directly, by searching for "remote access".
What not to do
Sometimes, Remote Desktop forwarding does not work because users expect it to be difficult. Common pitfalls:
If the Remote Desktop server you're trying to access is on the same computer as the SSH server – which it is in most cases – do not try to alter the Computer setting on the Remote Desktop tab in the SSH Client. Leave that at the default value, 127.0.0.1. This is the localhost address, and will work when the Remote Desktop server is on the same computer as the SSH server.
Don't configure manual port forwarding rules, in either the C2S or S2C direction. To use single-click Remote Desktop forwarding, no manually configured rules are needed. Any rules you configure will most likely not interfere, but will also not help.
Customization
A selection of commonly used Remote Desktop settings can be configured in the SSH Client, on the Remote Desktop tab. You can configure any of these, but do not configure the Computer setting unless the Remote Desktop server is on a different computer than the SSH server.
If the Remote Desktop server is on a different computer than the SSH server, then the Computer setting needs to be configured with the IP address of that computer, reachable from the SSH server. This is usually a private IP address, not a public one.
If the Remote Desktop server runs on a non-default port, other than 3389, you can configure it in the Computer field by appending it to the IP address, separated with a colon. For example, if the port is 12345, configure this field to 127.0.0.1:12345.
You may wish to configure Remote Desktop settings that are not supported in the SSH Client's Remote Desktop tab. In this case, run the Remote Desktop client (mstsc), configure the setting you want, and save the Remote Desktop profile. You can then configure the path to that profile using the Profile setting.
Chapter 2.7
Securing WinVNC With SSH
VNC is a free client/server system which allows you to view a computing 'desktop' environment not only on the machine where it is running, but from anywhere on the Internet and from a wide variety of machine architectures.
You can combine WinVNC and an SSH port forwarding client/server pair, such as Bitvise SSH Client and Server, to form a secure solution for remote GUI login. Suppose you install a VNC server on machine A, and the SSH server on machine B. Machine A and machine B can be the same machine, and should generally be as close as possible, because only the connection between the VNC viewer and machine B will be secured; the connection between machine A and machine B will be unprotected. In order to securely access the VNC server from a client machine, you need to perform the following steps:
- Equip the client machine with an SSH port forwarding client. Configure this client to connect to the SSH server on machine B, and to forward connections that come to port 5900 on the client machine to port 5900 on machine A. In SSH terminology, this is client-to-server port forwarding, or 'local' forwarding. If you intend to use a VNC display other than 0, you should alter the port numbers appropriately: the VNC port number is 5900 plus the display number, e.g. 5905 for display 5.
- Configure the VNC viewer to connect to localhost. If you configured the SSH client to listen on a port other than 5900, you also need to specify the display number. E.g., specify 'localhost:5' if the SSH client is listening on port 5905.
- If the SSH and WinVNC servers both reside on the same computer, you will need to enable local loopback connections in WinVNC. See the WinVNC documentation - look for the AllowLoopback keyword under" Advanced Options.
See also Making VNC more secure using SSH (alternate links 1) for a lengthier description of how to setup SSH port forwarding for VNC.
Chapter 2.8
Understanding Internet connections
Our products can be used in ways that don't require much knowledge about the internet. You can just type in the address of the server you're connecting to, open an SFTP window and start transferring files. However, if you will be using the more advanced features of our products, such as tunneling, you will need to understand the basics of how the Internet is structured. This guide is an attempt at relaying some of that understanding.
This guide is composed of the following sections:
- IP addresses
- DNS names
- Subnets
- Types of IP addresses and subnets
- TCP and UDP
- Direction of TCP connections
- Ports
- Connecting to the internet from office
- Connecting to the internet from home
- Dynamic IP address issues
- Virtual servers - port forwarding at the router
- Firewalls
IP addresses
Every computer connected to the internet has an Internet Protocol or IP address which identifies the computer on the internet. In the currently most widely used version of the Internet Protocol - version 4 - IP addresses are 4 bytes long and are expressed in the form nn.nn.nn.nn. Each nn is a number between 0 and 255.
When you connect to a web server to browse a web page, the DNS name of the web server, e.g. www.bitvise.com, is automatically translated by the software in your machine to an IP address in the nn.nn.nn.nn form. This address is then used to connect to the actual web server.
For example, the IP address of the server hosting fogbugz.bitvise.com at the time of this writing is 70.85.217.69. Our primary website, on the other hand, is hosted on several servers, and their IP addresses are 207.155.248.18, 207.155.248.31, 207.155.248.122 and 207.155.252.47.
In a Windows Command Prompt session, you can discover the IP addresses associated with DNS names using the nslookup command: e.g. 'nslookup www.bitvise.com'.
DNS names
IP addresses are difficult to remember, so the internet provides a translation service which translates memorable names into associated IP addresses. This facility is called the Domain Name System or DNS. You use DNS implicitly every time you type in an address such as 'www.bitvise.com' - your browser asks your operating system for translation into an IP address, and the operating system either returns a cached result, or inquires with a DNS server operated by your ISP. This server in turn either returns a cached result or inquires with another DNS server.
Subnets
No computer is directly connected to every other computer on the internet. Instead, each computer is a member of one or more subnets. Subnets, in turn, are connected to each other by machines called routers or gateways, which belong to multiple subnets, forwarding internet traffic from one subnet to the other and reverse.
In order to successfully communicate with other computers throughout the internet, your computer must know what subnet it is part of, so that it knows what IP addresses are outside your local subnet and must be relayed through the gateway. In addition, your computer must of course also know the IP address of the gateway.
Typically, a subnet is a group of consecutive IP addresses, such as all IP addresses from 11.22.33.0 to 11.22.33.255.
Types of IP addresses and subnets
There are three major types of IP addresses (or subnets) that you need to be aware of.
Public IP addresses. Most IP addresses in the IPv4 address range have the purpose of uniquely identifying a computer on the internet. The IP address 207.155.248.18, for example, is a public IP address that at some point uniquely identified one of the servers hosting the www.bitvise.com website. This is the type of IP address through which a server must be reachable in order to be accessible to computers throughout the internet.
Private subnets. Special ranges of the IPv4 address range have been set aside for use in private networks, where the computers in such a network do not need to be directly accessible from the internet as servers (but may nevertheless access the internet through a gateway, as clients). These ranges include:
- 10.0.0.0/8 (addresses from 10.0.0.0 to 10.255.255.255)
- 172.16.0.0/12 (addresses from 172.16.0.0 to 172.31.255.255)
- 192.168.0.0/16 (addresses from 192.168.0.0 to 192.168.255.255)
Special IP ranges. There are several special purpose IP ranges, but the one you need to know about is 127.0.0.0/8 (addresses from 127.0.0.0 to 127.255.255.255). This is the local loopback range and is used to connect two programs running on the same machine. Any address in this range can be used for this kind of purpose, but the most commonly used are 127.0.0.1 and 127.0.0.2. The special DNS name 'localhost' translates to 127.0.0.1.
TCP and UDP
The Internet Protocol itself is a relatively rudimentary protocol which provides only the capability of delivering small chunks of data to other computers. The Internet Protocol does not provide reliability: chunks of data that are sent using the Internet Protocol may be lost. They also may arrive in an order different to the order in which the chunks were sent.
For some types of data transfer, the (un)reliability afforded by the Internet Protocol is fine. When streaming video, for example, it does not matter if chunks that make up intermediate frames of the video are lost. What matters is that most of the data arrives relatively quickly, allowing the video to be played with reasonable quality and on the fly. The User Datagram Protocol, or UDP, is a simple protocol layered on top of the Internet Protocol that provides this level of reliability. UDP is used for purposes such as relaying video and audio streams as well as for networked games; all environments where responsiveness and fast delivery are more important than perfect reliability.
For other types of data transfer, however, this level of reliability is not enough. When transferring a file, for example, you want to transfer all of its contents in perfect order and integrity; you don't want any chunks of it to accidentally be lost. When accessing a web page, likewise, you want all the text to be transferred without error. Data transfers that require this higher level of reliability use the Transmission Control Protocol, or TCP. Like UDP, TCP is a protocol layered on top of the Internet Protocol, but it is more complex than UDP: it contains mechanisms to ensure that data is received in order and that, if any chunks are lost, they are resent. The reliability provided by TCP has costs in terms of responsiveness. Before any data can be sent using TCP, the two computers must engage in a short back-to-forth to establish a TCP connection. If any data are lost during transmission, delivery of subsequent data awaits until the data that were lost are retransmitted and delivered. When there is a high rate of data loss on a connection, this may cause transmission to be jerky.
The majority of widely known protocols used on the internet are layered on top of TCP. These include:
- the Simple Mail Transfer Protocol (SMTP), used for email delivery;
- the Post Office Protocol (POP) and IMAP, used for email retrieval;
- the Hypertext Transfer Protocol (HTTP), used for accessing websites;
- as well as, of course, the Secure Shell protocol (SSH), which our products are about.
Direction of TCP connections
TCP connections are like phone calls: they are always initiated by one party and accepted (or not) by the other. The computer that originates the TCP connection is usually the client, and the computer that accepts it is usually the server. Sometimes, notably in the FTP protocol, a secondary TCP connection will be established in the reverse direction, from the server to the client. But, in protocols other than FTP, connections are almost always initiated by the client.
Regardless of the direction in which a TCP connection is established, data can always flow both ways. However, the direction of the TCP connection matters because it determines who the initiating party is, and is also used by network components to impose rules on whether a connection can be established.
Ports
In order to handle multiple simultaneous connections with the same computer, your computer must be able to distinguish them. To do so, each connection is assigned two port numbers, one at each end point of the connection. A connection is then uniquely identified with four pieces of information: (1) local address, (2) local port, (3) remote address, (4) remote port. Valid port numbers are between 1 and 65535. The party that originates a TCP connection usually selects a local port number at random. On the other hand, the port number of the party that accepts the connection must be known in advance by the party that originates the connection. You can confirm this by executing 'netstat -n' from a Windows Command Prompt just after loading a web page in your browser.
For example, this excerpt from 'netstat -n' output was taken just after opening www.bitvise.com in a browser.
Proto Local
Address Foreign
Address State
TCP 10.10.10.123:21681 207.155.248.122:80 ESTABLISHED
The above output indicates an established TCP connection with local address 10.10.10.123, local port 21681, remote address 207.155.248.122 and remote port 80. The connection was initiated by the local machine, therefore the local port number 21681 was randomly selected, whereas the remote port number 80 is the well-known HTTP port. This is the port where the vast majority of web servers accept connection, so even when access to other ports is blocked, connections to port 80 will very likely be permitted.
Other well-known destination ports are:
- 21 - FTP (control connection)
- 22 - SSH
- 23 - Telnet
- 25 - SMTP
- 80 - HTTP
- 110 - POP3
- 143 - IMAP4
- 443 - HTTPS (HTTP over TLS or SSL)
- 1080 - SOCKS proxy
On Windows, a more exhaustive list of well-known ports can be found in the file \Windows\System32\Drivers\etc\services (open it with Notepad).
Connecting to the internet from office
In an office environment, your computer will most likely be connected to a subnet in one of the private address ranges. This means that your computer will have an IP address not unique throughout the internet, so it cannot communicate with other computers on the internet directly. However, the network administrators at your office have most likely applied one of the following solutions to allow you to access the internet.
Network address translation (NAT). In this setup, your computer directs all traffic destined to the internet through a gateway in your local subnet. This gateway has a public IP address which is unique and can be used for internet addressing. The gateway substitutes its own IP address and port in place of your computer's. When chunks of data arrive in reply, the gateway knows from the port number in the data that they must be forwarded to your computer and local port.
In this setup, your computer is led to believe that it is present on the internet with its private subnet IP address; but it isn't. The gateway is present on the internet and represents all computers in the subnet with its own public IP. All connections initiated to the internet by computers on the subnet appear to outside observers as coming from the gateway's public IP address.
- Proxy. In this setup, your computer cannot initiate connections to the internet directly. Instead, applications on your computer must contact one of several types of proxy servers residing on your local subnet, and ask the proxy server if it would kindly relay a connection to the outside. This is conceptually similar to NAT. However, whereas NAT works for all applications on your machine and requires from them no special awareness, the proxy setup works only with those applications which can connect to the internet through the proxy. The proxy setup also affords administrators more control: they can more easily restrict and monitor your traffic and permit or deny access selectively based not just on port numbers, but the content being accessed and protocols being used.
There is also a number of office environments where each computer has a separate, own public IP address. These are simple and involve no NAT or proxy servers as outlined above.
Connecting to the internet from home
From home, you usually connect to the internet through a modem - whether it is phone, cable, ISDN or DSL. In any case, you can either hook the modem directly to your computer; or, if you have multiple computers, you can buy a router, connect the router to your modem and your computers to the router.
- If you use a router, the machines connected to it are assigned addresses in a private subnet, and the router performs Network Address Translation to allow your machines to access the internet.
- If you connect the modem to your machine directly, the computer gets a public IP address directly accessible from the internet. If you then connect other machines to this machine (through a second network interface), those machines are joined to a private subnet. The directly connected machine then performs Network Address Translation to allow the other computers to access the internet.
In most cases, you will be provided a single public IP address by your internet provider. Sometimes this IP address will be fixed; this is called a static IP address. In other situations, the IP address will periodically change; this is called a dynamic IP addres. With dial-up modems, you will get a different public IP address every time you dial up. With DSL and cable modems, your IP address may change at a predefined time every day or night.
Dynamic IP address issues
The following issues correspond with a continuously changing IP address.
Whenever your public IP address changes, all ongoing TCP connections to and from your machine are terminated and must be reestablished using the new IP.
Since the IP address of your computer is unpredictable, it is difficult for others to connect to it. If you want to host any kind of network-accessible service on your machine, you need to either use a dynamic DNS service; this works by allocating you a DNS name which is regularly updated to reflect your changing IP address; or you need to implement a more pedestrian solution, such as configuring a program on your computer to periodically connect to another server and store your current IP address there, making it available for retrieval.
If you want to host a service on your home machine and find that your IP address changes periodically, the best way around this problem is to ask your ISP to grant you a static IP. They will frequently agree to do this free of charge. If this is unavailable, you can use a dynamic DNS service.
Virtual servers - port forwarding at the router
If you want to make a server accessible from the internet, but the computer on which the server will be based has only a private subnet IP addresses, there is a solution. Usually, the router which connects the private subnet to the internet can be configured to forward all incoming connections on a certain port to one of the computers inside the private network. This is called port forwarding (not the same thing as SSH port forwarding) or a 'virtual server' facility (although the server is quite real; it's just its IP address that is not).
This setup generally works just fine, but there is one thing to remember. The IP address by which the server is known to internet clients is not the IP address that the server machine actually has. This distinction between the public IP address at the router, and the private IP address of the actual server machine inside, frequently arises in SSH connection tunneling, leading to incorrect configuration if not properly understood.
Firewalls
Modern computers run a large number of local services (such as Windows file and printer sharing) which accept connections on various port numbers, but are meant to be accessible only from locally trusted subnets. Preventing the wider internet from accessing these services in possibly malicious ways is the purpose of ingress firewalls.
In organizations, gateways that connect the local subnet to the internet usually feature an ingress firewall. This firewall should normally be configured to allow no connections into the subnet, except connections to servers that must accept connections from the internet.
At home, your ISP will usually not protect your PC from malicious access from the internet. Instead, this task must be performed by a firewall installed on your home router, or if your computer is connected to the internet directly, a software firewall in your machine. Windows XP comes equipped with such a firewall; you should use it. Software firewall solutions are available for earlier versions of Windows.
There is another type of firewall called an egress firewall, or a firewall that filters outbound connections from your machine to the internet. This is generally software which tries to control what programs on your machine access the internet. This is intended to block malicious software from doing too much damage after it has already infected your computer. However, cleverly written malware can fool an egress firewall like this with fairly simple and straightforward deceptions. The only real medicine against malware is therefore to prevent it from infecting your computer in the first place.