Frequently Asked Questions about Bitvise SSH Server
As an administrator of Bitvise SSH Server, you should first become comfortable with the SSH server's log files. Bitvise SSH Server writes warnings and errors into the Application section of the Windows Event Log, but it also writes more detailed information to textual log files. These are located by default in the 'Logs' subdirectory of the SSH server installation directory.
Whenever you have a problem, the SSH server log files are the first place you should look.
- Personal Edition
- Configuring and Running
- Terminal Shell
- File Transfer
- Automated Actions After File Transfers
- Public Key Authentication
- Account Settings
- Usage Issues and Operation Concerns
- Upgrading and Moving
- Contacting Support
Personal Edition
Q000. Where do I get an activation code for personal use?
No activation code is needed to use Bitvise SSH Server for personal use. If your Bitvise SSH Server Control Panel is saying that there is an evaluation period, this means that you installed the product as the Standard Edition. In this case, you need to uninstall Bitvise SSH Server, re-install it again, and choose the Personal Edition this time.
Note that Bitvise SSH Server may be installed in the Personal Edition only by genuine, non-commercial personal users who are not using the SSH server as part of a commercial endeavor, and are not using it in an organization, whether commercial or otherwise. All commercial or organizational use requires a purchased license.
Q020. What are the limitations of the Personal Edition?
The Bitvise SSH Server Personal Edition:
- On domain member computers, can use only local Windows accounts. On a domain controller, can use domain accounts of that domain controller.
- Can configure only one Windows group (Everyone).
- Can configure only one virtual group.
- Has a limit of 10 Windows account entries.
- Has a limit of 10 virtual account entries.
- Has a limit of 15 concurrent connections from non-administrators.
- GSSAPI authentication is disabled (Kerberos and NTLM).
If you are deciding whether to use the Personal or Standard Edition – in most cases, this is not a technical decision. All organizations, as well as personal users who do not qualify as non-commercial, must purchase a license for the Standard Edition. The Personal Edition is available only for users who are both personal and non-commercial, and are therefore likely to be unaffected by the above limitations.
Configuring and Running
Q075. When I try to run the SSH Server or Client installer, nothing happens. How do I start it?
Depending on your Windows version, security settings, and how the installer was downloaded, you may need to take an extra step to start it. On Windows Server 2016, right-click the installer executable in Windows Explorer, click Properties, and see if you need to check Unblock on the General tab.
Q090. The SSH Server or Client installer warns me that the "installation directory is insecure". Why is it insecure, and what can I do about it?
This can happen if you created a custom parent directory such as D:\Programs into which you are installing Bitvise software, but you have not taken care to configure Windows filesystem permissions on that directory.
Bitvise software generally runs with high privileges. The SSH Server runs as Local System or equivalent, and the SSH Client can be run by administrators.
This means that any other user on the system who is able to rename a Bitvise software installation directory, or to rename or modify files it contains, can use this limited access to give themselves complete administrative access to the system.
Recent versions of our software will warn about this situation, and will do so even if the system does not currently have any non-administrative users. If the filesystem permissions are not fixed, a problem can still arise if non-administrative accounts are added later.
To fix this problem, you must set up Windows filesystem permissions on the parent directory into which you are installing Bitvise software. For example, if you are installing under D:\Programs, you must ensure that only administrators have the right to rename or modify files and subdirectories under this location.
This is achieved by configuring permissions using Windows File Explorer. If you are unfamiliar with Windows permissions, we suggest installing into a standard location such as C:\Program Files or C:\Program Files (x86). Filesystem permissions on these directories are configured properly by default by Windows.
Q100. After I install Bitvise SSH Server, what do I need to configure before I can start using it?
For a basic, open setup, just start Bitvise SSH Server and it will work. Use one of your existing Windows account names and passwords to log on. For a basic usage case, where you want to use the SSH server for remote administration, the default server settings do not need to be changed. The one exception is the Open Windows Firewall Setting, described in Q103.
After you have established a successful connection, consider locking down your settings to prevent SSH access to Windows accounts and features that you do not want to be accessible over SSH. See the page Securing Bitvise SSH Server for more information.
Q101. Can the SSH Server be configured by a user who does not have full administrative rights?
The SSH Server is configured primarily by a user who is a member of the Administrators group on the computer where the SSH Server is running. The SSH Server also supports a delegated administration feature where aspects of SSH Server settings can be configured by a user who does not need administrative rights.
Delegated administration can be set up as follows:
Use Advanced settings to configure one or more accounts so they can connect to the SSH Server and use the delegated administration feature. This can be configured either for an individual user in their account settings entry, or in a group settings entry as a default for multiple users. The settings can be found under Remote administration access.
Use a recent Bitvise SSH Client version to connect to the SSH Server using an account that can use delegated administration. Once connected, use the SSH Server Control Panel button in the SSH Client. This will open a delegated administration interface which allows the user to perform administrative tasks within limits configured by a full administrator.
The delegated administration interface permits access to a subset of SSH Server settings. If you would like specific functionality to be configurable using this interface, and it is not, please contact us to describe the situation.
Q103. I can connect to Bitvise SSH Server from the local network, but not from the internet.
To help prevent inadvertently exposing your SSH server to the internet before it has been properly configured, Bitvise SSH Server will not open its ports to the internet by default. When you are ready to open your server to internet connections, go to Easy SSH server settings, and change the setting Open Windows Firewall to Open port(s) to any computer. If your Windows Firewall is disabled, or if you prefer to manage it manually, change this setting to Do not change Windows Firewall settings.
If you still cannot connect from the internet after making this change, make sure that your router is properly configured to forward SSH connections to the SSH server. You can configure the router directly through its administrative interface, or if the router can be managed using Universal Plug and Play, you can set Bitvise SSH Server to configure it. To let the SSH server manage the router, enable Automatically configure router (requires UPnP) in Easy SSH server settings.
If the SSH Server is installed on a cloud instance, such as Amazon EC2 or Azure, ensure also that security settings which apply to the cloud instance (e.g. the security group in Amazon EC2) allow connections to the instance and port on which the SSH Server is accepting connections.
Q110. How do I log in to a Windows domain account?
It is best practice to specify the username in either the domain - backslash - account format; for example, "COMPANY\John"; or with a fully qualified name; for example, "john@company.com".
It is possible to log into a domain account by providing only the account name, e.g. "John". In this case, authentication outcome may be undependable if Windows finds multiple matches. For example, there may be a local account named "John", a domain account named "DOMAIN\John", and another one named "OTHER\John". You can control the outcome in such circumstances by configuring the Windows domain order setting in Advanced SSH Server settings.
Users can also log in using Unix realm accounts if they are in a trust relationship with the server's domain. Such users must always provide the fully qualified Unix realm account name, because Windows cannot look up Unix realm usernames.
Q120. What client software can I use to connect to Bitvise SSH Server?
You can use any client program that supports SSH, as long as it implements SSH version 2 - the newer and secure version of the protocol. There are multiple types of SSH clients, including terminal session clients, file transfer clients, port forwarding clients, command execution clients, and they come in all sorts of combinations. If your client machine runs Windows, you can use Bitvise SSH Client for most purposes. Our SSH client offers an excellent terminal console, graphical file transfer, dynamic and manual port forwarding, as well as scriptable command-line clients and an FTP-to-SFTP bridge. Also available for Windows is PuTTY, which includes SSH file transfer programs 'pscp' and 'psftp'. On Unix platforms, the OpenSSH package is freely available and provides the 'ssh' program for terminal sessions and port forwarding, as well as 'scp' and 'sftp' for file transfers.
Q130. My Bitvise SSH Server logs show an error like 'Failed to bind listening socket', and I cannot connect to the server.
Such an error indicates that another application is already listening on the port you have configured for Bitvise SSH Server. The default port is 22, and this port is used as default by all SSH servers. It is likely that you already have another SSH server running on your machine, and that it is occupying port 22. You either need to shutdown the other SSH server, or configure Bitvise SSH Server to listen on a different port.
Q140. I can only log in with an administrator account - attempting to log in with a regular account fails.
There are two most common causes.
- You are trying to log in with an account configured in Bitvise SSH Server to use the 'interactive' logon type, but this account does not have the Windows permission to log on locally. On domain controllers, this permission is not granted to regular users by default and must be enabled in the Domain Controller Security Policy.
- You have successfully logged in with an account configured in Bitvise SSH Server to use the 'network' logon type, or you logged in using GSSAPI (Kerberos or NTLM) authentication, but starting the terminal shell failed with an Access Denied error. This is because default filesystem permissions on Windows 2003 servers grant access to cmd.exe and other command line tools only to 'interactive' users. Switch this user or group in Bitvise SSH Server to use the 'interactive' logon type, or modify filesystem permissions for cmd.exe and other command-line tools to allow execution by users logged in with the 'network' logon type.
For more information, please read the Network vs. interactive logon section in the Bitvise SSH Server Users' Guide.
Q145. The SSH Server sometimes terminates client connections with "Locked out due to too many failed login attempts." If I restart the SSH Server, the issue is fixed for a while. Why does this happen?
You have a client that's trying to connect to the SSH Server with invalid credentials, most likely using an incorrect username or password. To protect against password guessing and related attacks, the SSH Server is configured by default to automatically block IP addresses that initiate many such connections.
If IP addresses have been automatically blocked, you can unblock them using the Manage blocked IPs interface. This can be accessed on the Connections tab of the SSH Server Control Panel.
If this feature is causing legitimate clients to be blocked, we can recommend the following changes:
If it's an important client IP address that should never be blocked, open Advanced settings in the SSH Server Control Panel, and add this address to IP blocking > IP blocking - whitelist. Note: this will not allow the address to log in if it is prohibited to connect via Access control > Client IP address rules. It will only prevent the SSH Server from automatically blocking the IP address.
Ideally, a client should not initiate login attempts that cause it to be locked out. We recommend investigating the SSH Server's textual log files to see what login attempts the client is sending that cause it to be locked out. You can find the SSH Server's textual log files via Open log folder viewer on the Server tab of the SSH Server Control Panel. Once the nature of the problem login attempts is understood (e.g. an incorrect password), the configuration of the client should be fixed so it will no longer send login attempts that result in penalties.
Finally, you can also change the thresholds for automatic IP blocking, or disable the feature altogether. This can be done in Advanced settings, under IP blocking.
Q150. I'm trying to get some SSH client to work with Bitvise SSH Server. However, the session gets terminated immediately after connecting, and the SSH server logs tell me: 'Unable to create child process: Access is denied.' What is going on?
In order to provide SFTP, SCP, terminal shell, or exec request functionality, Bitvise SSH Server must have permission from Windows to execute a child process in the name of the user. You have probably configured your machine in such a way that, when the user logs in and the SSH server starts impersonating that user, the server loses permission to execute the necessary child processes. In order to use Bitvise SSH Server, you must configure your machine so that the remote user will be able to run executables in the SSH server installation directory; plus, of course, whatever programs you want the user to be able to execute, such as the terminal shell - 'cmd.exe'. Read and execute access is also required to the dynamic load libraries that programs use - in particular, system libraries which reside in the \Windows and \Windows\System32 directories.
Q170. An SSH client hangs for no apparent reason when connecting to Bitvise SSH Server, and then the session breaks due to an authentication timeout.
If the SSH client is set up to try Kerberos authentication, but Kerberos isn't available between the client and the server, the client might hang when it tries to unsuccessfully get Kerberos credentials.
To rectify this behavior, you can disable GSSAPI (Kerberos) either in the SSH client, or in the SSH Server.
If you prefer to disable GSSAPI authentication in the SSH Server, you can do so either globally or for a specific make of client:
To disable GSSAPI globally, find the settings Kerberos 5 authentication and NTLM authentication on the Access control page of Advanced settings, and set them both to Disabled. Disabling both methods will disable GSSAPI authentication for all users.
To disable GSSAPI for specific client software, find the section Client version rules under Access control in Advanced settings. You will need to either find an existing rule or define a new one for the affected client software. In the client version rule, disable the setting Allow GSSAPI authentication. This setting is available in SSH Server versions 8.xx and higher.
If you disable GSSAPI on the server, the server won't advertise GSSAPI (either to this client or globally), and the client won't shoot itself in the foot trying to get Kerberos credentials.
Q175. Kerberos authentication works using Bitvise SSH Client and PuTTY, but it does not work using an OpenSSH client.
A number of OpenSSH clients are misconfigured to try Kerberos authentication even when they can't obtain credentials. If the SSH Server advertises GSSAPI support to these clients, the clients incur a long delay trying to get Kerberos credentials, even when the user does not intend to use Kerberos. This causes connections to fail in a way that isn't understandable for users.
For this reason, Bitvise SSH Server versions 8.xx and higher disable GSSAPI authentication for OpenSSH clients by default. However, it can be enabled.
To enable Kerberos authentication for OpenSSH clients, find the section Client version rules under Access control in Advanced SSH Server settings. Find the client version rule for OpenSSH. In this rule, enable the setting Allow GSSAPI authentication.
Q180. How do I configure two-factor authentication (2FA, MFA) using a time-based one-time password (TOTP)?
The SSH Server supports time-based one-time passwords compatible with RFC 6238 authenticator apps, including Microsoft Authenticator, Google Authenticator, LastPass, Authy, WinAuth, or FreeOTP.
Configuring TOTP is straightforward:
- In Advanced settings, open the user's Windows or virtual account settings entry.
- In the account settings entry, navigate to Authentication > Time-based one-time password.
- Configure the setting Time-based OTP authentication to Required.
- Click the link Secret key to open the TOTP secret key management interface.
- Click Generate to generate a secret key, then Copy key to copy it to clipboard.
- Alternately, you can click Export as image to export a 2D image that many authenticator apps can read. You can also use Show 2D code to show the image, which a mobile authenticator app can immediately scan.
- Close and save SSH Server settings.
- In your chosen authenticator app, either scan the 2D image that contains the secret key, or enter the secret key manually.
That's it. Fundamentally, all you need to do is use the account settings entry to set TOTP to Required, and set up the same secret key in the account settings entry and in the authenticator app.
The SSH Server supports other TOTP-related settings which you can change. Those settings are only for advanced users and should not be changed in most circumstances. If you changed such settings without understanding the impact, reset them to defaults.
Q190. I would like to provide a user with access only to port forwarding, but the client disconnects unless I also allow terminal shell access.
Most clients can be configured to not require a terminal shell when using port forwarding:
- If using OpenSSH, use the -T parameter ("Disable pseudo-tty allocation").
- If using plink (part of PuTTY), use the -N parameter ("don't start a shell/command").
- If using the graphical PuTTY client, enable Connection > SSH > Don't start a shell or command at all.
If using Bitvise SSH Client, the session won't be disconnected if a terminal window can't be opened, in the first place. However, if terminal shell and/or SFTP access are not available, you may want to disable the automatic opening of a terminal shell and/or SFTP window. This is configured under Options > On Login.
Terminal Shell
Q160. I'm trying to use PowerShell in a terminal session using the 'dumb' terminal type. It doesn't display a command prompt.
From Windows PowerShell Cookbook:
When PowerShell detects that its input or output streams have been redirected, it suppresses any prompts that it might normally display. If you want to host an interactive PowerShell prompt inside another application (such as Emacs), use "-" as the argument for the -File parameter. In many shells, this implies "taken from standard input."
powershell -File -
Q180. Can I set up Bitvise SSH Server to use a different terminal shell, such as Windows PowerShell, or a Unix-style shell such as Bash?
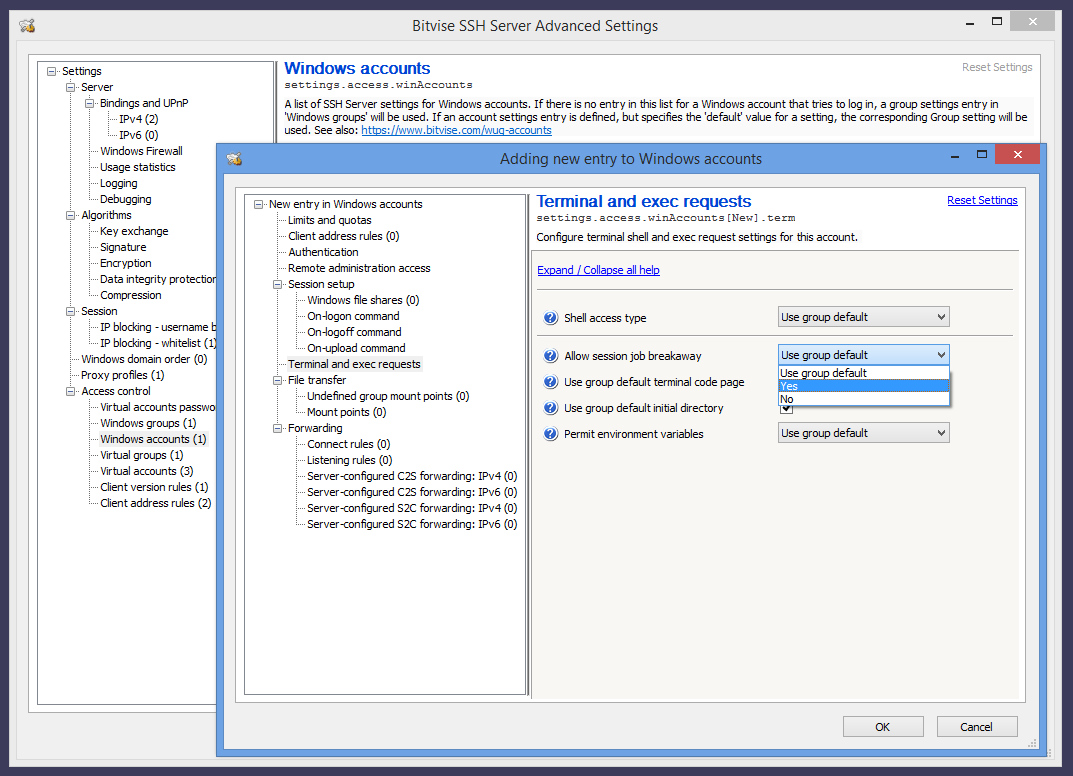
Certainly. The Shell access type setting can be configured either in Easy settings or Advanced settings. In Advanced settings, the setting can be found in the account or group settings entry, under Terminal and exec requests.
To use a terminal shell that doesn't come with Windows, such as Bash, you will need to install it. You can obtain Bash from a variety of sources, such as Cygwin.
For Windows PowerShell, see also Question 160.
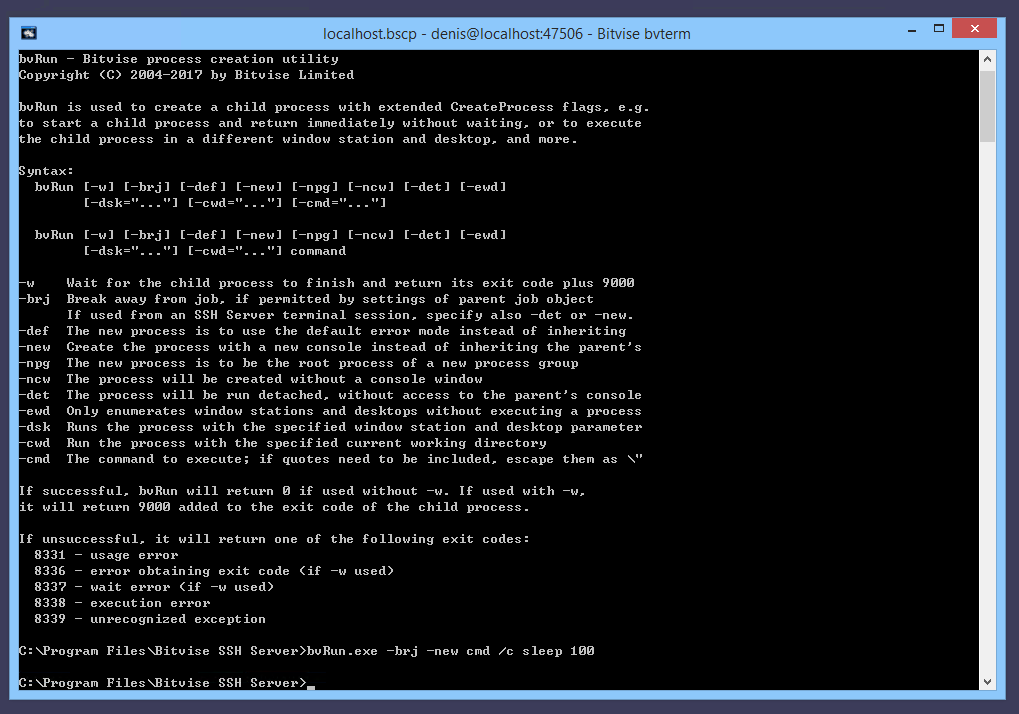
Q185. How do I use the terminal shell or an exec request to run a process that should continue to run when the SSH session exits?
By default, all child processes of a terminal shell or exec request are terminated by the SSH Server when the SSH session exits, unless you take extra steps to launch a process outside of the session's job object. The following are some of the ways:
You can launch the process using Windows Task Scheduler. To do this, first use the Task Scheduler to configure a task that you can run by name. Then run the task from the SSH session using:
schtasks /run /tn NameOfTask
If the task runs a PowerShell script or batch file, you can also change the contents of the script file on demand, to correspond to what you want to run.
You can directly start a process to run outside of the SSH session job:
Enable the setting Allow job breakaway in Advanced SSH Server settings. This setting can be configured either in an account settings entry for an individual account, or in a group settings entry as a default for multiple users. The location of this setting is as shown in this screenshot. If the user's shell access type is configured to Command Prompt or PowerShell, this setting is enabled by default.
Within a terminal shell or exec request, use the BvRun utility in the SSH Server's installation directory using the -brj parameter to launch a child process outside of the session job. In addition, if you're launching a console program, use either -new or -det to run it in a new console or a detached console, otherwise the process will close when the console window closes. Example screenshot.
Q187. How can I use SSH to start a program so it displays on the server's interactive desktop?
The easiest way to do this is using the Windows Task Scheduler. First, use the Task Scheduler to configure a task that you can run by name. Then run the task from the SSH session using:
schtasks /run /tn NameOfTask
If the task runs a PowerShell script or batch file, you can also change the contents of the script file on demand, to correspond to what you want to run.
Q195. I'm using the Command Prompt shell access type. When I send an exec request that chains commands using &&, the "cd" command does not appear to be effective.
If you are executing a command like this:
ssh user@host cmd /c 'cd C:\Path && echo e > tmp.txt'
... and if the SSH Server is configured to use the Command Prompt shell access type, it will automatically prepend an additional cmd.exe /c, so that the full command executed is this:
<event seq=... time=... app="BvSshServer 7.44" name="I_EXECS_COMMAND_EXECUTED" desc="Command executed."> <session id=... service="SSH" remoteAddress=... windowsAccount=.../> <channel type="session" id="1"/> <parameters command="cmd.exe /c cmd /c cd C:\Path && echo e > tmp.txt" initDir=... execRequest="cmd /c cd C:\Path && echo e > tmp.txt"/> </event>
In this case, the outer cmd.exe will interpret the && echo part, whereas the inner cmd.exe will interpret the cd C:\Path part. As a result, cd will not take effect for the outer command.
To fix this, omit the extra cmd /c prefix in your command:
ssh user@host 'cd C:\Path && echo e > tmp.txt'
Q197. Our security software is detecting events such as "toterms.exe created a remote thread in the context of conhost.exe". Is the SSH Server intended to run a process such as "conhost.exe 0xffffffff -ForceV1"?
"toterms" is the SSH Server's terminal subsystem. The terminal subsystem is launched if an SSH user is permitted to open an interactive terminal shell window using any of the available Shell access types. This includes BvShell, PowerShell, or the Windows Command Prompt.
The SSH Server's terminal subsystem uses low-level techniques to capture Windows console output and translate it into escape sequences for the terminal client. This functionality allows the SSH Server to render Windows console output accurately.
As of 2024, detection techniques in security software have increased in sensitivity, so that they now trigger alerts about this functionality. The functionality has been in place since SSH Server versions 5.xx released in 2008, with improvements implemented over time.
Bitvise is not aware of a simpler approach which could deliver a similar quality of terminal output for a wide variety of Windows console applications. It is possible to configure the SSH Server to simply pass through the stdin, stdout and stderr streams for console applications. However, this only works with software that outputs its own terminal escape sequences, and is able to handle escape sequences from the client.
File Transfer
Q210. When users log in, they can see all drives on my server. How do I limit them to a certain directory?
If using Easy settings, you will need to use the Virtual filesystem layout setting under a Windows or virtual account settings entry. Configure this setting to Limit to root directory, and then configure the Root directory. Alternately, select Advanced filesystem layout, and you can configure multiple directories.
If using Advanced settings, this feature is configurable either per-account or per-group. When editing account or group settings, click Virtual filesystem layout in the configuration tree on the left side of the account or group settings window. Edit Mount Points, and change the 'Real root path' setting for the default mount point (virtual mount path "/") to the directory you want the user to be able to access. The user or users will now be able to see only files and subdirectories in that folder.
If configuring mount points via Advanced settings for a specific account, note that the setting Inherit group mount points is enabled by default. Leaving this enabled will inherit a default mount point ("/") from group settings which allows full filesystem access unless it's redefined or undefined in the account settings entry.
If you want the user to be able to access multiple directories in independent locations, add additional mount points.
Note that the virtual filesystem limits will affect only users who log in using SFTP, SCP, or terminal shell using BvShell. Users who are allowed to use an external shell, such as PowerShell or the Command Prompt, will be able to use this shell to access the entire filesystem, limited by their Windows filesystem permissions.
If you want users to only have file transfer access, you should configure their Shell access type to either BvShell or No shell access. See also Securing Bitvise SSH Server.
Q215. File transfer users are able to upload and download files, but cannot delete them. What permission am I missing?
When a client logs into the SSH Server via SFTP, SCP or FTPS, the client's access is controlled by two things:
Permissions configured for the mount point in SSH Server settings. If you configure a mount point, then by default, all permissions are granted on files and directories within the configured Real root path.
Windows filesystem permissions. These are checked independently of SSH Server permissions, and must also be granted in order to access files.
If you log into the SSH Server with a Windows account, then the filesystem permissions that apply are those for the Windows account you used to log in.
If you log into the SSH Server with a virtual account, then the SSH Server will use a Windows account to provide a security context for the session. By default, this is a local account named BvSsh_VirtualUsers, which is created and managed by the SSH Server. See also Security architecture.
Whichever Windows account the session is running as, that account needs to be granted Windows filesystem permissions to access files and directories under the Real root path, in order for the session to be able to access them.
Windows filesystem permissions are configured using the Windows File Explorer. Select and then right click on a file or directory, and select Properties > Security.
Q217. Can I use Windows EFS encryption for files accessed via the SSH Server?
Yes, with important considerations.
For Windows accounts that use password authentication, there are no obstacles.
For Windows accounts that use public key authentication, see Q340. The Windows account password needs to be configured in the SSH Server's password cache.
For virtual accounts, only use EFS if you configure a custom security context for these virtual accounts in Advanced SSH Server settings. The security context can be configured either in the virtual account settings entry, or in a virtual group as a default for virtual users.
To use EFS with virtual accounts, you must configure their security context to be a Windows local or domain account which you control. You must know the password for this account. For the virtual accounts to access EFS-encrypted files, you must configure the password for the Windows account that provides the security context in the SSH Server's password cache. This is done using the Manage password cache interface in the SSH Server Control Panel.
If you ever use administrative privileges to reset the password for this Windows account (i.e. not a graceful password change), EFS-encrypted files will be lost.
Do not use EFS with virtual accounts that use the default security context provided by the SSH Server. This is the BvSsh_VirtualUsers account if you installed a default (unnamed) SSH Server instance, or the equivalent BvSsh_... account if you installed a named instance.
Windows EFS encryption keys are linked to the Windows account password. The password for the BvSsh_VirtualUsers account is reset by the SSH Server when it starts, or if the password expires. The SSH Server does not persist this password. It is only stored in memory. When the SSH Server stops, EFS-encrypted files which were encrypted under BvSsh_VirtualUsers will become unrecoverable.
We suggest whole-disk encryption, e.g. using Windows BitLocker, as a stronger alternative to EFS. It is less fragile and provides greater protection.
Q220. What is the difference between SCP and SFTP?
SCP and SFTP are different file transfer protocols. SFTP, despite its name, has no relation to FTP. It is a remote file access protocol which provides rich and fine-grained functionality for managing, accessing, and modifying files on an SSH server. SCP is an adaptation of the Unix utility 'rcp' to run over an SSH session, and provides simplistic file transfer operations only. SFTP is launched by the client opening a session channel and requesting the 'sftp' subsystem. SCP is launched by the client instructing the server to execute the SCP program via an SSH exec request.
Up to WinSSHD 4, the SCP subsystem was not supported as well as SFTP. In later versions, support for the two subsystems is integrated, and the same virtual filesystem can be accessed through SFTP or SCP. Since Bitvise SSH Server version 7, the BvShell shell access type now also provides access to the same virtual filesystem.
Q230. How do I get WinSCP to work with Bitvise SSH Server?
WinSCP works well in SFTP mode, without requiring additional configuration beyond any other SFTP client. In SCP mode, WinSCP requires a Unix-style terminal shell. WinSCP will work in SCP mode if you configure the user's Shell access type to BvShell.
Q235. Can I use rsync with Bitvise SSH Server?
Bitvise SSH Server can be used with rsync, but it currently does not include it. To use the SSH Server with rsync:
Install a bash shell and rsync from a third party source. One such source is Cygwin.
Do not use the Windows 10 bash shell. That runs under the Windows Subsystem for Linux, which currently does not work well in a multi-user environment.
In SSH Server settings, in the account settings entry for the user, set Shell access type to bash.
Open an SSH terminal shell using the configured account. Make sure the user can run rsync from the bash shell. If bash can't find the rsync command, use the Windows Control Panel to edit the system-wide PATH environment variable so it will contain the directory which has the rsync executable.
It will now be possible to use rsync with the SSH Server.
Note: Use of rsync is incompatible with restricted filesystem access. The third-party bash and rsync are not familiar with SSH Server settings, and will not respect the virtual filesystem you configure for the user. The user will be able to access everything in the server-side filesystem that they can access using their Windows filesystem permissions.
Q240. The SFTP client I tested performs poorly with Bitvise SSH Server. How can I improve performance?
SFTP performance is almost entirely client-controlled. Almost always, the solution is to use a faster client.
If the bottleneck could be in the SSH Server, check whether the server is consuming at least one CPU core at 100% during most of the transfer:
If the server is consuming 100% of at least one CPU core, then you are running into hardware limitations of the server system.
If you are not seeing 100% consumption of a CPU core during most of the transfer, you're running into a limitation of the client or network.
For high-performance transfers, the SFTP client must implement performance optimizations appropriate to available bandwidth and latency. These optimizations include:
- Read/write request sizing.
- Read/write request pipelining.
- SSH channel receive window sizing.
The only performance parameter the SFTP server has control over is its own SSH channel receive window size. However, this only affects the speed of uploads - not downloads - and Bitvise SSH Server is already aggressive in this regard; it's unlikely to bottleneck the client.
If your SFTP client doesn't reach transfer speeds that would cause the server to reach 100% of a CPU core, but network bandwidth is still available, try with a different client. Our Bitvise SSH Client performs aggressive pipelining, which might perform better than some other clients.
Q245. We are using the SSH Server to provide access to Windows file shares. Sometimes connections to the network shares don't work. We are seeing textual log file events such as I_LOGON_SHARE_CONFIGURED_NOT_CONNECTED_YET. File transfers in those connections fail.
In such circumstances, Windows is taking a long time to complete the connection to the network share. After a configurable period, the SSH Server allows the connection to proceed, even though the network share connection has not completed. Then, two kinds of errors are likely:
If the network share is configured to map to a local drive, and the virtual filesystem mount point is configured to use that drive, the drive letter intended for the network share will not be available.
If the virtual filesystem mount point is configured to directly access the UNC path, attempts to access the network share will use implicit (anonymous) access. If permissions on the network share server are well-configured, this fails with "Access is denied."
The SSH Server does not control connecting to network shares, and cannot cause network share connections to complete faster or more reliably. However, the following are some settings to investigate:
You can enable and configure Windows session sharing in the SSH Server. SSH Server settings upgraded from older versions preserve the behavior of those versions, and remain configured by default so that each connection uses a separate Windows logon session. In Advanced SSH Server settings, under Sessions, you can find the setting Windows session sharing. You can enable this setting, and configure how long Windows sessions should be kept alive. In recent versions, this setting is enabled by default, but the setting Windows session keep-alive time is set to a short duration (e.g. 10 minutes).
Enabling Windows session sharing causes the SSH Server to reuse the same Windows logon sessions for the same accounts, as long as the accounts connect more frequently than the configured keep-alive time. Reusing the same Windows logon session keeps connections to network shares active, so they are not repeatedly connected and disconnected. Since fewer connections to network shares are made, there are fewer opportunities for them to fail. However, this also causes the total number of active connections at the network share server to increase, potentially reaching a limit.
For more information, we recommend the page Accessing network shares in the SSH Server Users' Guide. See section: Intermittent reliability problems.
You can configure the SSH Server to refuse login outright if a network share could not be connected. In Advanced SSH Server settings, under Sessions > Windows file share settings, you can find the setting On share connect failure. The default setting is Continue connection. This can be changed to Disconnect.
This setting can be overridden and configured differently for a specific group or account. In that case, the setting is found in the group or account settings entry, under Session setup > Windows file share settings.
You can configure a longer timeout for network share connections. This causes the SSH Server to delay the login process further until network share connections are complete. However, long network share connection attempts are unlikely to succeed; and waiting for them longer can cause clients to time out.
In Advanced SSH Server settings, under Sessions > Windows file share settings, there is a server-wide default setting Max total share wait time. The default value in recent versions accommodates clients with aggressive login timeouts. You can raise this value if you want the SSH Server to wait longer for network share connections to succeed or fail. They will most likely fail.
This setting can be overridden and configured differently for a specific group or account. In that case, the setting is found in the group or account settings entry, under Session setup > Windows file share settings.
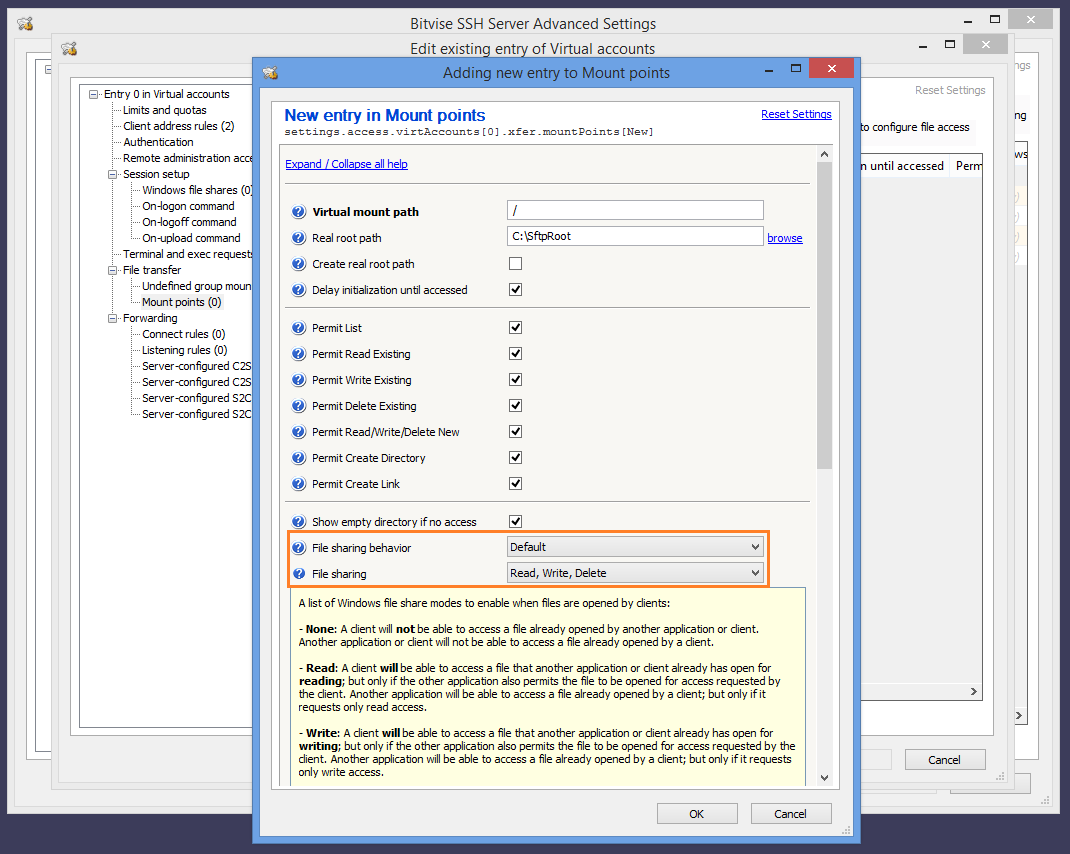
Q250. How do I configure Bitvise SSH Server so that clients can upload files, but not see or modify existing files - a file drop scenario?
If you are using Easy settings, then in the latest SSH Server versions, you can configure the user's Virtual filesystem layout setting to Blind drop.
Alternately, this can also be configured in Advanced settings. In this case, under the account or group settings entry where you want to configure the mount point, open mount point settings under File transfer > Mount points. To implement a file drop scenario, remove permissions to List, Read Existing, Write Existing, and Delete Existing, but enable the permission to Read/Write/Delete New. Also, enable Show empty directory if no access (enabled by default).
See also Configuring Bitvise SSH Server for SFTP, SCP file transfer.
Q255. File transfers to and from Bitvise SSH Server are getting randomly disconnected. Both client and server report the session was disconnected or terminated by a socket error.
If both the SFTP or SSH client and server report that the connection was terminated by a socket error, then neither the server or client is terminating the connection. This means it's being terminated by an intermediate network component, such as:
- Drivers. This has been seen in practice.
- Security software, such as an anti-virus.
- Firewalls and routers.
- Network misconfiguration.
Since the issue does not occur in either the SSH or SFTP server or client, we cannot help diagnose it. Instead, someone who has direct access to the computers in question has to look at the possible causes and eliminate them one by one through trial and error.
The above applies if the SSH or SFTP server and client are both reporting a disconnect due to a socket error. If software on either side reports a different cause, then that is the cause to follow up on.
Q257. We are seeing I_SFS_TRANSFER_FILE events which state: "File transfer ended by connection cleanup; file transfer may not have completed as intended." Why does this happen?
This message is typically logged when the file transfer client disconnects before completing the file transfer. A disconnect can happen for a variety of reasons. The most common is an unreliable network connection. To determine the reason, both server log files and client-side output need to be examined.
Shortly after the I_SFS_TRANSFER_FILE event, the SSH Server logs an event which describes how the client disconnected. If the disconnect event describes a TCP connection error, this means that either (A) the client encountered an error and disconnected abruptly, or (B) the connection was disconnected by a network component between the client and the server.
If the client-side output also describes a TCP connection error, the disconnect is due to a network component. In this case, see Q255.
Q260. I don't want the SSH Server to load the users' Windows profiles during file transfer sessions. How do I prevent the Windows profile from being loaded?
Bitvise SSH Server will load the user's Windows profile if it's asked to provide functionality that requires the Windows profile. To avoid loading the Windows profile, turn off options which require it to be loaded. These options may be found in Advanced SSH server settings, either in a user or group settings entry. They are as follows:
- Session setup > Windows file share settings > Map remote home directory
- Session setup > Windows file share settings > Map remembered shares
- Session setup, Connection setup > On-logon or on-logoff command that enables profile loading
- File transfer > Load profile for file transfer
With all of the above options disabled, the SSH Server will not load the user's Windows profile for file transfer sessions.
The most common culprit that's causing the Windows profile to be loaded is that Load profile for file transfer is enabled under File transfer in the group settings entry that applies to the user. This is disabled in new SSH Server installations by default, but an enabled setting can be inherited from older configurations.
Q265. Should I disable Windows profile loading?
The latest versions of Bitvise SSH Server are configured by default to avoid profile loading for file transfer connections. However, profile loading may be enabled when upgrading from an older SSH Server version where it was enabled by default.
Several versions of Windows contain a leak which will lead to resource exhaustion after a very large number of profiles have been loaded, requiring the system to be restarted. Unfortunately, this is not a problem we can fix in the SSH Server. You can work around it by following instructions in Q260 to disable profile loading.
Loading a Windows profile can also take varying amounts of time; sometimes up to a minute with large domain account profiles. Disabling profile loading when not needed will improve performance.
Finally, a Windows profile can get corrupted. If profile loading is enabled and the profile becomes corrupted, connections will no longer work until a manual intervention. A typical intervention is to delete the affected Windows profile so that Windows can recreate it. The greater the number of connections that the SSH Server handles, the greater the chance that profile corruption will occur. To avoid this, it is better to disable Windows profile loading.
Q270. Can Bitvise SSH Server lock (or not lock) files being accessed by a client, to prevent (or allow) them to be accessed by other applications? How do we enable (or disable) such blocking?
The following are default SSH Server locking behaviors for files that clients access via SFTP, SCP or FTPS:
In SSH Server versions 9.xx and newer, the SSH Server by default permits Read, Write and Delete sharing for downloads, and only Delete sharing for uploads. Disabling Read and Write sharing for uploads prevents a failure case where another process – a task or file transfer session – can corrupt a file while it is being uploaded, or process a partial upload which has not yet completed.
In SSH Server versions 8.35 - 8.49, the SSH Server by default permits Read and Delete sharing, but not Write sharing. These versions use the same setting for uploads and downloads.
In versions 8.34 and earlier, the SSH Server by default permits all access by other applications.
These behaviors can be configured in Advanced SSH Server settings, in the following locations:
Server-wide defaults can be configured in Advanced settings, under File transfer. The settings are File sharing behavior, File sharing for uploads, and File sharing for downloads.
In an account or group settings entry, under File transfer > Mount points, in the entry for a specific mount point. The settings are File sharing behavior, File sharing for uploads, and File sharing for downloads. Screenshot.
If File sharing behavior is set to Free, then SFTP clients which implement a sufficiently high SFTP version can request different locking than configured in SSH Server settings.
In versions 9.34 and newer, if the SSH Server detects that a file is being uploaded to a network share, it opens the file for unbuffered I/O (the Windows flag FILE_FLAG_NO_BUFFERING). This is intended to improve upload performance, but causes the file to be opened for exclusive access. This is currently not configurable. It will be configurable in a future version.
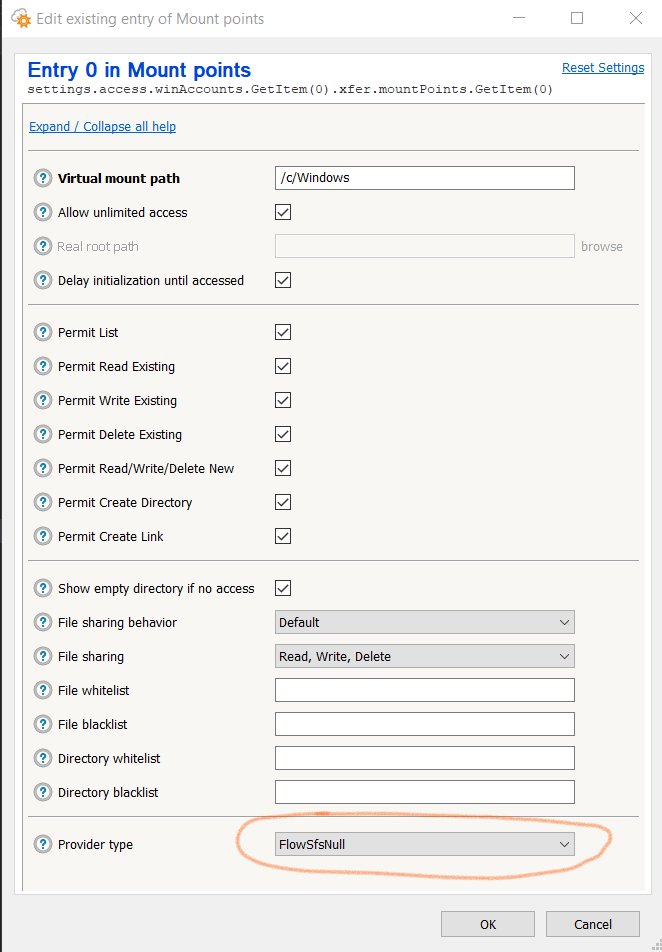
Q275. How can I configure the SSH Server to provide file transfer access to a directory, but hide specific subdirectories?
For each subdirectory that should be hidden, use Advanced settings to create a mount point with a virtual mount path to match the subdirectory. Configure the setting Mount type to Hidden, access denied.
For example, if you have the virtual mount path "/" mapped to C:\SftpRoot, and you want to hide C:\SftpRoot\Subdir, then create an additional mount point at the path "/Subdir" and set its Mount type to Hidden, access denied.
In versions 8.xx and older, there is no Mount type setting. In this case, configure the Provider type setting for that mount point to FlowSfsNull. Example.
Automated Actions After File Transfers
Q277. How can I configure the SSH Server to automatically delete files older than a number of days?
In Advanced settings, under Tasks and actions > Task list, you can configure a task of type Execute command, and configure the Command setting as follows:
forfiles /p "C:\Dir\SubDir" /s /d -60 /m * /c "cmd /c del /f @path"
This uses the Windows built-in FORFILES command to recursively enumerate files under C:\Dir\SubDir, and delete files older than 60 days.
You can configure the SSH Server to run this as frequently as you choose, for example on a daily basis. The SSH Server can also be configured to record the task output, and either log or email the results.
Q280. How can I configure email notifications for uploads or downloads?
In SSH Server versions 9.xx, this is easiest to configure using Tasks and actions. See Examples using I_SFS_TRANSFER_FILE. Under default settings created by SSH Server 9.16 and later, you can find ready-made examples of email notifications for uploads and downloads in Advanced settings, under Tasks and actions > Task list. You must also configure settings under SMTP sending: see Q535.
For uploads, there is also the option to configure this using an On-upload command: see Q285.
Q285. How can I configure automated processing for uploaded files?
The SSH Server can be configured to execute a command on successful upload. Example PowerShell scripts:
An alternate way to send on-upload email notifications:
An alternate way to move files after upload:
The scripts are renamed to .txt from their original .ps1 extension. They require that you edit them and insert essential details – they cannot be used as-is.
This script can be used as an On-upload command in Advanced SSH Server settings. The setting can be configured either in an account settings entry for a single user, or in a group settings entry as a default for multiple users. When using the above script, the command would be simply as follows:
PowerShell C:\Path\To\OnUploadEmail.ps1
For more information about environment variables available to an On-upload script, see Environment variable expansion.
Q290. I'm trying to configure an On-upload command, but my PowerShell script does not run.
If you are certain the problem is not due to Windows filesystem permissions, check the PowerShell script execution policy. You can determine if the PowerShell execution policy is the issue in the following manner:
- If terminal shell access is disabled, temporarily set the user's Shell access type to PowerShell in SSH Server settings.
- Log into the SSH Server using the same account that needs to execute the script, using a terminal shell client.
- Attempt to execute the script.
If a PowerShell script does not work, the Start-Transcript cmdlet can help with troubleshooting. For example, add it to the top of the script as follows:
Start-Transcript -Path "C:\Temp\Transcript.txt" -Append
If you don't truly need PowerShell's features, a Windows Command Prompt batch file does not have these complications. Write a batch file instead:
cmd /c C:\Path\To\OnUploadScript.cmd
Q295. I have an On-upload command that uses PowerShell, configured for a user that uploads 500 small files. When the user disconnects, the system bogs down and many of the On-upload commands don't run.
PowerShell has a heavy memory footprint. A single PowerShell instance uses 60 - 75 MB just to run. 500 PowerShell processes require 30 - 40 GB of RAM.
A Windows Command Prompt uses on the order of 3 MB. If you expect to run hundreds of concurrent On-upload commands, consider writing a Command Prompt batch file, or even a small C or C++ program.
Public Key Authentication
If you are having problems related to public key authentication, you may also want to check our page about Public Keys in SSH.
Q300. Someone wants to use public key authentication to log into the Bitvise SSH Server I'm administering. They have already sent me their public key file. How do I tell the SSH server to use the public key file when that user logs in?
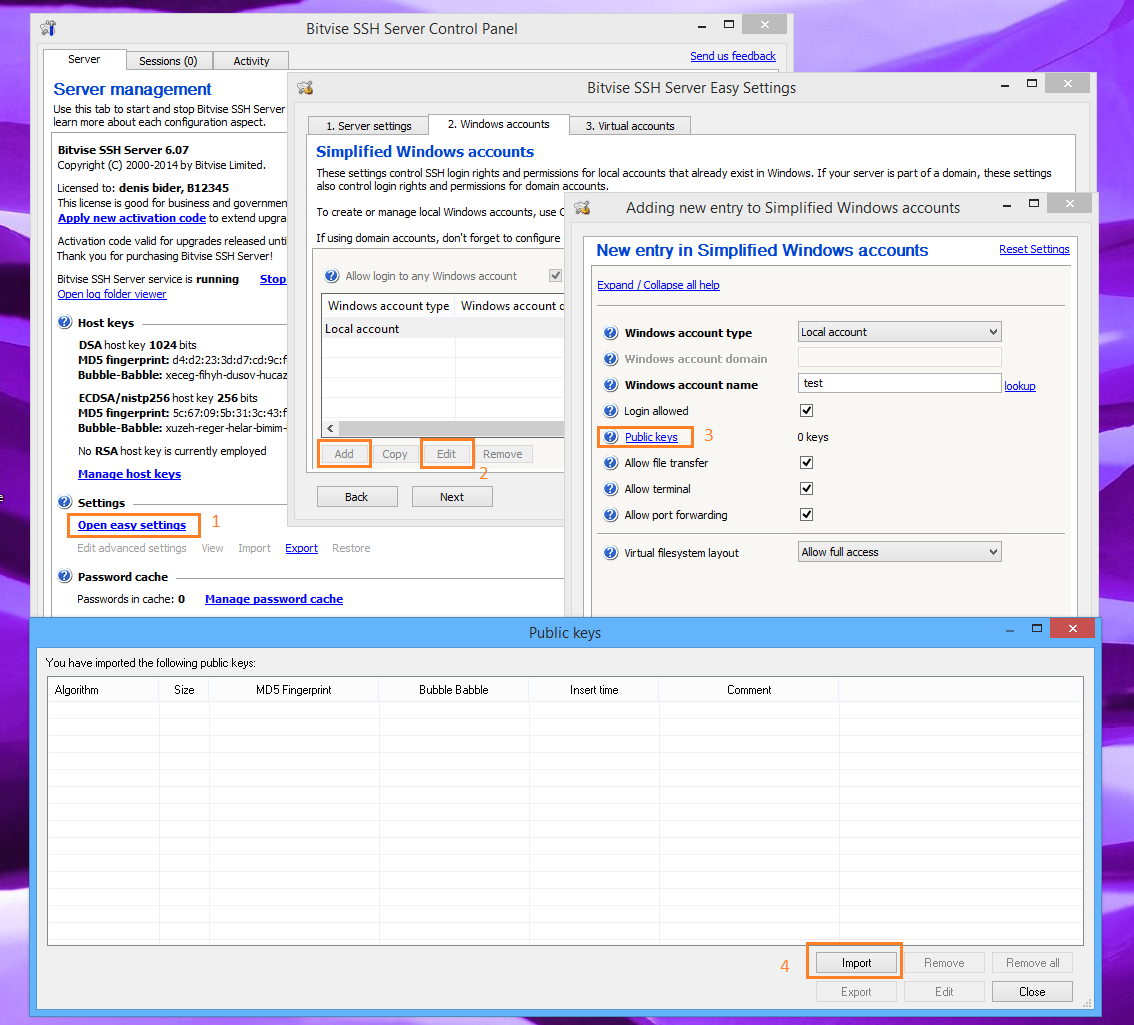
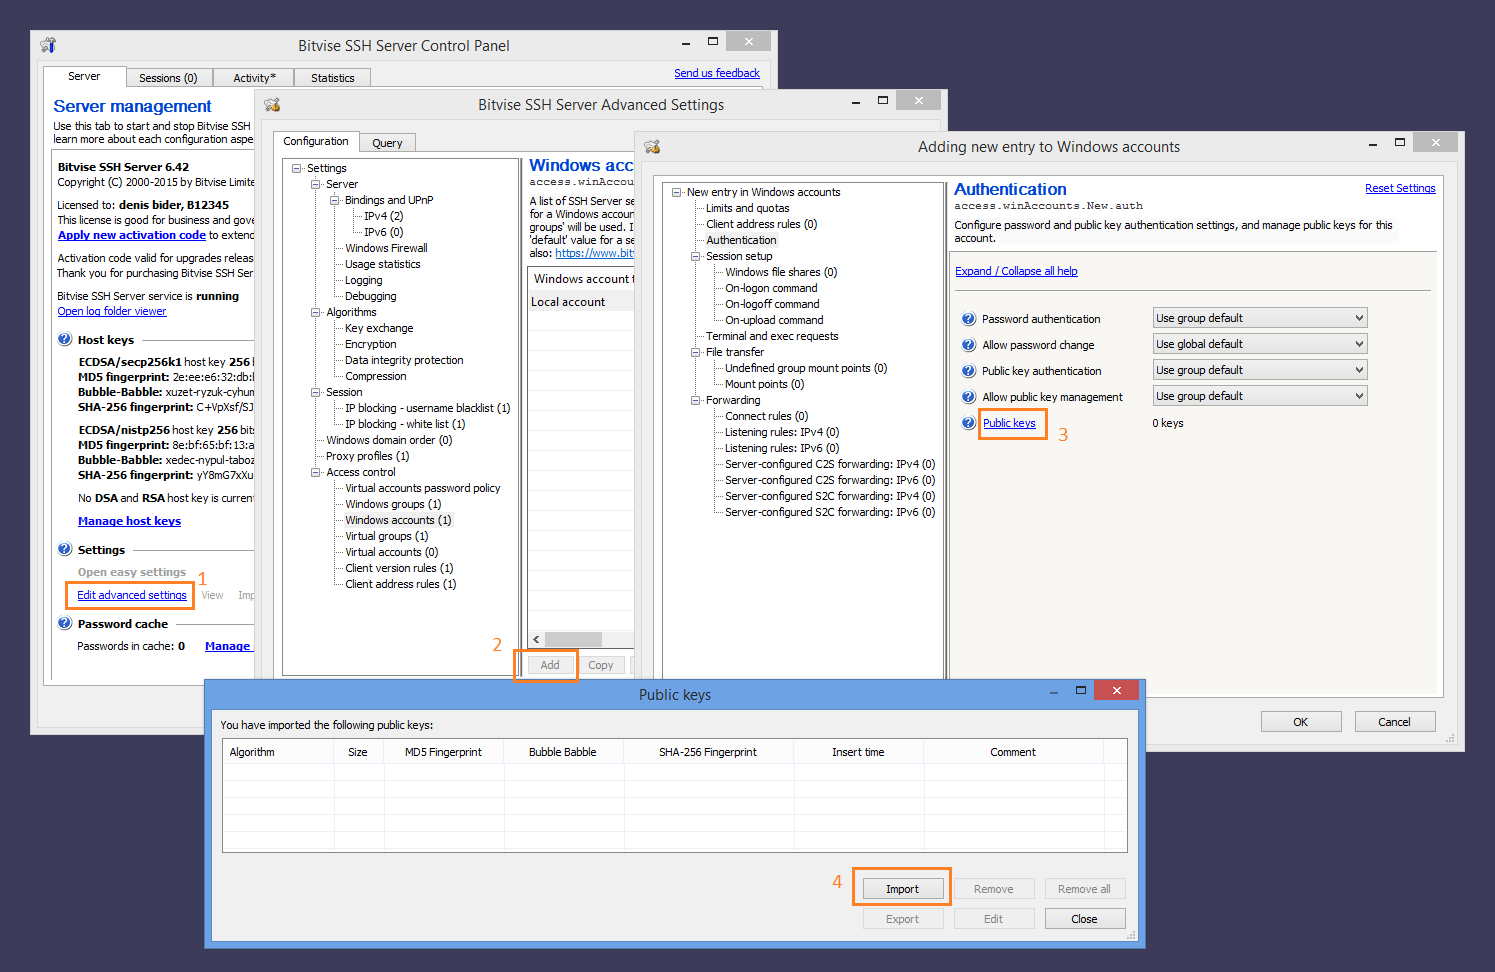
In the Bitvise SSH Server Control Panel, open Advanced settings and go to Access Control > Windows accounts (or Virtual accounts if this is a virtual user). If an entry for this user is not already present, you need to add one. For Windows accounts, the name of the entry must match the Windows username that will be used when logging in. Now, click Edit to open the account entry in a new window, and click the 'Public keys' link. A key management window will open which you can use to import the public key.
Screenshots for importing a client authentication public key:
We recommend also the Accounts and groups section of the Bitvise SSH Server Users' Guide for additional important information.
Q310. I am unable to import a user's public key into Bitvise SSH Server's user key management window. I keep getting a dialog box telling me that the public key could not be imported. What could be the problem?
It is most likely that the public key you are trying to import is not in the right format. It might be a private key instead of the public key, or it may be an SSH1 public key file instead of an SSH2 key. The formats supported by Bitvise SSH Server are the standard SSH2 public key format, and the OpenSSH SSH2 public key format. The OpenSSH SSH1 public key format is different and incompatible with SSH2.
Another possible reason you might have trouble importing a public key is if you try to import it into the SSH server's Manage host keys interface, instead of into an SSH account settings entry. The SSH server's host key management interface, which is accessible directly from the Bitvise SSH Server Control Panel, is intended to manage host keys that are used to authenticate the SSH server. The place to import a client authentication keypair is into an individual account settings entry, either in Easy or Advanced SSH server settings.
Q320. The client sent their public key, I imported it into SSH Server settings, but public key authentication doesn't work, and they're still being prompted for a password. Help!
Most likely, the user's client software is doing one or more of the following:
- Not attempting to authenticate using a public key because the keypair is not properly configured in the client.
- Attempting to authenticate with a keypair that corresponds to a different public key than the one you imported for this client.
- Attempting to log into an account that does not match the one for which you imported this public key.
To see which problem it is, check the Activity tab of the SSH Server Control Panel, and/or the SSH Server's textual log files. If the client is not attempting to use public key authentication, you will see this as an absence of any public key authentication messages in the logs. If the client is using a different key, log messages will show that the server does not recognize the key they're using. If the client is attempting to log into a different account, there will be discrepancies between the user name provided by the client, and the one for which the public key has been imported in SSH Server settings.
Q330. How do I set up public key authentication with Bitvise SSH Client?
If you are able to connect to the SSH Server using password authentication, and if the SSH Server administrator has not prohibited users from managing their public keys, the simplest process is:
- Use the graphical Bitvise SSH Client to connect to the server.
- Once connected, open the Client key manager interface.
- Use Generate New to create a new keypair.
- Right click on the keypair and select Upload to server. You should now be able to authenticate using this keypair.
Alternately, if you must configure public key authentication before connecting to the server, or the server does not allow you to manage your public keys:
- Open the graphical Bitvise SSH Client. You do not need to connect to the server.
- Open the Client key manager interface.
- Use Generate New to create a new keypair.
- Use the Export button to export the public key in standard SSH2 format.
- Send the public key file to the server administrator. If you're the administrator, transfer it to the server machine.
- Follow instructions in Q300 (above) to import the public key into Bitvise SSH Server.
Once the public key has been uploaded or imported into the Server, configure the Login > Authentication > Initial Method setting so that the Client will use your generated user keypair for authentication. You can also save your Bitvise SSH Client settings into a profile for convenience, and copy the keypair into the profile using the Client key manager.
If you wish to manage public keys configured for your account on the Server non-interactively, or via the command line, you can also use spksc - a command line public key management client that's included with Bitvise SSH Client. In this case, run spksc from a Command Prompt for help.
Q340. When I use password authentication, I can access EFS-encrypted files, and network shares on the server's Local Area Network. But when I use public key authentication, EFS-encrypted files and network shares are inaccessible. How can I access them when using public key authentication?
In order to access EFS-encrypted files, the server needs to provide Windows with your password. Similarly, to provide you with access to network shares on other computers in the server's network, the server needs to authenticate you with the computer providing the network share.
When you log in using password authentication, the SSH server conveys your password to Windows, and your login session is created in a way which allows Windows to access EFS-encrypted files, and pass your login credentials to other Windows computers in the network, providing you with access to network shares.
When you log in using public key authentication, the SSH Server can create the Windows account login session without knowing the account password. However, a login session created this way does not have credentials necessary to access EFS-encrypted files and network shares.
One way to solve this is to add the Windows account's password to the SSH server's password cache. You can do this through the Manage password cache link on the Server tab of the Bitvise SSH Server Control Panel. The server will remember the password you enter indefinitely. When you log in using public key authentication, the server will use the cached password to create a logon session which will have credentials necessary to access network shares. This will work as long as the cached password remains synchronized with the account's actual password.
If you only need access to network shares (but not EFS-encrypted files), another way is to configure the SSH server, through per-group or per-account settings, to explicitly establish connections to one or more network shares, by providing network share access credentials in the SSH server's configuration. This can be done through the Windows file shares section of an account or group settings entry, in Advanced SSH server settings.
Q350. How can I let users manage their public keys themselves, without administrative intervention?
Bitvise SSH Server supports two ways for users to manage their client authentication public keys without requiring the administrator's manual intervention.
SSH clients that support the Secure Shell Public Key Subsystem (RFC 4819) can use this functionality to add or remove public keys associated with their account in Bitvise SSH Server settings. This feature is enabled for all accounts by default.
Windows accounts that have write access to their Windows profile directory can use the authorized_keys synchronization mechanism. To enable this, the administrator must enable the setting Synchronize with authorized_keys under Access control in Advanced SSH server settings. Windows users can then store a file named authorized_keys in a subdirectory named .ssh under their Windows profile directory. When the user's SSH session ends, Bitvise SSH Server will check for the presence of this file, and if it exists, the public keys encoded in this file will replace the public keys configured for the user in SSH server settings. This feature is disabled by default because some users have existing .ssh/authorized_keys files they are not aware of, which would conflict with intended SSH server settings.
Q360. When I examine the SSH server's log entries for a session, I see a logon attempt using the none method that fails, followed by a logon attempt using the publickey method that fails, followed by public key authentication that succeeds. How can I resolve the two failures?
These failures are a normal part of SSH authentication. First, the client may send a none authentication request, which is intended to fail, but provides the client with information about authentication methods supported by the server. Then, the client may attempt public key authentication without a signature, which is also intended to fail, but tells the client whether the server will accept the client's public key. Then, armed with this knowledge, the client sends the actual public key authentication request, which succeeds.
The client could avoid the preliminary requests if it were to assume outright that the server supports public key authentication, and that the server will accept the public key the client is trying to use. In this case, the client can just send the full public key request directly, as its first authentication request.
However, it is perfectly okay for the client to send the preliminary requests. This is a normal part of SSH authentication.
Q370. The SSH Server Control Panel displays the message: "The BvLsa authentication package cannot be loaded because LSA protection (RunAsPPL) is enabled. Public key authentication, as well as virtual accounts that use a custom security context, will require configuring the password cache as long as BvLsa cannot be loaded."
We recommend updating to SSH Server version 9.51 or newer. The latest SSH Server versions no longer require the BvLsa authentication package for password-less authentication, and do not install it on recent Windows versions.
Since Windows versions released around 2025, the LSA protection setting is now enabled by default. This means Windows does not load LSA authentication packages installed by third party programs unless they carry a Microsoft signature. This prevents the loading of the SSH Server's authentication package. SSH Server versions before 9.51 required this authentication package to create logon sessions where a password is not available. This especially affects login into Windows local or domain accounts using public key authentication.
If you prefer not to update the SSH Server, workarounds are available:
Disable LSA protection in Windows. Or:
Avoid affected types of logon. For example: configure public key authentication for a virtual account instead of a Windows account. Or:
Enter passwords for affected Windows accounts into the SSH Server's password cache. This is configured using the Manage password cache interface on the Server tab in the SSH Server Control Panel.
To disable LSA protection in Windows, you can follow instructions under Disable LSA protection in the Microsoft article Configure added LSA protection. Either set the registry value RunAsPPL to 0, or disable the Windows policy Configure LSASS to run as a protected process.
If the LSA protection setting has been locked into UEFI, it is not sufficient to disable the setting in Windows. In this case, to disable LSA protection, you need to follow the section Remove the LSA protection UEFI variable.
Q380. The SSH Server's log files say password-less authentication across Windows domains is not supported. What can we do about it?
The SSH Server does not implement logic for contacting the domain controller of another domain, i.e. not the SSH Server's domain, to obtain information about an account in that domain. If it did support this, it would likely not be able to contact the other domain controller due to firewall restrictions; or it couldn't obtain the necessary information due to Active Directory security settings.
Currently, therefore, the SSH Server cannot construct a password-less logon session for a user in another domain, even if the domain is in the same forest. However, the SSH Server can construct a normal logon session for the user, by calling the Windows function LogonUser. The SSH Server can do this if you configure one of the following:
Enter the password for the Windows account from the other domain in the SSH Server's password cache. You can do this using the Manage password cache interface in the SSH Server Control Panel, on the Server tab.
Alternately, you can configure the SSH Server to cache the password automatically. You can set this in Advanced settings > Access control > Password cache auto-save behavior. If you change this setting to Public-key accounts or All accounts, the user will need to enter their password the first time they try to authenticate with a public key. However, subsequently, the SSH Server will have the saved password and will be able to create the logon session using only public key authentication.
Account Settings
Q400. How do Bitvise SSH Server account settings work?
We recommend the Accounts and groups section of the Bitvise SSH Server Users' Guide for this important explanation.
Q430. How can I limit a user so that they cannot access files outside of a certain directory?
The answer depends on what sort of access you have in mind. For shell access and remote execution, jailing a user is possible only through Windows file system permissions. On the other hand, if you are permitting the user only file transfer access (using SFTP and SCP), you can configure a limited-access virtual filesystem for the user by editing settings for their account or group in Bitvise SSH Server settings. In settings for the individual account or group, open Virtual filesystem layout > Mount points, and set the 'Real root path' setting for the default mount point ('/') to the directory you want them to access.
Q440. How do I use virtual accounts on a domain controller?
On computers that are not domain controllers, Bitvise SSH Server manages a local Windows account – usually named BvSsh_VirtualUsers – to provide a security context for virtual account login sessions. See Q530 for more information about this account.
On domain controllers, the SSH Server cannot create this account because there is no concept of local accounts on a domain controller. If you would like to use virtual accounts on a domain controller, you need to create or designate a domain account which will provide a security context for your virtual account login sessions. You then need to configure this backing account in Advanced SSH Server settings, either individually for each virtual account settings entry, or in a group settings entry used by one or more virtual accounts.
Q445. How do I configure virtual accounts to use a domain account as security context?
If you would like your virtual accounts to use a domain account as their security context, open Advanced SSH server settings, and edit your Virtual group settings entries as follows:
- Change Security context to A specific Windows domain account.
- Configure the Windows account domain and Windows account name settings to identify the domain account.
Virtual account settings entries will inherit their security context settings from their assigned virtual group by default - unless settings for a specific virtual account are configured differently.
We recommend also adding the domain account's password to the SSH Server's password cache. See Q450.
Q450. If I use an explicitly configured backing account to provide a custom security context for virtual accounts, do I need to enter the backing account's password into the SSH Server's password cache?
When you explicitly configure a backing account for virtual users, you can choose to save the password for this backing account in the SSH Server's password cache using the Manage password cache interface in the SSH Server Control Panel.
If you configure the password cache, the SSH Server will be able to create virtual account login sessions that will have implicit access to EFS-encrypted files and network resources (e.g. Windows shares) accessible to the backing account. If you do not configure the password cache, the virtual account sessions will still work, but without access to such resources. See also Q340, which describes the same issue when using Windows accounts with public key authentication.
Q460. I installed Bitvise SSH Server on a computer that's not a domain controller, but there is no BvSsh_VirtualUsers account. What's happening?
The BvSsh_VirtualUsers account is not created at installation time, but later when the SSH Server determines that it is needed. If it does not yet exist, it is possible that the SSH Server has not been started. If it was started, it is possible that the settings do not yet contain virtual accounts that would need this security context.
If the SSH Server was started; and its settings do contain virtual accounts – the SSH Server installer supports multiple concurrent installations on the same computer. Separate SSH Server instances are distinguished from each other by name, and the directory in which they are installed. Because the instances are independent, they create separate automatically managed accounts with different names.
The default, unnamed instance uses the account name BvSsh_VirtualUsers. For named instances, the name of the account will start with BvSsh_, and the remainder depends on the instance name.
If you have multiple SSH Server instances, and wish to discover the name of the automatically managed account associated with one, use Open log folder viewer in the SSH Server Control Panel for that instance, and open one of the textual log files. Look for the event I_AUTO_ACCOUNT_ENABLED. The name of the account will appear in this event, as follows:
<parameters account="BvSsh_VirtualUsers"/>
Q465. What is the difference between Client IP address rules configured in account and group settings entries, and the server-wide Client IP address rules configured under Advanced settings > Access control?
The global Client IP address rules in Advanced settings > Access control take effect at a different stage than Client IP address rules defined in an account or group settings entry.
Server-wide Client IP address rules apply to all connections. They take effect as soon as a connection is received. If the IP address of the client is not permitted according to server-wide rules, the SSH Server does not receive or send any connection data. Instead, it immediately terminates the connection.
The Client IP address rules configured in account and group settings entries are applied later in the SSH or FTPS connection. They are applied after SSH or TLS key exchange, during user authentication. The SSH Server cannot apply these rules until the connection reaches this stage, because it must know which account and group settings apply to the user.
When the client is authenticating, if the account settings entry does not contain any Client IP address rule matching the IP address of the client, the SSH Server checks Client IP address rules in the group settings entry. If the group settings also do not contain a matching a rule, the SSH Server denies the login attempt.
The global Client IP address rules were already processed for the connection to be accepted at all. They are not applied again when the client is authenticating.
Q470. How can I export a list of accounts from SSH Server settings in a textual format?
There are multiple ways:
Since SSH Server 8.xx versions, you can export accounts in CSV format from Easy or Advanced settings. Exporting from Advanced settings will include more complete information.
Alternately, you can open an administrative, elevated Command Prompt or PowerShell window and navigate to the SSH Server's installation directory. There, run the command:
BssCfg settings exportText
This exports the complete SSH Server settings in a format that is textual and suitable for use in scripting SSH Server settings using PowerShell.
In the SSH Server installation directory, you can find an example PowerShell script named VirtAccountExporter.ps1. You can either use this script as-is or adapt it for your purposes to export specific aspects of account settings.
Q480. I would like to apply a change to a large number of account settings entries. How do I avoid having to do it manually?
There are two main ways you can save time if you need to apply a change to a large number of account or group settings entries:
You can use the SSH Server's support for scripting settings using PowerShell, .NET and other languages.
You can use the BssCfg command line configuration utility to export settings in textual format, modify them in your favorite text editor, and use BssCfg again to import the modified settings. To do this, open an elevated, administrative Command Prompt or PowerShell window, change to the SSH Server's installation directory, and run:
BssCfg settings exportText <filename> edit the exported settings using text editing tools BssCfg settings importText <filename>
The textual and scriptable settings formats are the SSH Server's secondary settings format. They are first-class formats which allow access to all of the SSH Server's settings, but they are not guaranteed to work 100% the same after upgrading to newer versions.
The SSH Server's binary settings format is the primary format which does guarantee 100% compatibility when upgrading.
Usage Issues and Operation Concerns
Q502. We have been using your software and have not updated it for X years. People who set it up left the company years ago. Yesterday, critical connections started failing. We don't understand the software and can't describe the issue. Please join our Zoom session or conference call!
Bitvise will not join your Zoom or WebEx session or conference call.
Bitvise provides a product, not a product with a service. We have two main objectives when we provide support:
- To detect and fix issues in recent versions of our software.
- To learn about opportunities for new features and improvements.
Over the years, we sometimes see the following pattern:
- A company had skilled administrators who found and liked our software.
- The administrators configured the software and it worked.
- These administrators leave the company or get replaced.
- The new administrators do not learn about the software because it works.
- The software does not get updated. Settings are maintained in routine ways.
- Years pass without issue. Then, a new and unexpected event occurs.
- This event requires understanding of the software.
- The company no longer has anyone who has this understanding.
- Bitvise – help! Help! Join our conference call!
Bitvise is not geared to provide this type of support.
If you contact us about an issue, we can help if you provide technical information by email. This includes:
- A detailed description of the steps you are taking.
- A description of what you expect to occur, vs. what actually occurs.
- Relevant client-side screenshots, errors or diagnostics.
- Excerpts from the SSH Server's textual log files which correspond to the issue.
You will need an administrator who can collect this information, and who can interpret and act on our replies.
If such a person does not exist, you are not fundamentally experiencing a technical issue. It is a human resource issue, and Bitvise cannot fix this for you.
Q505. What versions of TLS does Bitvise SSH Server use?
Bitvise SSH Server is primarily an SSH server, not a TLS server. SSH is a different and independent protocol from TLS.
In its default configuration, Bitvise SSH Server does not accept client connections using TLS, but using SSH version 2. This is the most recent SSH protocol version. Recent Bitvise software versions implement a set of current recommended cryptographic algorithms for use in SSH.
Since SSH Server versions 8.xx, you can also enable support for FTPS. FTPS is different from SFTP or SCP, which are both file transfer protocols secured using SSH. FTPS is the older FTP protocol, secured using TLS. In this case, the SSH Server does not have its own TLS implementation, but uses Windows Schannel for TLS. If you enable FTPS, you can use Advanced settings in the SSH Server Control Panel to selectively enable or disable TLS 1.0, 1.1, 1.2 or 1.3. Use of TLS 1.3 requires a recent version of Windows, with an Schannel component that supports TLS 1.3.
If you want to configure TLS cipher suites in more detail, you can do this using Windows registry settings that apply to Windows Schannel.
Q507. I'm using the SSH Server for FTPS in addition to SSH/SFTP. I was previously able to import a TLS certificate in PFX format. Now I must import a new certificate, but importing the new PFX file fails.
A new PFX file (PKCS #12) might not be compatible with older SSH Server versions, or with older versions of Windows. In this case, you may be able to re-encode the PFX file into a format which works, using the openssl utility.
An openssl utility is included in software such as Git for Windows, Strawberry Perl, and others. It is also available via WSL, the Windows Subsystem For Linux. Using a Windows Command Prompt, you can run where openssl to see if it's already set up in a directory which is in your PATH environment variables.
You will need at least two commands to re-encode the PFX file:
Convert the source PFX to PEM:
openssl pkcs12 -in Original.pfx -out Temp.pem
You will receive password prompts to decrypt the PFX, and to encrypt the private key in output. You can avoid the output prompts using the parameter -nodes. In this case, the private key in the temporary PEM file will be unencrypted. Such a file needs to be securely deleted, using a tool such as sdelete.
Convert the temporary PEM to PFX:
openssl pkcs12 -export -in Temp.pem -out New.pfx
If you are using a newer OpenSSL version, and must import the PFX on an older Windows version, specify the -legacy parameter. This avoids newer PKCS #12 encryption formats which are not supported on older versions of Windows.
Q510. How can a user change their password remotely?
The SSH Server supports changing passwords in multiple ways:
During SSH user authentication by using a client that supports this feature, such as Bitvise SSH Client.
If the user's Shell access type is configured to BvShell (typical for virtual accounts), the user can change their password using the passwd command.
If the user's Shell access type is configured to Command Prompt or PowerShell (common for Windows accounts), the SSH Server comes with a bvPwd utility. This allows a Windows account to change their password if they know what it currently is. The utility can be found in the SSH server installation directory. Run it with bvPwd -h for help.
An administrator can use the net user command, intrinsic to Windows, to change any user's password. Type net help user in a Command Prompt or PowerShell window for help.
An administrator can change virtual account passwords in SSH Server settings or using the BssCfg command-line configuration utility.
Q515. My SSH client logs me into a different account than I intend when I connect from a computer in the same domain. Why does this happen, and what can I do about it?
Some clients, including OpenSSH and PuTTY, will automatically try to log you in using Kerberos + GSSAPI, using the Windows domain account with which you are logged into the client computer. The clients will do this even if you specify a different username for authentication, and have no intention of using Kerberos to authenticate.
In SSH Server versions 8.xx and newer, the setting that prevents this is in Advanced SSH Server settings, under Access control > Client version rules. Find or create a client version rule that applies to the client software with which you experience the issue, or edit the default version rule for all clients. In the client version rule, enable the setting SSH username must match GSSAPI.
In new SSH Server installations, this requirement is already enabled for all clients except Bitvise SSH Client by default.
Q516. I'm trying to use Kerberos authentication with delegation, so that the client can access a network share, but delegation does not appear to work.
Windows supports two types of delegation: constrained and unconstrained.
Unconstrained delegation will be available if:
Active Directory settings permit it. For example, in the Active Directory entry for the server computer, under Properties > Delegation, the following setting is enabled: Trust this computer for delegation to any service.
The SSH client requests it. Bitvise SSH Client requests delegation if the checkbox Request delegation is enabled.
Windows is not using cached Kerberos tickets from before any delegation-related settings changes were made.
If a login is made using Kerberos and unconstrained delegation is available, the SSH Server will record this in the log event I_LOGON_AUTH_SUCCEEDED with the attribute:
tokenType="Kerberos5Obtained, DelegationCapable"
On the other hand, constrained delegation will be available if:
Active Directory settings permit it. For example, in the Active Directory entry for the server computer, under Properties > Delegation, the following setting is enabled: Trust this computer for delegation to specified services only.
Windows is not using cached Kerberos tickets from before any delegation-related settings changes were made.
Whether the SSH client requests delegation makes no difference on whether constrained delegation will be available or not.
The SSH Server does not currently log information about whether, or to what extent, constrained delegation is available. To examine a Kerberos ticket for constrained delegation, connect with an SSH client that can open a terminal shell and use the klist utility included in Windows. Example commands:
klist query_bind klist sessions klist tickets -lh ... -li ...
Q517. I'm trying to set up an embedded device (e.g. a Brocade ICX switch), which uses an SSH client such as RomSShell, to upload logs to Bitvise SSH Server. The client disconnects before user authentication with "Not expecting new keys message". What's happening?
If you see this particular message, the cause is most likely that the client does not support RSA host keys larger than 2048 bits, and the SSH Server generates a 3072-bit host key by default.
You can avoid this issue by using the Manage host keys interface in the SSH Server to dismiss the 3072-bit RSA host key, and instead generate and employ a 2048-bit RSA host key.
If the server's host key has already been set up for use with other clients, note that replacing the host key will require changes to the configuration of such clients, so that they will trust the server's new host key.
Q520. I'm seeing pop-ups from Bitvise SSH Server showing unknown IP addresses trying to guess usernames and passwords. What can I do about this?
In order to refuse access to unauthorized users, while still allowing authorized users to log in, the SSH server must accept connection attempts coming from permitted sources, and must allow those connections to reach a point where the client can provide authentication credentials.
When installed with default settings, Bitvise SSH Server will take several steps to thwart unauthorized attackers.
One way is by imposing a delay between login attempts. The default delay is 3 seconds. Without any other countermeasures, this 3 second delay would ensure that even an account with a weak password, e.g. 6 letters chosen randomly from an alphabet of 26, would on average take years of back-to-back attempts to guess. (Note that passwords this short are very weak and are highly disrecommended.)
Another way Bitvise SSH Server tries to thwart attackers is through automatic blocking of IP addresses that have recently initiated multiple failed login attempts. In default settings, the SSH Server will block for 1 hour any IP address that initiates more than 20 failed login attempts in 5 minutes.
If you wish to see fewer password guessing attempts, an effective mitigation is to configure the SSH Server to accept connections on a port other than 22. This would not be very effective against a determined attacker, but will avoid random hackers looking for low-hanging fruit. Any random port number between 1024 and 49151 is suitable. The main drawback is that any legitimate client that tries to connect to your server will then need to be configured with the port number in addition to the host name. Some Internet Service Providers may also block connections on non-default ports.
If all of your legitimate connections come from Bitvise SSH Client, you can enable SSH protocol obfuscation in the SSH Server in Advanced settings, under Bindings and UPnP. If you enable obfuscation, only Bitvise SSH Client will be able to connect, and then only if configured with the correct obfuscation keyword.
You can also block connections from specific geographic regions outright. If you never expect to receive legitimate connections from specific regions or countries, you can block them in Advanced settings > Access control > Client address rules. If you block all connections except specific countries, remember to also add IP address allow rules for connections not associated with a country (e.g. from the LAN).
Despite these countermeasures, it is very important to make sure that your accounts are configured with complex passwords, and to lock down your settings so as not to grant access that you don't need to. For more information and for password complexity guidelines, see Securing Bitvise SSH Server.
Q521. I never want my SSH Server to accept connections from certain continents and countries. How can I block connections based on the geolocation of the client IP address?
You can configure country-based and continent-based IP blocking in Advanced settings > Access control > Client IP address rules.
Q525. On Windows 10, I can launch apps through an SSH terminal shell which appear on the interactive user's desktop. How do I avoid this?
On Windows 10, graphical apps launched through an SSH terminal shell can appear on the interactive user's desktop under the following conditions:
- The SSH terminal shell has administrative permissions.
- The app is a Windows modern app. For example, the Calculator is a modern app in Windows 10.
- The app was previously run in the interactive user's logon session.
At this time, our investigation does not indicate that this behavior violates Windows security permissions. Since the terminal shell must run with administrative rights, what's happening is not different than if the administrator that is logged in via SSH used a utility such as bvRun or psexec to cause a graphical application to run on the interactive desktop. Still, it is peculiar that Windows 10 will do this by default, and in an inconsistent manner. This may be an oversight in current Windows.
As far as we can tell, this issue will not occur for SSH login sessions that do not have administrative permissions. Administrators should be aware that launching modern apps may cause them to appear on the interactive desktop.
Q530. When I install Bitvise SSH Server, it creates a local Windows account named BvSsh_VirtualUsers (or similar). What is the purpose of this account?
When you configure virtual users in Bitvise SSH Server settings, the SSH server needs to provide some kind of security context for actions taken by those users when they connect. Advanced SSH server settings allow you to configure a specific Windows account that should be used as security context for virtual users. If you don't take explicit steps to configure this, the SSH server will use as security context a default local Windows account, which it creates and manages for this purpose. In a default (unnamed) SSH server installation, this account is named BvSsh_VirtualUsers. (If your first installation was a version prior to 5.50, the account is named WinSSHD_VirtualUsers.)
You can use Windows Explorer, and other Windows administration tools, to apply Windows filesystem permissions to the BvSsh_VirtualUsers account. In this way, you can control what parts of your system a virtual user will be able to access. These Windows security permissions will apply to virtual users even if they are permitted to use terminal shell or exec requests, in which case, the virtual filesystem configured in SSH server settings does not apply.
You should not attempt to delete the BvSsh_VirtualUsers account, or change its password. Such changes will either be detrimental to your SSH server's operation, and/or will not be effective. The SSH Server will automatically enable this account when the server is started, and disable it when stopped. The SSH server sets this password to an extremely long, extremely complex random value. It will not be possible to log into this account, other than by allowing the SSH Server to use it as a security context for a virtual account.
In SSH Server version 8.48, the password for the BvSsh_VirtualUsers account is generated as 41 cryptographically random characters from an alphabet containing A-Z, a-z, 0-9, and special characters. The cryptographic strength of this password is on the order of 256 bits. The SSH Server will change the password if it expires according to your password expiration policy configured in Windows.
For more information: Security architecture in Bitvise SSH Server
Q535. I want to configure the SSH Server to send email notifications. How do I configure SMTP settings?
SMTP settings can be found in Advanced settings > SMTP sending. The settings depend on your SMTP server. Example settings using an on-premise SMTP server:
- Email sending: Send via outgoing SMTP server
- From address: An email address from which the SMTP server permits you to send.
- Sender computer name: A DNS name identifying the SSH Server computer. The SMTP server usually does not verify this, but it has to be specified and has to use DNS name syntax.
- IP version preference: None
- Host: The DNS name of the SMTP server. If you specify an IP address instead, you have to reduce the TLS requirement.
- Port: 465 if the SMTP server supports implicit TLS from the start of the connection; 587, 25, or 2525 if the SMTP server supports explicit TLS using STARTTLS. Other port numbers are also possible; check with the administrator of the SMTP server.
- Implicit TLS: Enable if port 465; disable if port 587, 25, or 2525.
- TLS requirement: If the SMTP server has a properly configured TLS certificate, set this to TLS, server name is exact match. Otherwise, use an appropriate lesser setting.
- Sender authentication: PLAIN authentication is usually best when using TLS. For Office 365, use LOGIN authentication.
- Username: Your SMTP username
- Password: Your SMTP password
Example using Microsoft Office 365:
- Email sending: Send via outgoing SMTP server
- From address: An email address from which Office 365 permits you to send.
- Sender computer name: A DNS name identifying the SSH Server computer. The SMTP server usually does not verify this, but it has to be specified and has to use DNS name syntax.
- IP version preference: None
- Host: smtp.office365.com
- Port: 587
- Implicit TLS: Disable
- TLS requirement: TLS, server name is exact match
- Sender authentication: LOGIN authentication
- Username: Your SMTP username
- Password: Your SMTP password
See also Microsoft article.
Q540. The SSH Server's log files are very detailed. How do I extract just the information I'm looking for?
The SSH Server's log files are intended to be machine processable. Log files use the XML format, which can be handled by utilities such as Microsoft Log Parser, or custom applications. It's straightforward to process XML files using any .NET language.
For more information, see also Interpreting SSH Server log files using Microsoft Log Parser.
Q545. How can my program programmatically inspect sessions currently connected to the SSH Server?
The SSH Server comes with a command line utility, BssStat, which supports several parameters including the ability to list currently connected sessions and channels. Like the BssCfg utility, BssStat needs to be run from an elevated, administrative Command Prompt or PowerShell window, or from a program that has administrative permissions. Run it without parameters for help.
The SSH Server also comes with C++ source code for BssStat included in the SSH Server installation directory. This source code requires minimal dependencies, and can be incorporated into an application that wishes to connect to the SSH Server and monitor it directly.
Q550. I enabled the Omit server version setting, but the server still sends the name of the product in the SSH version string. How can I completely remove product information from the version string sent to clients?
You can remove the exact server version from the SSH version string by enabling the setting Omit server version in Advanced settings, on the Connections page. (In versions before 9.xx: the Server page.) However, we do not support completely removing the product name.
Any hacker who can exploit a server-specific vulnerability can also identify the server product based on the contents of the KEXINIT packet the server sends. KEXINIT packets are sent in plaintext and have specific patterns which are sufficient not just to identify the make of the server, but also a particular version subset.
Even if KEXINIT was not identifiable, it is always possible to narrow down the operating system make and version by the mere behavior of the TCP/IP stack on the server. The SSH Server cannot do anything about this.
As a result, removing the server software name from the version string only denies useful information to legitimate clients, while not significantly preventing attacks. Meanwhile, legitimate clients need this information for compatibility measures.
In general, we recommend the following measures to reduce the annoyance of drive-by hacking attempts:
- Instead of using the default SSH port (22), configure the SSH Server to accept connections on a random port between 1024 and 49151.
- If you only connect to the SSH Server using clients that support SSH protocol obfuscation (e.g. Bitvise SSH Client), enable obfuscation with a keyword.
Q560. How do I import a list of IP addresses I want to block from a file?
You can do this using the SSH Server's scriptable configuration language. For example:
$cfg.settings.access.clientAddresses.new.addressRule.addressType = $cfg.enums.AddressVer6Type.ipv4 $cfg.settings.access.clientAddresses.new.addressRule.ipv4 = "10.2.3.4" $cfg.settings.access.clientAddresses.new.instr.allowConnect = $false $cfg.settings.access.clientAddresses.NewCommit()
After adding entries, edit the rule list to make sure that their order is correct - for example, that individual IP address block rules appear in the list before a blanket allow-all rule.
Q570. How many simultaneous client connections does the SSH Server support?
The answer depends on the type of connections, their activity, the lowest performance you find acceptable, and hardware resources available to the server.
In versions 9.xx, the SSH Server is configured by default to allow up to 500 concurrent connections. This is configured with the Maximum connections settings, found in Advanced settings, under Connections.
Separate limits can be configured for connections with and without child processes. Connections with processes include file transfers, terminal shell, and exec requests. Connections that do not use child processes include those that only use port forwarding, or SSH Server Remote Control, or the SSH public key subsystem.
Very old Windows, such as Windows Server 2003, will run out of a kernel resource called desktop heap space if more than 50-60 Windows sessions with processes are created. In SSH Server versions 9.xx, the number of sessions may be less than the number of connections if you enable Sessions > Windows session sharing.
In all more recent versions of Windows, desktop heap space is not statically limited. In this case, the SSH Server's ability to support a greater number of connections will depend on their activity and the server's hardware resources. If most connections have low activity, hundreds can be supported. However, if all connections attempt to perform file transfer at maximum available speed, they will quickly start competing for CPU and bandwidth.
Given unlimited hardware resources, the SSH Server can support several hundred simultaneous sessions on a 32-bit platform, and several thousand on a 64-bit platform. For reasons related to US cryptography export restrictions, the SSH Server has a maximum hard limit of 2,498 simultaneous authenticated connections. You are likely to run into CPU or bandwidth limitations before that, and should restrict the maximum number of connections to a smaller number.
Q572. We have clients that connect but never disconnect. The SSH Server's maximum configured number of sessions is reached, and then no new connections are accepted. What can be done about this?
The main thing to do is to ensure you are assigning separate accounts to different clients, and then configure per-user limits for the clients. These limits can be configured in Advanced settings, either for an individual user in their account settings entry, or in a group settings entry as a default for multiple users. The settings can be found in the account or group settings entry under Limits and quotas.
You can also configure a server-wide Connection timeout setting in Advanced settings, under Connections. (In versions 8.xx and older, the setting is Session timeout, under Session.) An automatic connection timeout is disabled by default because the SSH Server cannot prevent clients from reconnecting. The connection timeout will also not trigger if the client generates regular activity of any kind, for example if it performs repeated directory listings.
Check also Q570 for information about raising the maximum number of allowed connections. The maximum connection limit configured on your system may be too low for the number of simultaneous connections you want it to handle. However, if you don't configure per-user connection limits, then if you have a client that keeps connecting but never disconnects, this can exhaust the maximum number of connections regardless of how high it is set.
Q575. Sometimes, login attempts fail with the message "This login attempt was serialized and could not be processed in the time configured", or "The logon attempt expired due too many concurrent logon attempts." How do I fix this?
A message like this means the login attempt was serialized and could not be processed in the time configured in Delayed login expiration, found in Advanced settings > Connections.
This happens if another simultaneous login attempt for the same account or from the same IP address is taking too long. It can also mean there are too many concurrent login attempts for the same account or from the same IP address, and they all use a method like "password" that is subject to the Penalty login attempt delay setting.
The purpose of this functionality is to protect your server from password guessing.
To avoid this situation, change any of the circumstances involved:
Make sure there aren't so many simultaneous connections using "password" authentication from the same IP address, or using the same user name.
If you are using the same account for many different clients, it is more secure to use a different account for each client.
If the SSH Server is behind a load balancer that hides the real IP addresses of clients, recent SSH Server versions support enabling the PROXY protocol in Advanced settings, under Bindings and UPnP. The PROXY protocol allows a load balancer to relay the client IP address to the SSH Server, so that the connections do not appear to all be coming from the load balancer IP.
Use public key authentication instead of password. Public key authentication is not subject to defenses that are enabled by default against password guessing.
You can disable the defenses against password guessing. The main way to do so is to remove or lower the setting Penalty login attempt delay. This is configured in Advanced settings, under Connections. (In SSH Server versions 8.xx and older, the location is under Session.)
If you remove defenses against password guessing, you must ensure that all passwords which could be used to connect to the SSH Server are long, randomly generated and highly complex. Furthermore, check your SSH Server settings to ensure that users are not allowed to change their passwords to weaker values.
Q578. A client is attempting 200 file transfers in 200 simultaneous connections. All connections are made in the same second. The SSH Server interprets this as a Denial of Service attack and most of the transfers fail. What settings can I relax to make this work?
Depending on the number of simultaneous connections and the authentication method used, the following settings may need to be adjusted:
Ensure that the client's account is permitted more than the required number of concurrent connections. This is configured in Advanced settings, either in the account settings entry that applies to the client, or in a group settings entry, as a default. The connection limits are configured under Limits and quotas.
Screenshot in account settings; Screenshot in group settings (defaults).
Advanced settings > Connections: Ensure that Maximum connections from users and Maximum connections with processes permit more than the required number of concurrent connections from all users. Screenshot.
Advanced settings > DoS protection: Under default settings, the SSH Server will begin to drop connections on arrival if more than 200 connections are received within 10 seconds. This is controlled by the settings Enable accept delay threshold (default 200) and Enable accept delay window (default 10 seconds). Screenshot.
If this is the cause of connections being dropped, the SSH Server records the Info-level event I_SERVICE_CONNECTIONS_DISCARDED. If the SSH Server does not log this event, and the event is not disabled in Advanced settings > Logging, then DoS protection is not being triggered.
To relax this setting, either increase Enable accept delay threshold to a higher value, or reduce Enable accept delay window to a lower value.
If you relax these settings, it becomes easier for an unauthenticated remote attacker to exhaust all TCP sockets available to the SSH Server. If the sockets are exhausted, this prevents further connections from any client until some existing connections end.
Advanced settings > IP blocking: If the aggressive client is connecting from predictable IP addresses, add these addresses to IP blocking > IP whitelist.
If the client's IP addresses are not predictable, you may need to increase the setting IP blocking > Total threshold. When a client starts an authentication attempt, the SSH Server gives the client a temporary, lightweight penalty. This counts toward the Total threshold setting, and is reset if the client authenticates successfully. But if the client makes hundreds of simultaneous connections, the Total threshold can be exceeded before any authentication attempt succeeds.
If the client is using password authentication, you may also need to relax Advanced settings > Connections > Penalty login attempt delay. Screenshot.
If the aggressive client can use public key authentication, this is a much better choice. If not, then in order to allow the aggressive client to reliably connect, you must sacrifice protection against brute force password guessing. This is done by reducing the Penalty login attempt delay to either 1 second or 0 seconds.
If you reduce the Penalty login attempt delay to 0 seconds, protection against brute force password guessing will be completely disabled. In this case, you must ensure that all accounts which can conceivably log in using password authentication can only use secure, long, randomly generated passwords.
To achieve 128-bit security, all passwords must consist of 22 random characters from the alphabet A-Z, a-z and 0-9. Adding special characters can create interoperability issues, and only reduces the needed password length to e.g. 20 instead of 22 characters.
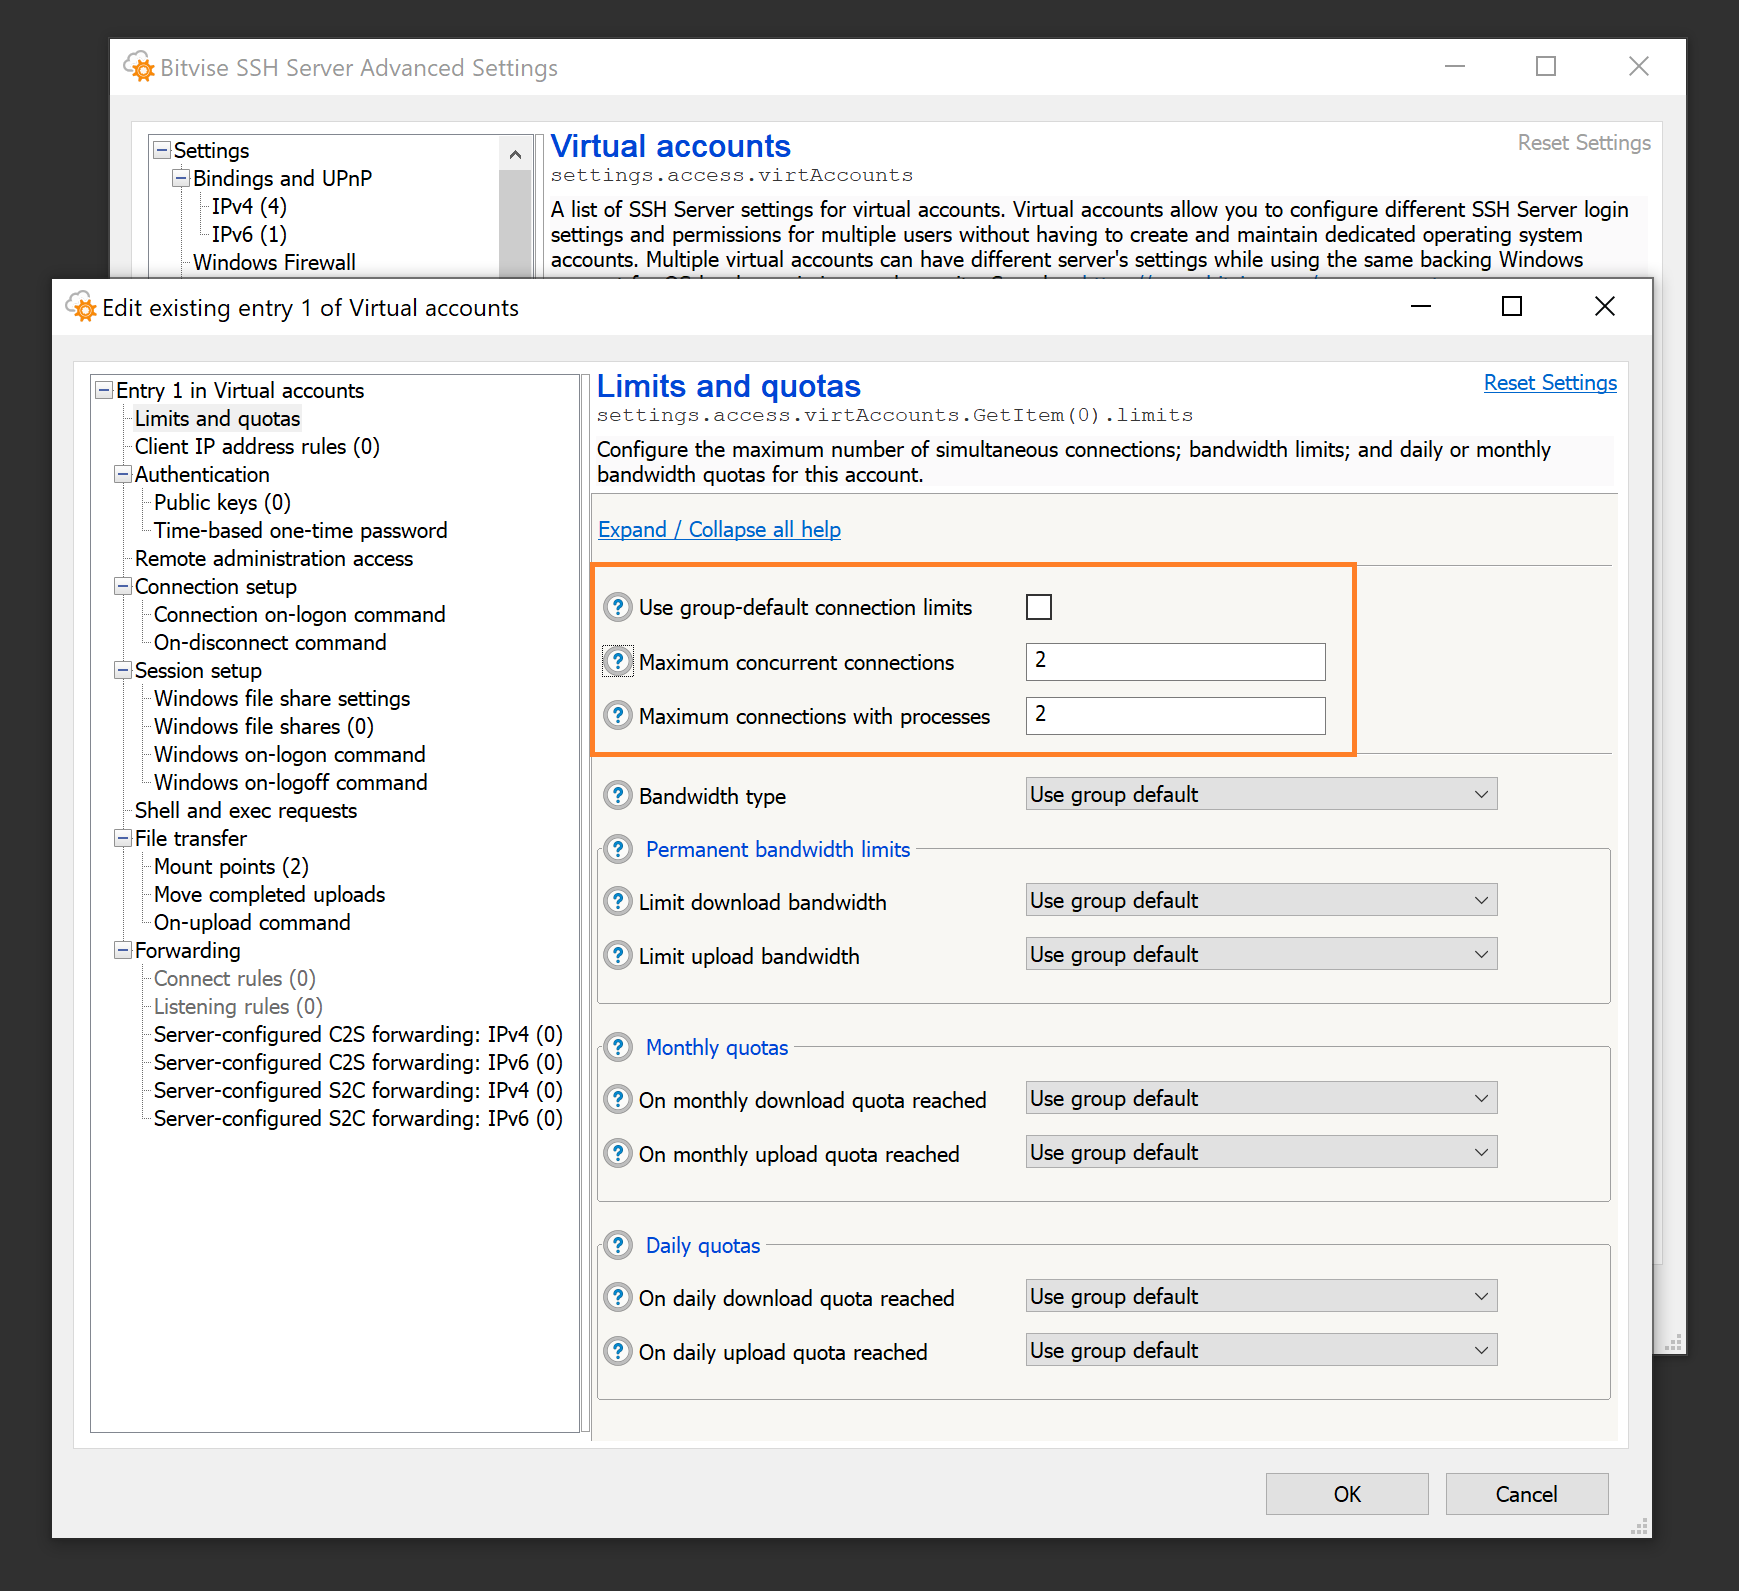
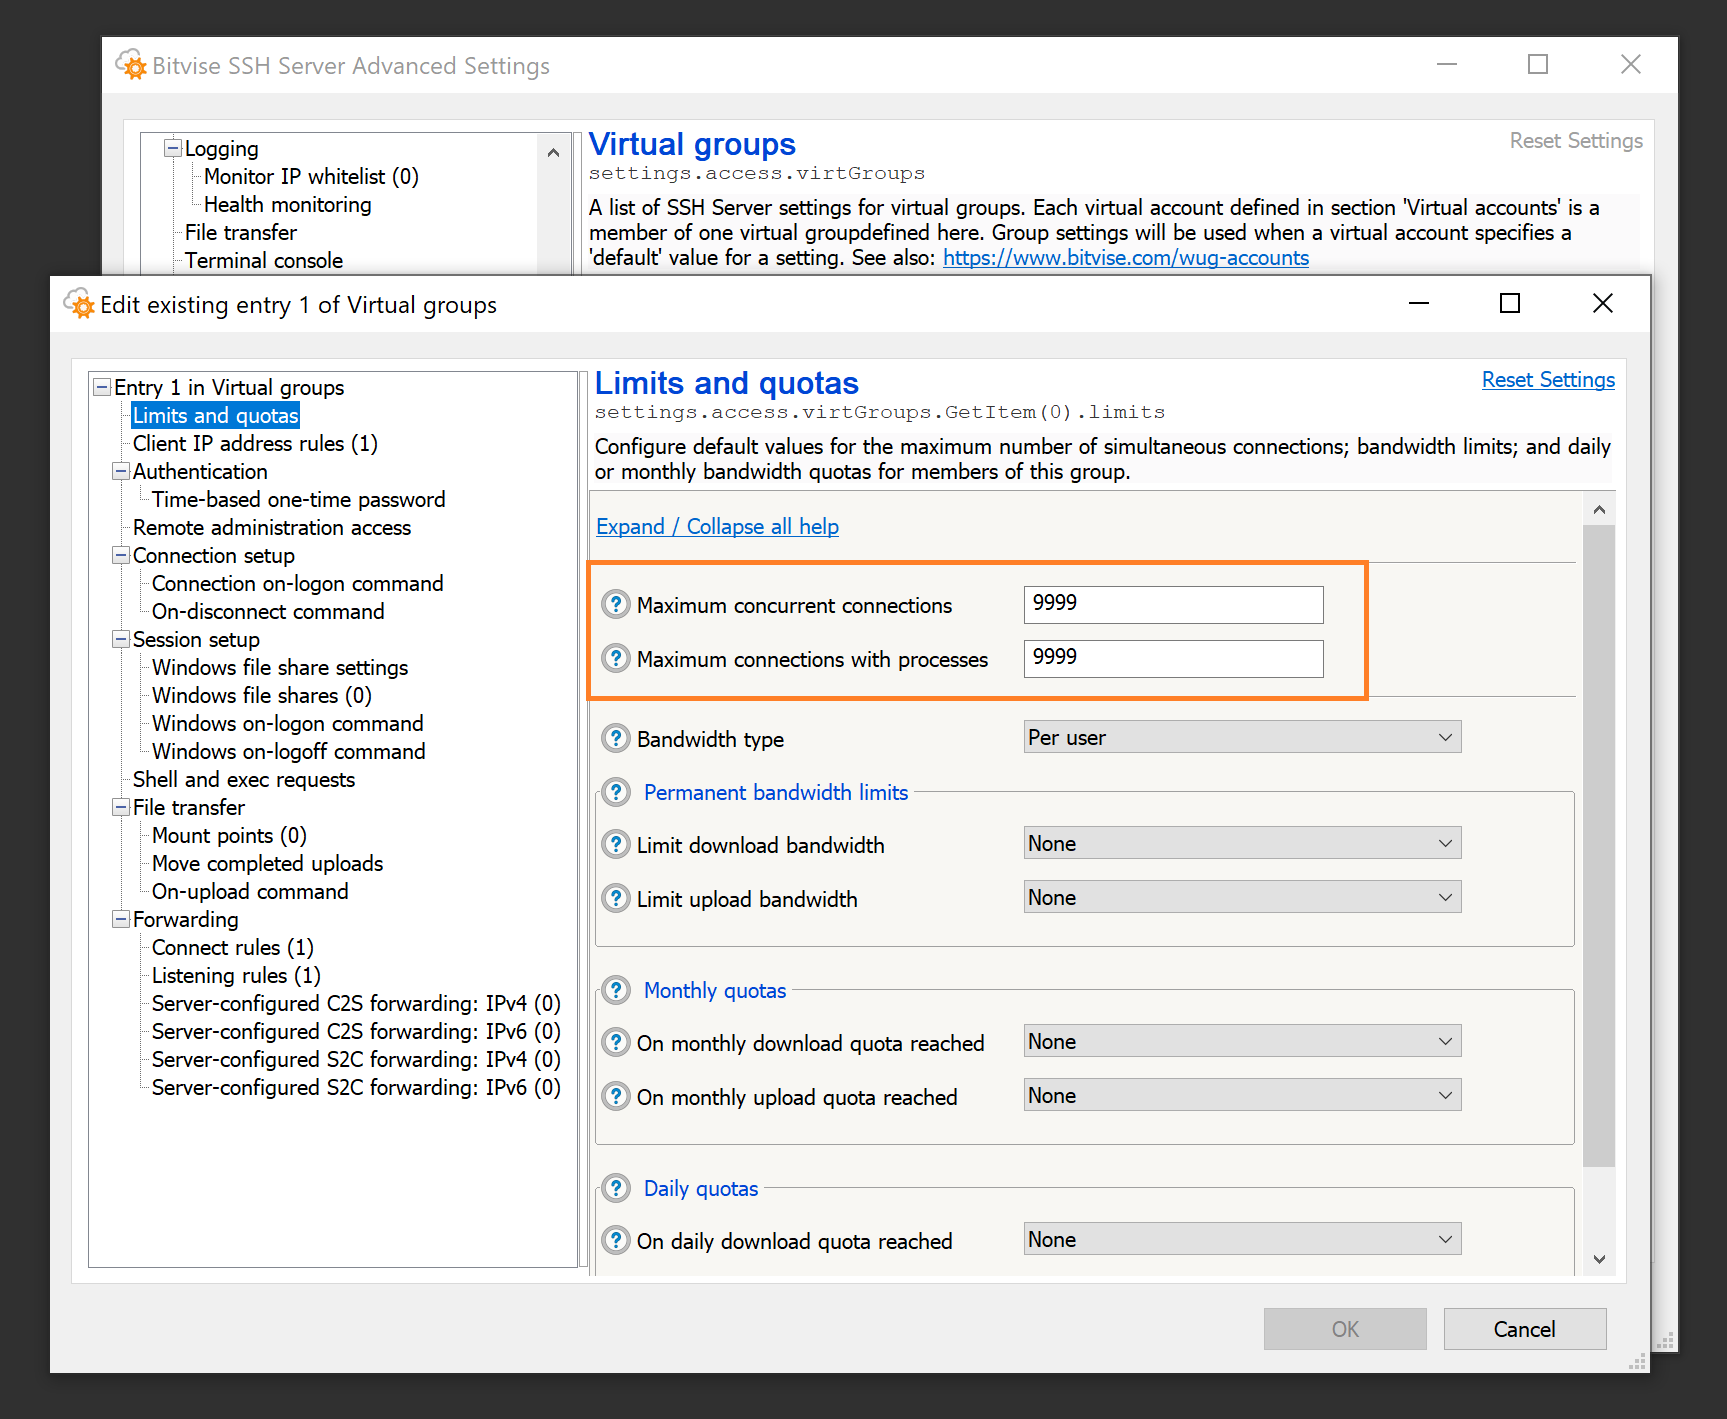
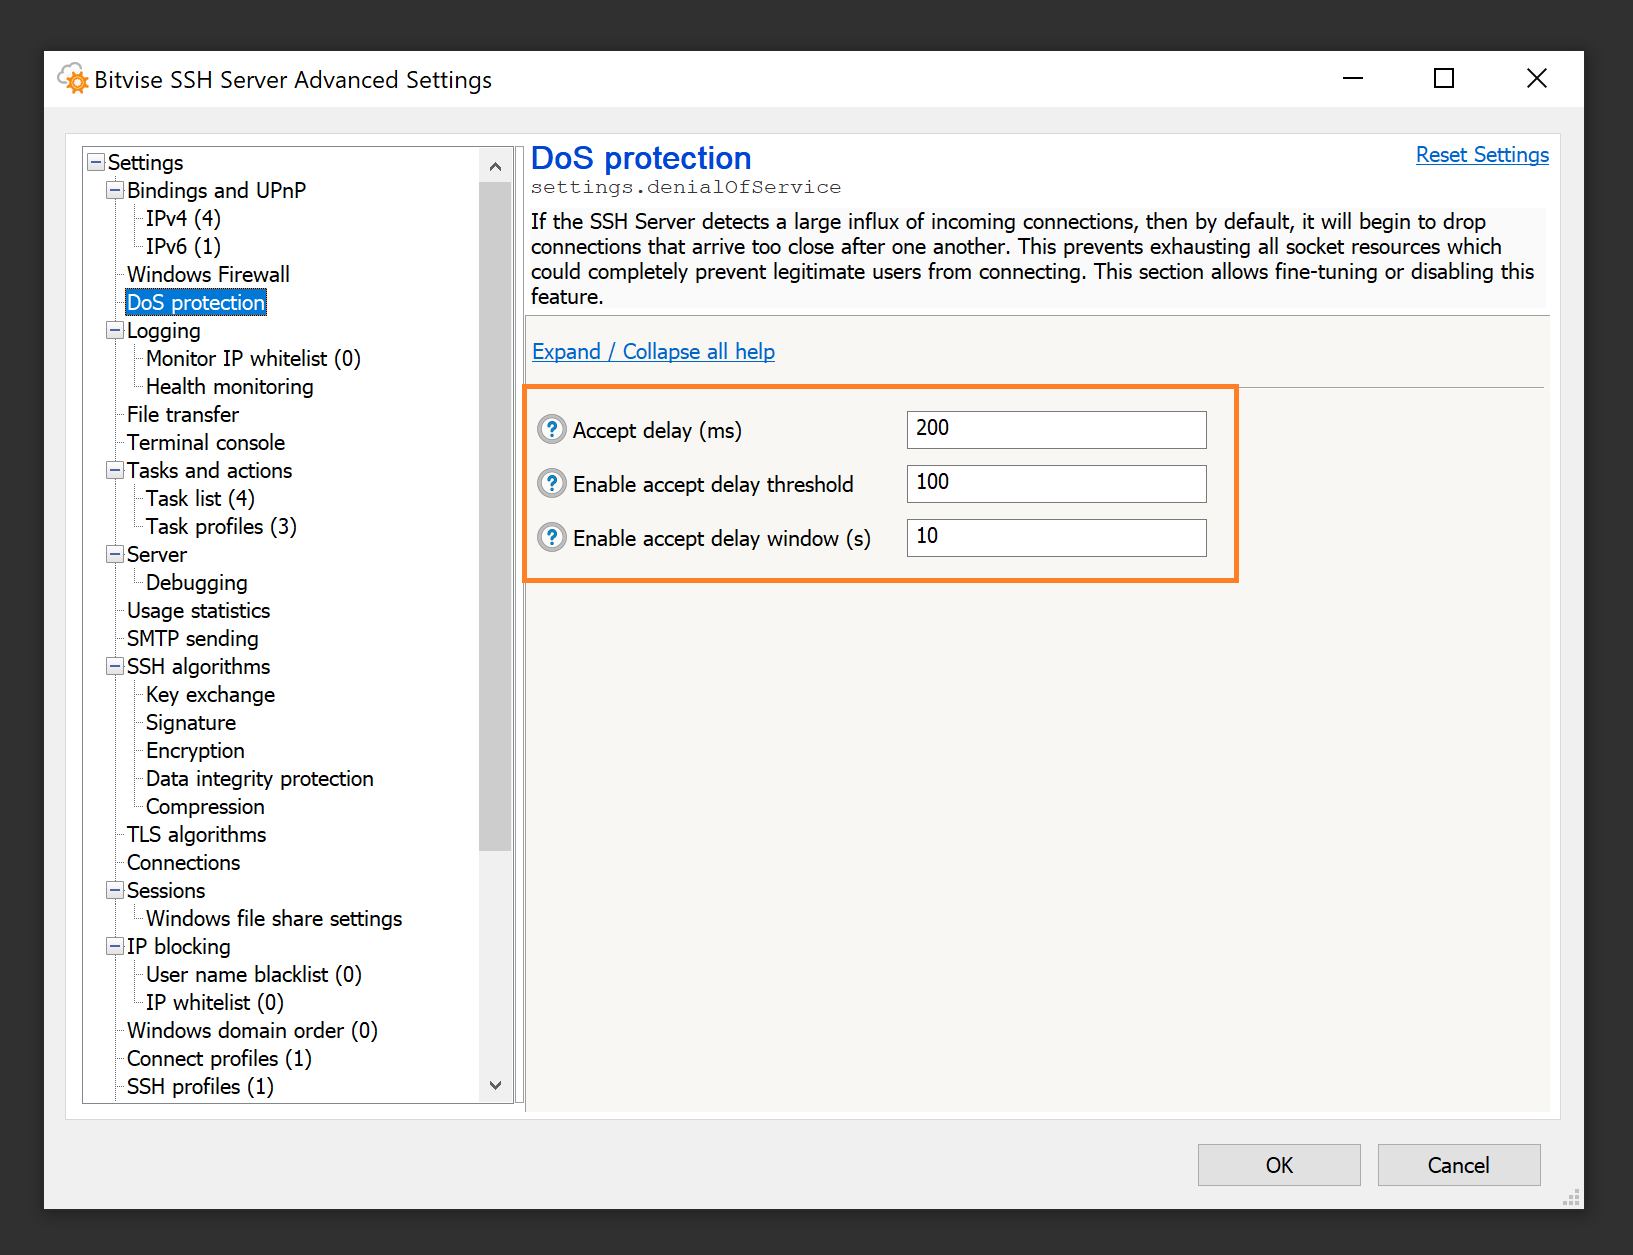
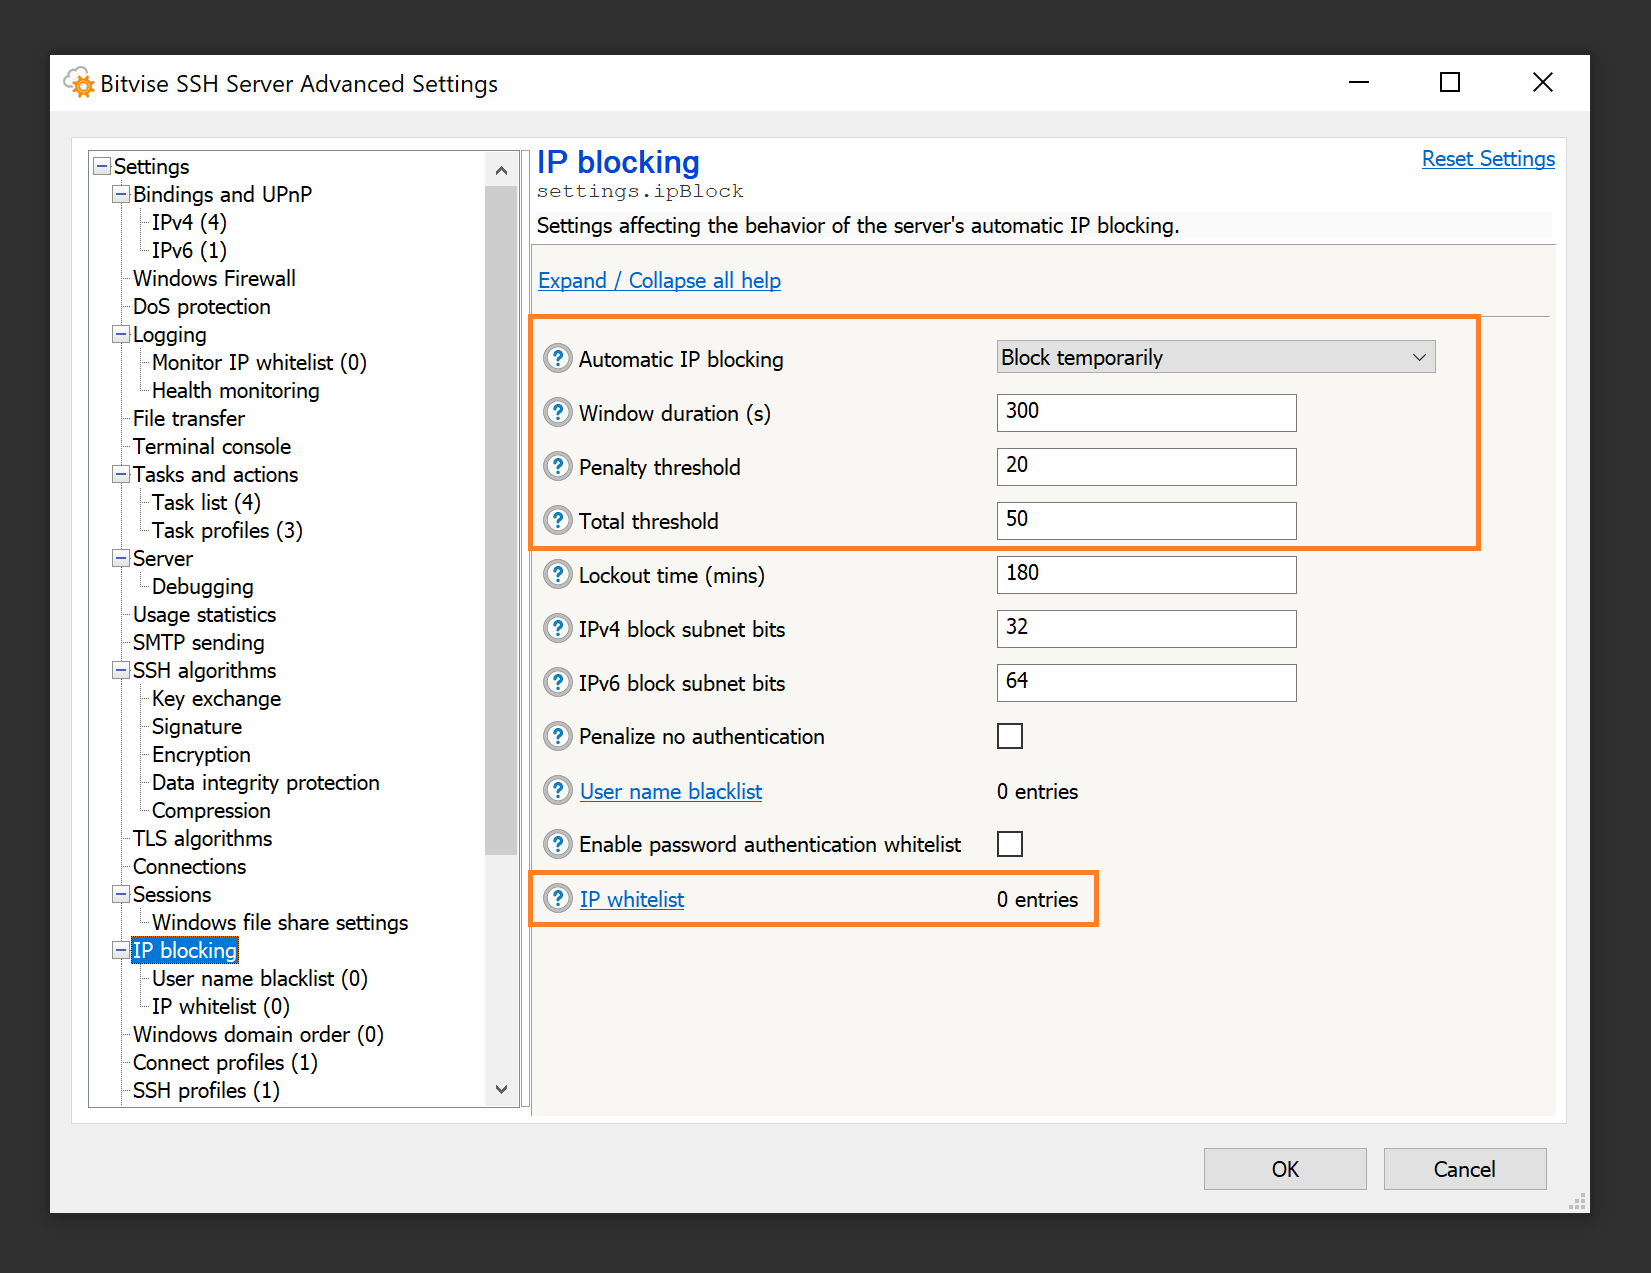
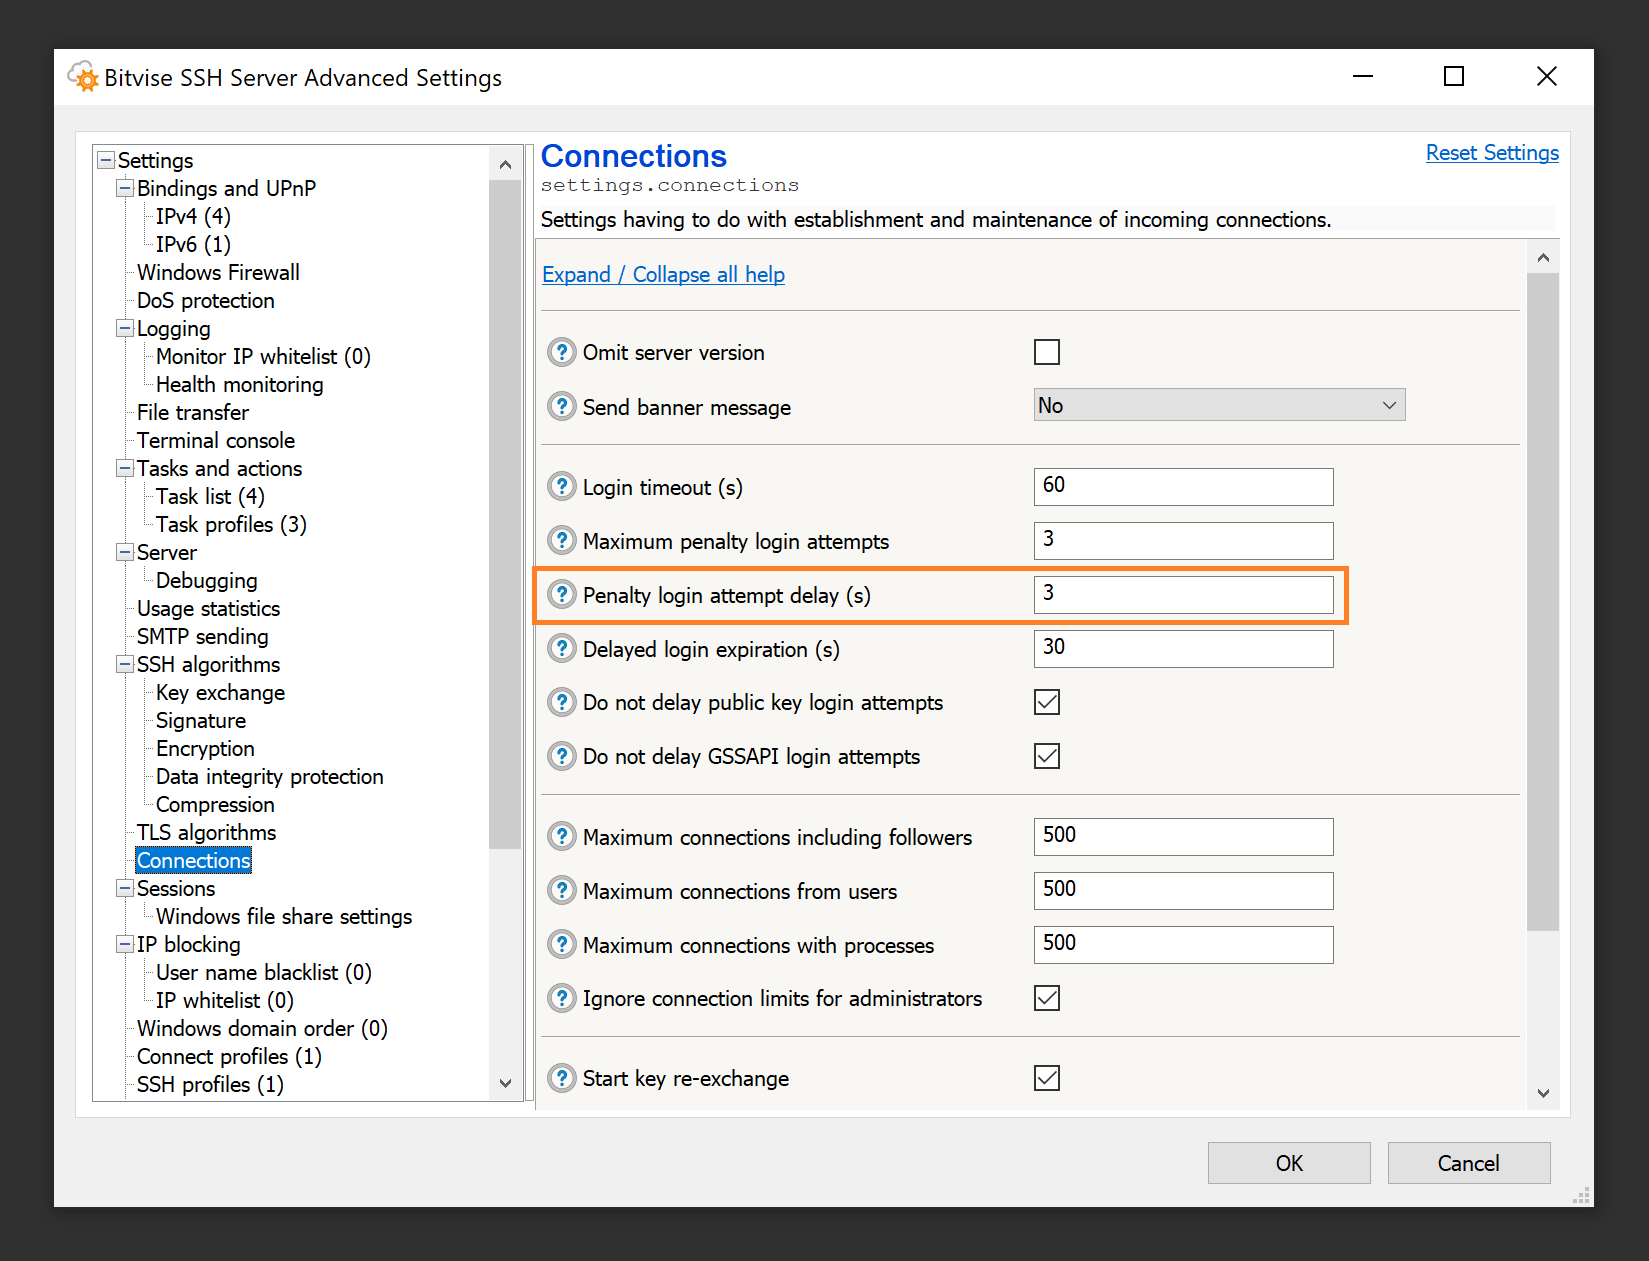
Q580. While testing in a domain environment, I find that when using the gssapi-with-mic authentication method, the SSH Client allows me to log into the SSH Server with no password. Is this secure?
Yes, this is secure. In order for this type of logon to work, all of the following has to be true:
- Both the client and server computers have to be part of a Windows domain. The client can also be in a Unix realm.
- The client and server must be either in the same Windows domain, or in separate domains or realms that have an established trust relationship.
- The user has to be logged into the client computer as a domain account that can also log into Windows on the server.
- Bitvise SSH Server has to be configured to allow login with this domain account.
- GSSAPI authentication (Kerberos and/or NTLM) has to be enabled in the SSH Server. Because it only works in strict conditions, it is enabled by default. It can be disabled in Advanced SSH Server settings, under Access control.
If all of the above conditions are met, then the user is already logged into Windows on the client machine with an account that has permissions to log into the SSH Server. In this circumstance, the Windows domain infrastructure allows the user to use the gssapi-with-mic authentication method to perform single-sign-on authentication into the server, without having to authenticate again. This is a security advantage: it allows the user's password to be more complex, because it does not have to be entered as often.
If you would like to prevent this, make a change to any of the conditions enumerated above. The most common situation where this could be a problem is if the SSH Server is configured to accept login from domain accounts that you do not in fact want to log in. In this case, configure the SSH Server more strictly to accept login only using accounts you approve of.
Q582. We have a Windows account that keeps getting locked out by Windows. How could this be caused by our SSH Server settings?
There are multiple possible configurations that could cause a Windows account to get locked out due to SSH Server settings. All of them boil down to that login is being attempted, somewhere, using an incorrect password. The following are some possibilities:
Password guessing by unauthorized third parties. If your SSH Server settings permit login into Windows accounts using password authentication, then anyone who is permitted to connect to the SSH Server (as configured in Advanced SSH Server settings > Access control > Client IP address rules) can attempt to authenticate using a username and password which the SSH Server will submit to the Windows LogonUser function. This is because usernames and passwords for Windows accounts must be verified by Windows, and cannot be verified by the SSH Server.
This means, if you permit login into Windows accounts using password authentication, then anyone connecting from an IP address which is allowed to connect to the SSH Server can attempt username and password combinations which can lead to Windows accounts being locked out.
You can prevent this by disabling password authentication for Windows accounts. You can configure this in Easy settings, on the Server settings tab, using the Password authentication setting. You can also configure this in Advanced settings, under Access control.
If you disable password authentication for Windows accounts, then if you want to support login into Windows accounts, they will need to log in using a different authentication method. For example, Windows accounts can log in using Kerberos (via GSSAPI) or using public key authentication.
Incorrect password in a legitimate client. You may have set up an SSH or SFTP client which connects to the SSH Server using a username and password. The client logs into a specific Windows account, to perform specific actions. This client might be scripted and connects every several minutes.
Suppose that you change the password for the Windows account, but you don't update the configuration of this client. The client is still connecting to the SSH Server using the previous password, and the login now fails each time the client connects. This can result in the Windows account being locked out by Windows.
Incorrect password in a Windows file shares settings entry. Suppose you configured the SSH Server to provide access to a network share. This network share could be configured for any Windows or virtual account. Suppose that you configured specific credentials in a Windows file shares settings entry in Advanced SSH Server settings, so that access to the network share occurs with a specific username and password.
Suppose that you change the password for the Windows account which is used to access the network share, but you do not update the Windows file shares settings entry with the new credentials. Now, whenever a user connects which is configured with this Windows file shares settings entry, the SSH Server will call the Windows function WNetAddConnection2, specifying the stored username and password, which is now incorrect.
This can result in Windows locking out the account that's configured in the Windows file shares entry; not the account that is logging into the SSH Server.
Incorrect password in the SSH Server's password cache. Suppose you configure the SSH Server so that a Windows account can log in using public key authentication. This account needs implicit access to network resources, so you configure the password for this Windows account in the SSH Server's password cache. This allows the SSH Server to create a logon session which has access to network resources, even when using public key authentication.
Suppose that you change the password for this Windows account, but you do not update the password stored in the SSH Server's password cache. By default, the SSH Server is not configured to clear the password from the password cache if login fails. If the user tries to log in multiple times using public key authentication, the SSH Server will try to use the password in the password cache, which is now incorrect. This can cause the Windows account to be locked out.
In this case, if you want to remove the password from the password cache on failure, this is configured in Advanced SSH Server settings, under Access control > Clear password from cache on failure.
Q585. File transfers sometimes get interrupted with an error like "MAC error", "data integrity failure", or "integrity check failed". What is the cause?
This type of error can be caused by:
An incorrect MTU setting. The Maximal Transmission Unit setting might be set to a too high value at one of the computers or network components involved in the connection.
This is a likely cause if the error:
- occurs with multiple types of client software over the same link;
- occurs early in the session, e.g. soon after starting the first upload or download, or even during authentication.
Accidental corruption of data in transmission that is not detected at a lower network layer. The TCP/IP protocol will detect errors in transmission with a probability of 65535 out of 65536, leaving a 1 in 2^16 chance that a transmission error will not be detected. If you are transferring a large file using a wireless link, or another type of connection that is prone to transmission errors, then any errors not detected by TCP/IP will cause an integrity check failure at the SSH layer. In this case, it is best to either switch to a more reliable link, or to use a client that is able to reconnect and resume transfer.
This is a likely cause if the error:
- occurs with multiple types of client software over the same link;
- occurs on the order of once per gigabyte of data transferred (depends on transmission error rate).
Implementation problem. The client that's interacting with the SSH Server might have a bug where it occasionally writes over the data it's sending or receiving, resulting in this error.
This is a likely cause if the error occurs with a single type of client software, but not other client software over the same link.
Intentional data corruption by an attacker with access to the network connection. This is usually least likely, but is the kind of attack that SSH is designed to detect. If an attacker tampers with data in transit, the SSH protocol cannot continue the connection, but it can detect and report that tampering may have taken place.
This is a possible cause if prolonged investigation of other causes does not yield results.
Q590. I keep getting the error: "The Bitvise SSH Server settings file is currently locked by another process." How do I resolve this?
This message indicates that some process on the system is keeping SSH Server settings open. This could be e.g. a settings window left open in an idle Remote Desktop session; it could be a BssCfgManip script that's intended to modify settings automatically, that has hung for some reason with locked settings; it could be the settings interface is open by an administrator through an SSH Client via the SSH Server Remote Control Panel.
If you cannot identify the program that is locking the settings, the easiest way to resolve the issue would be to restart Windows. This will interrupt any SSH connections or Remote Desktop sessions that could be keeping the settings locked.
If the problem persists after restart, the most likely explanation is that the settings are being locked by an automated process. However, in most cases, the settings are just open in another logon session.
Q595. Users are getting the error: "Logon was successful, but the server has encountered logging problems. Only administrators can connect at this point." How do I resolve this?
You need to resolve the logging issue.
This error means that the SSH Server is unable to log to its textual log files. In Advanced SSH Server settings, under Logging, there is a setting that controls how the server should react when this happens. The default option is Allow connections from administrators only, and this option is being activated if you're seeing this message.
As server administrator, you need to investigate what's going on with the textual log files. Does the configured textual log file directory exist? We recommend that this directory is on a local drive; if it's configured as a network share, this may not be available to the SSH Server reliably.
Is there space on the drive where the log directory is located? If the drive is out of space, this issue would occur.
Is logging set to a higher level than needed? If yes, this can fill up disk space. The log level we recommend for textual log files is Errors, Warnings, Info. We do not recommend logging Trace or Debug events unless you are trying to debug a specific problem.
Q597. How can I debug the raw content of packets exchanged during an SSH session?
To debug packets exchanged during an SSH session, use Advanced SSH Server settings > Logging to change the log level for textual log files to Custom events. Enable the events D_FLOWSSH_PACKET_IN and D_FLOWSSH_PACKET_OUT. Use the Log Folder Viewer from the SSH Server Control Panel to roll over the log file. Make a connection which reproduces the problem in which you are interested. Once you are done, roll over the log file again and change the log level for textual log files back to Errors, Warnings, Info.
Q599. My settings enable non-recommended algorithms such as diffie-hellman-group1-sha1, or encryption algorithms that use CBC mode. How do I disable these algorithms? How do I check if any clients are still using them?
You can disable these outdated algorithms in the SSH Server Control Panel, in Advanced settings > SSH algorithms.
One way to check if any clients are still using these algorithms is to perform a text search for the algorithm names in your textual SSH Server log files.
A more thorough approach is to process the log files using a tool or script. For an example, see Interpreting SSH Server Log Files using Microsoft Log Parser.
Upgrading and Moving
Q600. How do I upgrade my Bitvise SSH Server to the latest version?
There are two parts to the upgrade process:
Ensure that you have a license with upgrade access for the SSH server version to which you are upgrading. You can verify your upgrade access expiry date by logging into your License Overview.
If your upgrade access has expired, you will be able to add the desired number of license-years through the Place a New Order section under the license information. The expected new upgrade expiry date will be displayed on the page when you enter the desired number of license-years. The full cost will be displayed on the next page, at checkout.
Download the installer for the latest version from our website. Run the installer on the computer where you want to upgrade your SSH server installation, and follow the process.
If the activation code needs to be updated, you can apply the new activation code in the Bitvise SSH Server Control Panel either before or after the upgrade.
Q610. Will my settings and keys be preserved when I upgrade?
In general, yes. The upgrade process is intended to preserve your keypairs, your password cache, and your settings.
We do recommend making a backup of your settings before you upgrade. Settings can be exported using the Export function in the Bitvise SSH Server or WinSSHD Control Panel. A settings backup may be useful if the new version encounters a problem reading your settings, or if you decide to downgrade to the previous version again. The older version may not be able to read your settings once the new version has upgraded them.
Q620. I would like to move my SSH server to a different computer. How do I move my settings, password cache, and keypairs?
Settings. To move SSH Server settings, use the Export feature on the Server tab in the SSH Server's Control Panel.
On the new SSH Server installation, use the Import feature to import the settings.
Moving the settings will also move any client authentication public keys configured for user authentication.
Host Keypairs. It only makes sense to move keypairs used for SSH server authentication if the SSH clients accessing the server will continue to access the server using the same port, IP address, and/or DNS name. If there is any change in what address or port the SSH clients use to access the SSH Server, the clients will need to re-verify the server's host key. In this case, there is no benefit to transferring keypairs to the new installation.
If the clients will continue to access the server at the same address and port, the host authentication keypairs can be moved using the SSH Server Control Panel > Manage host keys.
Very old WinSSHD versions (e.g. versions 4.xx) do not contain a user interface function to export a host authentication keypair. Depending on the version, you may be able to use the wcfg command line configuration utility to export the keypair. Alternately, you could upgrade to a more recent version in place, and export the keypair using the new version.
Password Cache. In the latest SSH Server versions, the password cache is usually necessary only if:
You use Windows domain accounts that need to log in using public key authentication, and also need to have implicit access as that account to network resources on other computers.
You use virtual accounts which are configured to run in the security context of a Windows domain account, and also need to have implicit access as that account to network resources on other computers.
In the latest SSH Server versions, the password cache can be backed up into, and restored from a file, using the SSH Server Control Panel > Manage password cache > More > Backup items to file. If you want to move the password cache, but are using an older SSH Server version which does not support password cache backup, you can update the existing installation to a newer version that supports password cache backup, before moving.
External resources. The way you are using the SSH Server may depend on resources configured outside of the SSH Server. Such resources may be required for the setup to work properly. This can include:
- Windows accounts
- Windows filesystem directories, such as those used for file transfers
- Windows filesystem permissions on those directories
Such external resources are not transferred as part of migrating SSH Server settings. The administrator needs to recreate these parts of the setup on the new installation, in order for migrated settings to work properly.
For additional information, we recommend:
- Understanding and replacing Bitvise SSH Server host keys
- Storage and backup of Bitvise SSH Server configuration
Q625. I would like to update to a new SSH Server version, but I'm concerned I might encounter a problem. How do I downgrade if I need to?
The more time has elapsed since the release of the latest version, the lesser the risk that you'll run into a new issue. We try to be conservative with new releases, especially minor releases, to minimize the risk of new issues due to an upgrade. Nevertheless, all changes involve some risk, and all unexpected new problems must first be encountered by someone. Therefore, it can be prudent to prepare.
If you want to be able to downgrade, preserve the installer for your existing version. You should be able to find the installer in the Updates subdirectory of your SSH Server installation directory.
If the downgrade is between minor versions, you should only need the installer. To downgrade, run the older version installer and select the option to replace the existing installation. Your settings should continue to work.
An upgrade or downgrade is between minor versions if both versions use the same settings format. For example, all SSH Server versions between 9.15 and 9.4x use the 9.15 settings format. However, 9.51 is intended to be a release with new features, with a new settings format.
If the downgrade is to a version which uses an older settings format, then by default, the SSH Server performs automatic settings backups. These may be found in the Config\Backup subdirectory of the SSH Server installation directory. After you downgrade, you should be able to use the Restore feature in the SSH Server Control Panel, on the Server tab, under Settings, to restore settings last saved by a compatible version.
To be completely thorough, you can prepare for a possible downgrade or recovery by backing up SSH Server host keys and settings, in the same way as if you were preparing to move the SSH Server to another installation. In this case, take the steps under Q620.
Q630. I would like to upgrade an SSH Server installation on a remote computer, but I can only access it over the SSH Server itself. How do I preserve access if there is a problem during upgrade?
What we recommend in this case is to have two separate SSH Server installations, one for normal use and one for maintenance access. That way you can upgrade one instance while accessing the computer through the other.
To install a second instance, simply run the SSH Server installer, and give the new instance a unique name instead of replacing or upgrading the existing instance.
You will not need an additional license to run two concurrent instances on the same computer. You just need to configure the second instance to accept connections on a different port.
Q650. What are your versioning and end of life policies?
The versions of Bitvise SSH Server, SSH Client and FlowSsh are maintained together. When one of the products receives new features that warrant changing the version number, the other products receive the new version as well.
A new major version, such as from 7.xx to 8.xx, means that at least one of our products has changed in such a way that not everyone might experience a smooth upgrade. Usually, the product that affects this is Bitvise SSH Server.
As much as possible, we try to ensure that upgrades are effortless, painless, and that all settings work after an upgrade as they did before. The main aspect where this is difficult for us to achieve is the SSH Server's scriptable configuration language. If you use scriptable configuration, some interfaces may change significantly between major versions. We try to minimize changes between minor versions.
When we introduce a new major version, we will continue to maintain the previous branch with security and reliability fixes until we are confident that there are no issues that would prevent users from upgrading. Since users who use scriptable configuration must adjust their scripts; and since it takes time to receive feedback if there exist upgrade issues; users can count on that we will maintain the previous major version series with security and reliability fixes for at least one year. This time may be extended if we become aware of substantial issues that prevent users from upgrading. The time may be reduced for Bitvise SSH Client and FlowSsh, which are likely to receive a new major version without experiencing major changes.
If you use automatic updates in versions 9.xx and 8.xx:
If you are on the strongly recommended channel, we will do our best to avoid breaking changes within a reasonable time frame. This channel may upgrade you from e.g. version 9.32 to 9.39. An update like this will be a rare security fix or a reliability fix. This is a suitable channel for production users who rely critically on scriptable configuration features.
But note: security fixes, and important reliability fixes, are marked strongly recommended. If you're still using a previous major version when it is no longer receiving updates, a strongly recommended update can eventually cause an automatic upgrade across major versions, which can break scripts.
If you are on the recommended channel, there may be small breaking changes for some setups, though not most. For example, there may be small adjustments needed for automated configuration scripts. Other setups may experience breaking changes inadvertently, such as from unforeseen interactions. This channel may upgrade you from e.g. 9.39 to 9.44. An update like this may include compatibility fixes, and may include other new improvements from recent releases. This is a suitable channel for production users who may use scriptable configuration from time to time, but do not rely on it critically.
If you are on the latest version channel, there may be significant breaking changes for some setups. For example, there may be non-trivial changes needed for automated configuration scripts. This channel may upgrade you from e.g. 9.44 to 9.45. This is a suitable channel for casual users and enthusiasts.
Q655. I'm currently using version A.BC, but the current latest version is X.YZ. What is the EOL date for my version?
Bitvise uses a linear release system. Each version is final when released. When we release version A.BC, we will not release another, different version A.BC.
All updates for past versions come in the form of new versions. All new versions are intended to be backward-compatible, to allow for straightforward updates.
This means:
There is no EOL date for your version. It is still maintained! The latest version, X.YZ, is the compatible update for your existing version, A.BC.
The question itself is a paradox. If you're still using version A.BC, when X.YZ is available, it suggests you don't want "life" in your SSH Server versions. So, what do you mean by "end of life"? You want updates... but not updates that change anything? We already try to avoid breaking changes in all new versions.
Important exception: scriptable configuration is the main SSH Server feature which is affected by major updates. See also: Q650.
Contacting Support
Q. I read the FAQ, but it didn't help me solve my problem. What do I do?
Contact us through our Contact page, and describe your problem in as detailed manner as possible. The more information you provide, the greater the chance of a swift and effective resolution.