Connecting for the first time
This section of Getting Started assumes that:
- You have recently installed Bitvise SSH Server.
- SSH Server settings are still at defaults.
- You have installed Bitvise SSH Client on the same computer as the server to aid with initial setup.
Create an SSH Client profile
When you first open Bitvise SSH Client after a fresh installation, it will show a blank default profile. Before you connect to a server, it is a good idea to first save a dedicated profile:
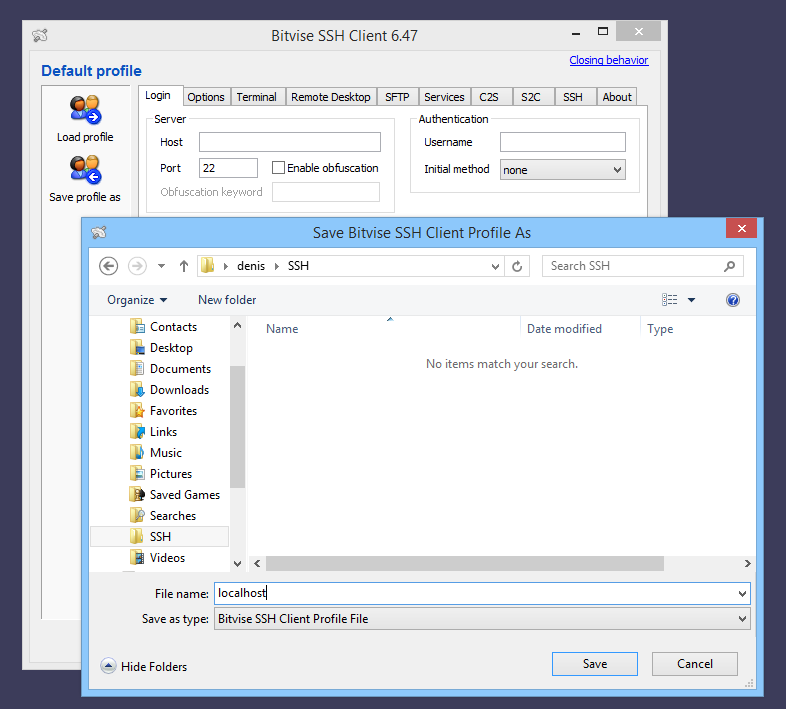
It is a good idea also to designate a folder in your filesystem to store your SSH Client profiles. In the above example, I created a folder named "SSH" under C:\Users\denis.
Enter connection information
After you have saved a new profile, populate the Login tab with basic connection information:
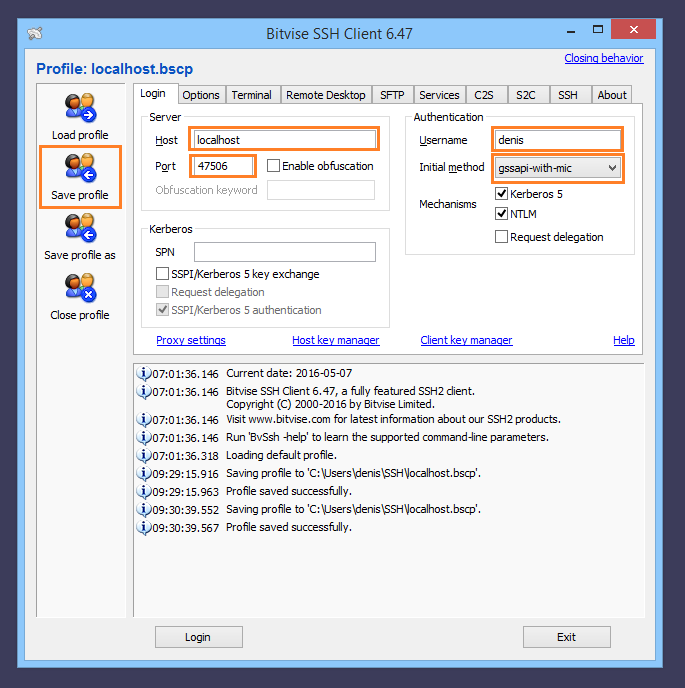
The information we entered in this case is as follows:
localhost as the address of the SSH server. This is because we are making a trial connection to an SSH Server instance running on the same computer.
47506 to match the port number we configured in the SSH Server. If the server were accepting connections on the default SSH port, we would leave this value at 22.
denis is the name of the account with which we are currently logged into Windows. The SSH Server is running with a default configuration, so it will accept a login with this account.
If you are logged into Windows with a domain account or with a Microsoft account, you can enter the full account name using the DOMAIN\USER format or the user@domain.com format.
gssapi-with-mic as the initial authentication method. This is a single sign-on authentication method that utilizes either Kerberos or NTLM over GSSAPI, and can authenticate you using the Windows account with which you are already logged in.
gssapi-with-mic works for connections to the same computer, or when the SSH Client and Server are part of the same Windows domain forest. For connections across the internet, you will later use password or publickey.
Once you have entered this information, save the SSH Client profile again.
Host key verification
Before you press the Login button, check the SSH Server Control Panel, and make sure that the SSH Server is running. If it is not, start it.
If the SSH Server is started, the following will occur when you press Login:

The SSH Client is alerting you that the SSH Server's host key must be verified before the connection can be trusted.
Verifying the host key is crucial to the security of the SSH session. If the host key is not verified, anyone with the ability to hijack network traffic will be able to intercept the SSH session. This could be an ISP, or anyone in proximity when using a wireless connection.
To verify the host key, compare the SHA-256 fingerprint - highlighted in the screenshot - with the fingerprints shown in the SSH Server Control Panel:
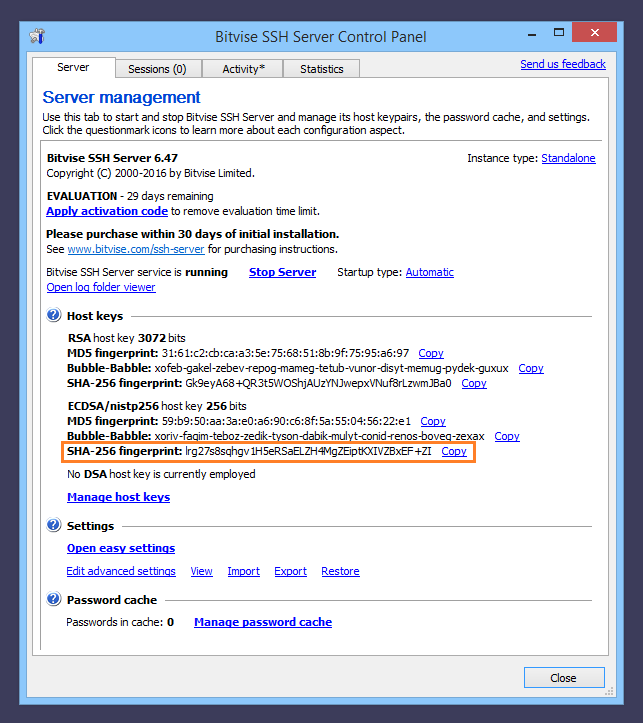
When verifying the fingerprint:
- The entire fingerprint must match.
- If you check just the beginning or end, it is easy to fake a fingerprint that matches only in those digits.
- Favor the SHA-256 version of the fingerprint, if both the client and server make it available.
- If SHA-256 is not available, check Bubble-Babble.
- MD5 is the weakest version of the fingerprint, and should not be relied on unless there is no other form.
Successful login
Once you have verified the fingerprint; if the login information provided is correct; the following windows will open:

The following events have happened:
- The SSH Client has opened a new SFTP window. This allows you to upload and download files between the client computer and the server.
- The SSH Client has opened a new terminal console window. This is hidden behind the SFTP window in the screenshot, but appears in the task bar.
- Because we are connecting to the SSH Server on the same computer, connection notifications from the SSH Server Control Panel are visible.
If we have made it this far, we have confirmed that the SSH Server is running and accepting connections.
Automatic opening of terminal and SFTP windows
If you do not wish the SSH Client to automatically open a terminal and SFTP window when you login, you can change this behavior on the SSH Client's Options tab:

Next steps
If SSH Server settings are still at defaults, then at this time:
- Assuming the Windows Firewall service is enabled (recommended!), the SSH Server is still only accepting connections from the same local subnet (if a Private or Domain network profile is active), or from the same computer (if a Public network profile is active).
- For now, the SSH Server will allow login with any Windows account that has the Windows security privilege to "Log on locally".
- No virtual accounts are configured.
The next steps involve configuring the SSH Server to provide the type of access you desire; and to the users you desire.